
Home » 3-D
Category Archives: 3-D


2024 Scrapbook Expo in Denver
A group of us went to the Scrapbook Expo in Denver, May 17, 2024. It was a fun time, not quite as many vendors as the one I attended several years ago, but certainly enough that I found most things on my list. My favorite vendor that I visited first was Krazy Kreations. I purchased numerous outlines from them years ago but never used them so I wanted to get instructions once again. They had a ‘make and take’ so not only did I receive instructions but I got to use the technique. Sal will link you to their site at the end of the blog post.

The shoes, flowers, greeting and hearts are all glossy stickers. You put the shoe stickers on super fine glitter paper, roll with a brayer tool to set them firmly in the paper and then you color with alcohol markers and then fussy cut the image. I used a light and dark pink to get a little shading. The background is three strips of DSP with a little line sticker on the left side.
I added a happy birthday die cut from pink glitter paper for the inside when I got back home. The line edge is a sticker as well!

It was pretty in real life but the camera didn’t work well with the glitter paper, Sal. I could have used the super fine glitter paper and colored it but I had lots of Stampin’ Up! paper in my stash so I wanted to save the super fine glitter paper I purchased at Krazy Kreations for my Christmas projects when it is my turn for another Shoebox event.
Another vendor I visited and made their make and take was the Spellbinders booth. I have seen the wax kits in advertisements and wanted to try using them. Their card also used a letterpress system to get the tree branch. It has indents and fine details but hard to catch in a photo. The faux strings behind the wax seal are actually from a die. I toyed with buying that die but decided I have a stash of bakers twine so best to save my money – for now!

The next make and take was at the Stampalistic booth, it is a tin box with a top we made from an amazing stamp set that created layers by stamping on different colored papers and then fussy cutting and popping up each layer.

I went back to Krazy Kreations and purchased the borders you see on the bottom of the tin. The flower jewels are from my stash.

I asked if the jewels were Swarovski crystals since they were so bright. She said Swarovski has changed and calls them ‘Illuminations’ so I think the answer was yes, but I am not sure. Anyway they are Illuminations.
 And you purchased the stamp so you can make more?
No, Sal. It was a lot of fussy cutting. Now if I had one of those fancy machines that would cut it, I might have. I sold my Brother because I had absolutely no room for it and no time to learn it.
Lastly, we met and compared our treasures. Sharon had found a make and take with a whole kit to take home that makes 8 cards- www.simplestories.com. This was the make and take.

Everything, including the background paper, was a punch out, but a heavy duty punch out, not just a thin sticker. I was impressed. This is something I can do with my grandchildren and they will be able to make a lovely card. They had Christmas card kits but I was hoping for a graduation card kit and birthday kit. I will have to go online for those.
Most of the make and takes were $5 so very reasonable. I had brought cash to make myself keep to a budget and my last purchase of the outline strips from Krazy Kreations, I was counting out my leftover change, but I kept to the budget.

Sharon, Lucille, Terry, myself and Michele!
I headed to the bathroom before we left and when I got back to the group they were yelling “You won”. I won a $20 gift certificate from Acushla Stamps (Acushla is Gaelic for Darling). I chose Petticoat Parlor stamps- a ‘Tea For Two’ stamp set and a ‘Sympathy’ stamp set.
 .
. 
It was a fun day! I would have come back for the second day but I had a party planned for our little graduating kindergarten grandchild, Emmitt. He wanted a chocolate donut and a cake so our dear friend who does cakes for a living made a large chocolate donut cake! She actually made a chocolate and vanilla which was perfect to have one for Jaxson who doesn’t care for chocolate. Yes, he is my grandson, but he sure didn’t get my love for chocolate!

Thank you, Barbara Lane, for wonderful cakes!
Stay tuned for cards from our next shoebox event which is tomorrow. I am the hostess so I will be posting those cards next.
Thank you for letting us bring a pinch of creativity to spice up your crafting world!
SAL, Sharing A Lot of fun with friends
Karen
(Krazy Kreations is the link for this post)

Riddle of the day:
Question: I am easy to lift but hard to throw. What am I?
Answer: A feather.
Card In A Box
Sometimes ‘Thinking of You’ just isn’t quite enough so then you might want a special card like a card in a box.

Not again! Those are stamps you had in the Bake Sale!
Yes, Sal. Sigh….
The box looks cluttered in the picture but in actuality there is a double Z fold piece you add to the box to give you different sections. Let’s look at the box from the bottom. The blue dashes show the inserted piece. I recommend tear and tape on the sides that attach. I used tape runner and it isn’t as good. I used strips of window sheet to attach the images to the sections.

The box still folds to fit in an A2 envelope. The back has one long piece which is good for writing your own personal message.
 .
. 
These are so fun to make! I made a dinosaur one HERE.
This is a printable pdf of the directions with lots of pictures: Box Card
This picture shows the sections a little better.

Bye for now!
SAL, Let’s be Salt and Light to someone today
Karen
Riddle of the day:
Question: You go at red, but stop at green. What am I?
Answer: Watermelon. You eat the red part, and you stop eating at the green part.
Easter Basket Card and 3D
In my last post you saw all the cool cards I made with the Divinity Designs Alleluia die and stamp combo. I also purchased from them a basket die set, a pastel egg paper/die duo and a pastel prints 6X6 paper pad. With all these wonderful products I made these cards with different crosses and different eggs:
 .
.
And this one:
 .
.
With pastels you can even stamp on the paper as I did here for the inside of the cards:

I had Easter baskets sitting out with paper grass so I used that grass in the paper baskets.
A picture of the products might help you save words.
Good idea, Sal! And I will link Divinity Designs down below with little Sal in the computer.


That fourth screen shot is one of the pastel print papers. I used the Stampin’ Up! ‘Cross of Hope’ die and put the heart of the paper right in the middle of the ornate cross die. When I die cut the cross, I left the middle intact and put scotch tape on the back so the pieces wouldn’t come out in hopes the little heart would show. You’ll see more of that cross in the 3D baskets I made for the grandchildren. The greeting on the front comes from:

The layer on the front is the Stampin’ Up! Ornate Layers die and the inside greetings are from Stampin’ Up! ‘His Grace’. Check out my previous post ‘Easter Celebration’ to see the Alleluia die at work. There’s not much you need for a recipe on this card. It uses a standard base and layer. Here is a pdf you can print out with the standard layers.
Standard Layers.pdf printable doc
Let’s look at the little 3D baskets Paul and I made for the grandchildren:
 I added a little heart to the middle of these crosses since the paper heart didn’t stand out.
On the opposite side of the baskets I used the dove in ‘HIs Grace’ punched out with a circle punch and layered on a slightly larger circle in the same cardstock as the basket:
 .
. 
I cut out numerous eggs and glued matching ones back to back and added them to the basket before the candy. The boys baskets were purple and blue:
 .
. 
3D Basket Recipe
- Base: Cardstock of desired color, 6 X 6
- Score at 2 and 4
- Turn 90 degrees and score at 2 and 4
- Crease all score lines
- Adhere DSP squares to the four corner squares – measurements below
- Cut on the score lines to the middle score line twice on opposite sides
- The middle uncut part is the part to attach the handle
- Fold the sides up to meet each other
- Handle: cardstock of choice, 8 1/2 X 1/2
- Decorative Layer (X4): Divinity Designs Pastel DSP, 1 3/4 X 1 3/4, adhere before gluing basket together
- Ribbon: 12″ tied to handle
- Adhere cross on one side and dove on opposite side- see above for paper used for cross

It was a wonderful Easter with Tyler, Amber and the boys, Jaxson & Emmitt!
The boys had matching shirts!

We died eggs but then made deviled eggs out of them so a bit pointless but tradition is tradition!


The boys hunted Easter eggs in their lovely yard on a wonderful sunny day! (It snowed again on Monday!)

All hostess’ need a hostess gift and I found this cute rabbit holding a carrot around a vase of flowers. I couldn’t resist!
Jonathan & Stacia spent the day on the slopes with Emma, Joey and a friend!

You can’t always have both families and, you know, ski season is almost over!
I know, Sal. At least we got pictures.
Thanks for spending time with me today friends! Hopefully you have ideas for next year’s Easter cards.
SAL, SingALleuia
Karen
Riddle for the day:
Question: What 5 letter word typed in all capital letters can be read the same upside down?
Answer: SWIMS
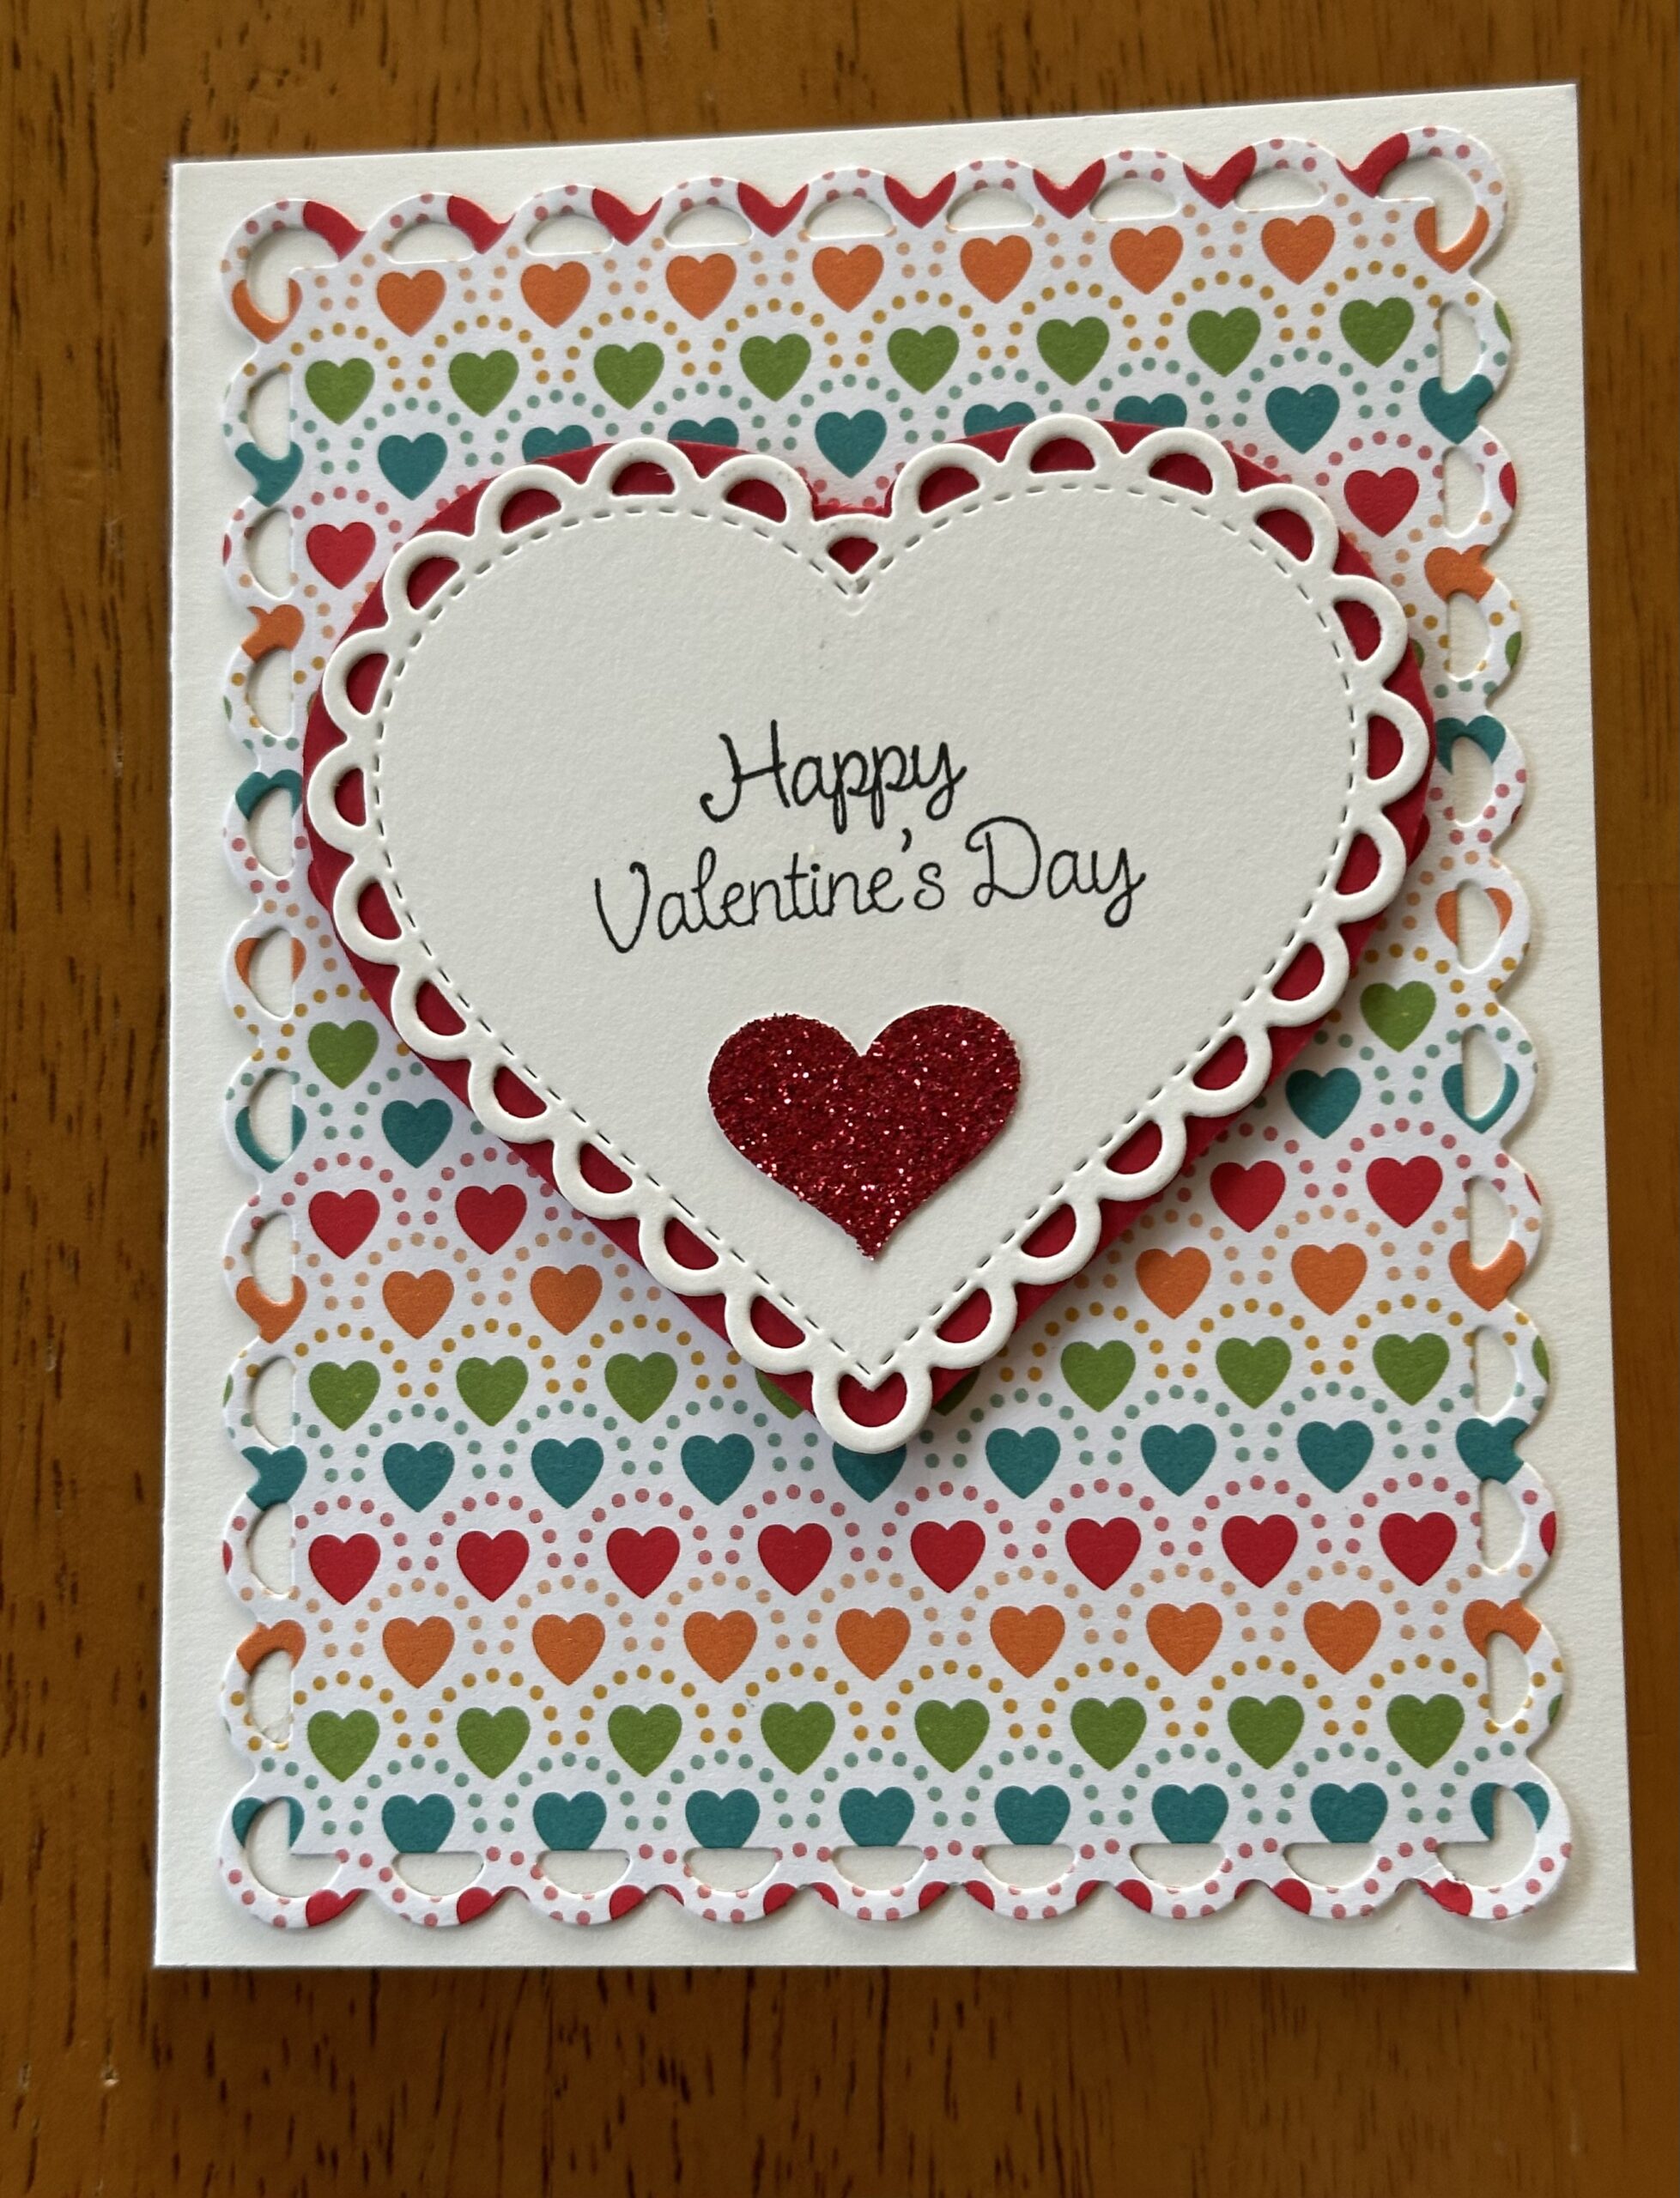
Valentine Fun
I have one more valentine entry before we start thinking about Easter cards! This time I am using a Kokorosa Custom cutting die called a ‘Big Love Heart Background Die. I am calling it a heart collage die! I purchased a similar collage die a while back and I cut it apart to die cut the pieces. See that card HERE. This time I left all the die pieces connected and just ran it through that way. It worked much better and I had main pieces for two cards.
 If you look closely, you can see that the left one has the dotted designer series paper (DSP) on the outside border with the real red on the inside which frames the pieces. The card on the right has the real red on the outside with the dotted designer series paper on the inside.
To keep the card from being too busy, I used only three different DSP designs. I could run the diagonal paper all at once but I selectively added the three hearts and the three ‘love’ letters. The DSP is from……
Let me guess…… Teaspoon of Fun?!
Right O’! And made by Pixie Dust Designs.

It is a 6 X 6 Pad with 24 double sided sheets in 12 designs. I wish it said what card weight it is because it is much thicker than my other DSP sheets. It made the mini mailbox project shown below much easier since I didn’t need to add layers for sturdiness. Can you pick out which sheets I used on the cards? Here they are again:
 .
. 
For the inside of the valentines, I used the Lovely Words Thinlits Dies from Stampin’ Up! The die cuts out the circle leaving the word ‘hugs’.
 .
. 
I used the ‘Embrace Each Moment’ Stampin’ Up! set for the greetings on both cards. The Stampin’ Up! ‘Lakeside Framelits Die cut out the ‘wishing you joy & blessings’ and I stamped the holding hands in grey, stamping off and then stamping on white so it was very light and I could stamp the ‘you will always be my forever’ in red on top of the grey. I cut out the three circles with the Layering Circles Dies rather than try to write over the DSP.
 .
.  .
.  .
.
For my other valentine project, I made a mini mailbox! They are all over pinterest and I wanted to try my hand at creating one. I wrote down directions for three different ones and then took ideas from each and made my own design with a few extras- I called it ‘Paul’s Mailbox’!
 .
.
 .
.

It holds two Hershey Nuggets. I didn’t glue the nuggets to the little box so you could eat your chocolates and not ruin the little box. The two sided DSP was great for having a fun inside and for creating a flag by centering a heart from the pink background side to punch with the Mini Banner Punch. The other side then matches the box. You do need to be careful because the DSP is so thick. I am used to breaking the fibers to get a curve with the bone folder but that ruined the paper, so just carefully fold your base with your fingers if you have stiff DSP.
How true – and several others that I really should keep since I do use them. I just hoped to make room by selling all the wooden ones but it would be better to make room by taking them off the blocks and putting them in CD cases.
Recipe
- Base: DSP, 1 1/2″ X 4 1/2″, score at 1″ and 3 7/8″, Burnish the score lines and form a gentle curve, adhere at bottom
- Back and the Door: DSP, 1″ X 3 7/8″, score each end at 1 1/4 before rounding the ends.
- I made a template out of white cardstock to fussy cut a rounded end; you could also use the 2nd smallest circle framelit to get a nice rounded cut but I was making multiples and either cut the end too much or too little with the framelit so I just fussy cut from a template. It took a couple tries to get the size correct on the template because I wanted the back to fit snugly and not need glued. You can make a strip 1 1/2 X 1/4, scored at 3/4, to glue the back in place but if it fits snugly you can actually use it to push the chocolates out the front! Adhere this strip to the bottom of the mailbox coming in 1/16″ from the back. I adhered so the opposite side of the DSP with the pink background was facing up.

 Looks like a large bandaid!
- Flag & Flagpole: DSP strip, 3 1/4 X 3/16, score at 1 5/8. The diagonal striped paper in the DSP was perfect for cutting a dark red strip that would have the same sheen as the mailbox pieces. I used the Mini Banner Punch for the flag centering a heart from the DSP. Manually, you could use a 3/4 long by 5/8 high square and cut one side to be a banner. Fold the flag pole in half and glue the flag between the front and back close to the fold. On the side of the mailbox punch a small hole 5/8″ up from the bottom and 1/2″ over from the front. Punch a hole 1/4″ up on the flagpole ( I used a paper piercer tool for the holes) and use a tiny brad to attach the flagpole to the mailbox. Your flag moves!! When you put in the chocolates, turn the mailbox upside down and put in the top nugget first, then the second nugget to avoid getting stuck on the brad on the inside.
- Handle: DSP with pink background, the handle in the ‘Sliding Door Framelits Dies’ fit perfectly over the heart. It made the handle look like it was a die cut heart but it is really a circle. Fold the handle right at the circle , punch a hole 1/2″ down and 1/2″ over on the front flap of the mailbox, punch a hole in the handle and adhere with a brad. Put a bit of glue on the backside of the handle since you don’t want it to move.
- Heart: Basic White scrap, I found a perfect sized heart in the Circle Card Thinlits die set. Stamp the greeting from ‘Love & Happiness’ stamp set with Real Red ink and then die cut. Sign then mount with glue dots over the brad.
- Envelope: Scrap of white cut 1″ X 5/8″ and scrap of red for a tiny heart. Score the front diagonally corner to corner for an envelope look or use the Kokorosa cutting die which has three sizes of envelopes and three little hearts to die cut. I purchased through InLoveArts but it came in Kokorosa packaging.


I thought you were trying to make more room in your craft closet.
Yes, I am beginning to think it is more about having new things to craft with than creating a stash to use. Wait ’til you see my Easter cards!
Let me show you the valentine gift/cards I received:
Joy Meadows made a beautiful valentine card:
 .
. 
The little red heart was a gift from Sharon Fincham last year!
Lisa Christensen had a cute bag of gummies for me:
 .
.  .
.
I love-love-love the heart on the back with the letters from ‘Valentine’ in red on the scripture John 3:16!
I want to make some Easter gifts like this so I measured out the cuts and score lines:
Lisa’s was 12 3/4 X 3 1/2 scored at 4 7/8, 6 1/4, 11 1/4 with the 1 1/2 edge punched with a scallop punch. The front cutout is a 2 1/8″ square. The heart is 3 3/4″. The greeting is a die cut 2 X 1 3/8 with a to/from tag that is 1 3/4 X 5/8. She stapled a clear bag with goodies to the back of the bag, added tiny velcro under the flap and made a red bow for the top.
That is a problem so I adjusted the measurements for a 12″ piece of paper:
- 12 X 3 1/2, scored at 4 1/2, 5 7/8, 10 1/2 still leaving 1 1/2 for the flap.
But you just purchased 6 X 6 Easter paper pads.
Another problem for sure, so I adjusted again only this time added glue tabs since I need three cuts of paper.
- Front: DSP, 6 X 3 1/2, scored at 4 1/2 leaving 1 1/2 for the base tab. Die cut a square in the front 3/4″ from bottom and sides.
- Back: DSP, 6 X 3 1/2, scored at 4 5/8 leaving a 1 3/8 for the base tab. The extra length in the back makes the front curve out nicely.
- Flap: Matching card stock 2″ X 3 1/2′ scored at 1/2″
I haven’t made them yet but now I have instructions that fit my paper!
And Jaxson made a card for Papa and Grandma and a card for Ruger. Both had treats inside:

 Can you see the wings & arrow on cupid?
 .
. 
Jaxson is in first grade and loves to draw!
Paul took me to Gabriels in Sedalia and we had a table by the fireplace!
 .
.  .
.
Next up is Paul’s birthday in Breckenridge! I had better get busy on his card!
Thanks for stopping by!
for a pinch of creativity to spice up your crafting world!
SAL, Such A Lot of words today
Karen
Riddle for the day:
Q= How are diarrhea and electric cars alike?
A= With both you hope to get home in time!
Valentine’s Day Pop Up Card
Would you like to see what I made for the grandchildren’s valentines? Do you ever see a card creation and say -“That is perfect”- what do I need to buy to make it? That was me when I opened a post of Deb Valder’s at Teaspoon of Fun. She had a pop up card with teddy bears! Yep – had to have the stamp, and the dies! Check it out:

 .
.


You pull the little heart to pull up the inside of the card. When it is flat it fits in an A2 envelope. The ‘Always In My Heart’ Stampin’ Up! set was the pull out greeting.
I will link the Stole My Heart stamp set at Teaspoon of Fun at the end with little Sal in the computer. The dies are available as well at Teaspoon of Fun.
We made these pop up cards years ago in club with the cutting and scoring done manually. I found the instructions carefully documented at Splitcoaststampers. If you would like those instructions click HERE.
 .
. 
 .
. 


To see the products I used on these cards, click HERE.
Do those cards open up sideways as well?
No, Sal, those cards are a vertical card with a full base that opens up. On the children’s valentines, I didn’t make a full base like those, I left enough space before the “Hi there, Valentine”, to write their name with a white gel pen. These are the products I used that I purchased from Teaspoon of Fun:

 .
.  .
. 
And here is a video from Deb Valder of Teasoon of Fun.
Recipe
- Optional Base: Real Red, 4 1/4 X 5 1/2; or a folded base 51/2 X 8 1/2 scored at 4 1/4
- Base as shown here, or Layer 1 on option: 4 1/4 X 5 1/2, Diecut with the large rectangle die in the ArtZy die set
- Stamp Greeting in lower section by temporarily lining up the pull up mechanism
- Pull Out Panel: Basic White, 3 X 4 3/8
- Stamp greeting before adhering; note: this greeting shows at the top as you pull up the panel
- Top Layer: Basic White, 4 1/4 X 5 1/4, Diecut with the smaller rectangular die of the set -burnish score lines
- Flip this over and adhere the small rectangle cut out of Basic White to the 1/2″ bottom of the flap
- Place foam strips around the sides and bottom of the pop up feature and adhere to card base
- Embellish:
- Scraps of red and white, Cut two circles & heart pieces and adhere to both sides of the pull out panel
- Love Designer series Paper (X2), 2 1/2 X 1 1/2 , Diecut with larger recrtangle; make two
- Love Designer series Paper, 2 1/2 X 1/2, Diecut with smallest rectangle
- Bears: Stole My Heart Stamp Set & Die, Basic White 3 1/2 X 3 1/2
- Stamp in Memento Black Ink, Die cut with die in set
- Copic Markers, cheeks- RV11, Bears-E31, E33, E13, Heart-R24, R27, R59
- Love Flourish: Love Designer Series Paper, 2 1/4 X 1 1/2 (I used the same DSP as the small rectangle)
- Cut two additional flourishes in real red and layer the three
- Heart: Many Hearts Dies
- Outside Heart, Real Red, 2 1/2 X 2 1/2
- Inside Heart, Basic White, 2 3/4 X 2 1/2 with this set of dies you can glue the red directly to the white
That’s not so complicated when you show a video and your dimensions and all the products you used.
Well, Sal, I list those so I have a good start when I make another. My card journaling so to speak.
I hope my journal is useful to some of my followers!
SAL, Send A Love letter
Karen
Sal will take you to Teaspoon of Fun!
Perpetual Birthday Calendar
Years ago I purchased a kit from Stampin’ Up! that is a perpetual birthday calendar. Without years shown and without days of the week and with only the days of the month listed, I can pencil in birthdays and have a nice stamped wall hanging for the office. I held a class when the kit came out; you can see that post HERE.
The kits were unavailable by the time I advertised and collected the fee so I made my own calendar kit as close to the original as possible.

Such a fun memory, however I never completed my calendar. It is hard being a hostess and attempting to stamp a project at the same time, so my kit was put away to prepare for the next event. It is time to work on my PHD (projects half done) so, out came the kit, and I finished it.
The sheets are 4 1/4 X 10 3/4, two could be printed on a sheet of white cardstock – just remember to watch for the number of days in the month.
“Thirty days hath September, April, June and November, all the rest have 31 except February.”
Thanks, Sal, and February this year has 29 and my printout only has 28. The pdf file does have 29.

 .
. The stamp set that went with the kit is The Perpeteual Birthday Calendar. It has fantastic background stamps you will see me use. However, through the years I have purchased so many additional stamps and dies that I had a plethora of things to choose from.

 .
.  .
.
 .
. 
 .
.  .
.
 .
.  .
.
 .
.  .
.
 .
.  .
.

 .
.
 .
.  .
.
 .
.  .
.
 .
.  .
.
 .
.  .
.
October uses left over pieces from a Paper Pumpkin. November uses a tiny ‘thanks’ from Waterfront, an acorn from ‘Time of Year’, another paper pumpkin piece and Itty Bitty Banners. December used ‘Holiday Invitation’ for the holly leaves.
They are Sal, because I didn’t take time to straighten and size and brighten the color on each one. I just needed to journal them for future reference. I think the calendar would make a nice craft booth product. It is an office decoration more than a necessary birthday reminder since our smart phones do that, but it sure is a quick look vs several clicks on the phone.
And now you can pencil in names!
Yes, and I do use a pencil since we have had so many folks come and go in our lives.
March 7 we will be celebrating 17 years of being in this house! That is a record for us! All but two of the neighbors on either side of us, across from us and behind us are new from when we moved in.
. Ummmm…. and Paul’s birthday?
Yes, we closed on the house on his birthday so that will be a fun celebration as well.
SAL, Stamping A Lot of unfinished projects
Karen
Riddle for today:
I am an odd number. Take away one letter and I become even. What number am I?
Seven.
Christine Dillon July 2023 Shoebox Event
Christine Dillon was our designer/presenter for the July Shoebox swap. There are six of us who take turns designing two projects and make kits for the group which meets monthly.
Ummm….it is September 1st you know.
Yes, I am behind on posting, but I had some wonderful camping trips! Would you like to see my pictures?
Probably be best to help your crafting friends with inspiration instead!
You bet!
Christine designed a 3D watering can for us to make. Note, this is my construction of her kit so not quite as perfect as her original design.
 .
.  .
. Watering Can Template printable pdf
 .
. Click on the blue to get the printable version. The above is just a screen print to show you the pattern.
Christine’s second project was a beautiful birthday card:
 .
.
 .
.
She used the Flourish Thinlits Dies from Stampin’ Up!

Surely you erased all the excess glue before sending it.
Of course I did! I am ‘adhesive challenged’ and I need to use one of the fine tip glue bottles instead of the Tombow glue tip. I stocked up on Tombow so I want to use it up.
So put the Tombow glue in the fine tip glue bottle.
Good idea!
This set is on EBAY and it is a beautiful set to add to your stamping collection with a variety of greetings. I am not ready to sell mine -yet! Keep an eye on the Bake Sale page and it might be available someday.
How about just one picture?
 Paul and I are in front of the Twin Falls in Yankee Boy Basin driving from Ouray, Colorado.
Hopefully we will have a wonderful fall. We have one more camping trip planned for Steamboat Springs, Colorado!
My daughter and Son In Law own the Wild West Balloon Adventures in Steamboat. A hot air balloon ride should be on everyone’s bucket list:

You can follow “Wild West Balloon Adventures” on Instagram for some amazing videos!
Have a wonderful day and I will be back soon with the cards from the August shoebox event.
Bringing a pinch of creativity to spice up your crafting world!
SAL, Stamp A Lot, Share A Love
Karen
Letter Opener Quick Gift
Let’s end 2022 with a quick project that you could add as a little gift to a New Year’s card or birthday card or….. I am casing an idea by Jeanie Stark at Juststampin.com but adding Happiness Hues designer series paper and a stamped “mail” image from ‘Stamping Your Way To the Top’ stamp set to make a pocket which holds a letter opener. It could also be a gift card holder.

It is another project using the Pretty Pillowbox dies. This one isn’t as 3D as the last one I made for favors at the Christmas stamp camp but fun to make for a card insert.
 Did you ever use the Pretty Pillowbox die as it was intended to be used?
Well, ummmm…… I guess not! I used the greeting die in the die set for the Post It Note holder greeting. It has a stitched edge so it is perfect for this project and many others.

These are the letter openers I ordered from Amazon:

Recipe
- Base: Bermuda Bay, Melon Mambo or Gorgeous Grape, 4 1/4 X 4 3/8; die cut using both the large base die and the die with the two little holes at the same time. Fold on the middle score line and use tear and tape on the sides. NOTE: For these letter openers the tear and tape can’t go all the way to the top.
- DSP Layer: Hues of Happiness Designer Series Paper, 2 1/4 X 4 1/2, line up with the score line in the middle of the die and die cut just the bottom section. I selectively cut certain sections of the DSP that matched the base.
- Greeting: Basic White, 3 X 1, die cut with the long greeting die AFTER stamping the “Mail” image; you can glue it right on the score line at the top of the die which hides the score line and keeps the greeting straight
- Ribbon: 15″ of matching color
Here are individual close up pictures:
 .
.  .
.
 .
. And a group shot just for fun:
 .
. I hope you have had a successful 2022, however you define success, and that you are ready for a new year, with new challenges and new blessings!
“May the Lord bless you and keep you, may He make His face to shine upon you and be gracious to you, May He lift up His countenance upon you, and give you peace!” Numbers 6: 24-26
Sal and I wish you a very Happy New Year!
Karen

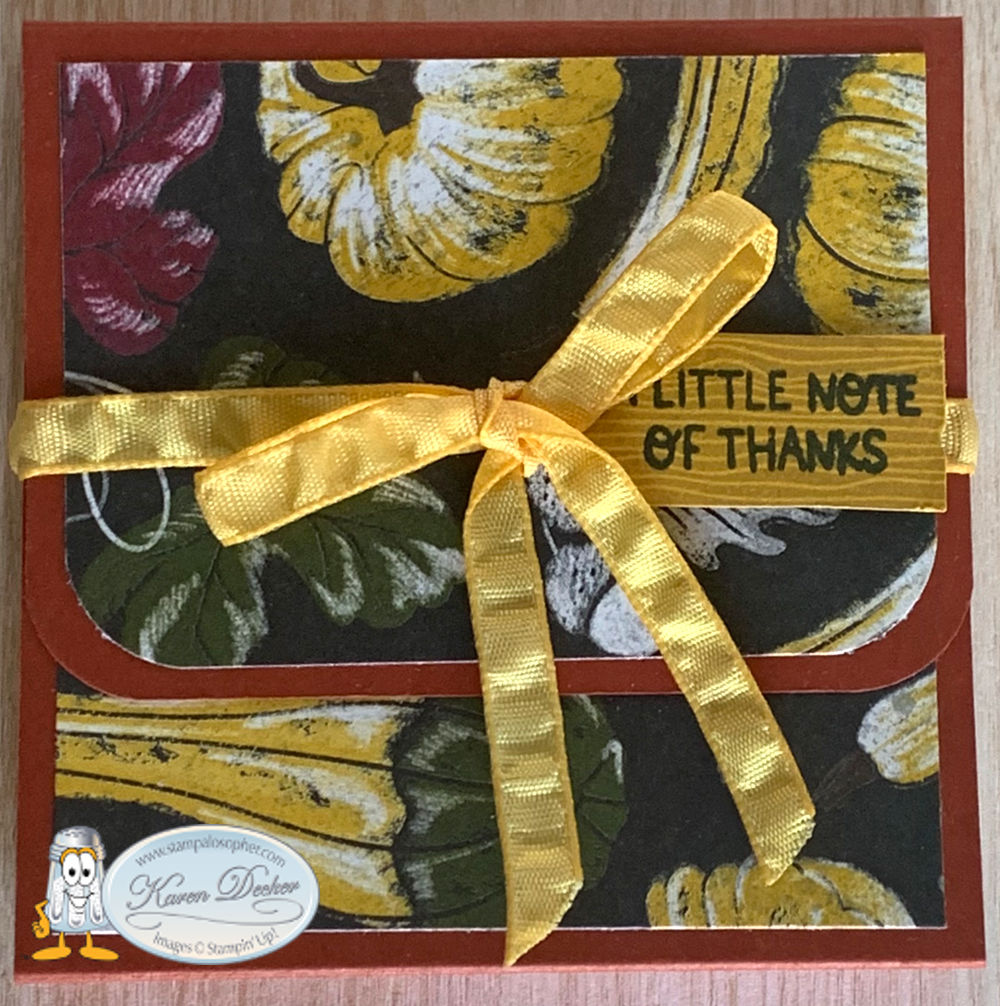
Party Favor – Post It Note Holder
Do you need a party favor for an event? These cute Post It Note Holders are great. It also makes a different type of thank you gift that will make your recipient smile and give her/him something quite useful!
These are the absolute cutest butterfly dies Stampin’ Up! has ever had! They are not realistic just fun and ‘whimsical’ as one of my stampers commented. This little guy is from the Build A Butterfly Dies set.
Sample A:
 .
. Sample B:
This set uses the Rustic Harvest Designer Series Paper.
 .
. 

I found a pack of three post it notes at the grocery store in the office section — on sale!!
For sure, Sal. You just never know where you will find the beginning of inspiration! I looked at several crafters directions and combined a little from each to get what I have here. I loved the rounded corners on the flap that one lady used and I really thought the back should have a pretty piece of the designer series paper, not just the front. I have the little magnets from one of our previous projects -Amazon:

so I used those instead of velcro dots. Do you see the little tiny heart on the magnet in the fall set? I have a tiny heart punch in my stash that was the perfect size and didn’t interfere with the magnet.
Recipe
- Base: A-Parakeet Party/B-Cajun Craze, 9 1/4 X 3 1/8
- Score at 2 1/4, 2 5/8, 5 3/4, 6 1/8
- Top & Back Layer (X2): A-Butterfly Kisses Designer Series Paper/ B-Rustic Harvest DSP, 2 7/8 X 2 7/8
- Flap: Same DSP, 2 X 2 7/8, Corner Round the bottom only of the flap edges, leave the top squared
- Greeting: A-Sweet Songbirds Stamp Set for the little note of thanks stamped on a Calypso Coral scrap and cut with a Pretty Pillowbox Die/ B- Sweet Songbirds Stamp Set for the thank you and also to stamp the little wood sign in Soft Suede on Crushed Curry before stamping the thank you.
- For the magnets- using a glue dot adhere the inside bottom magnet 1 1/2 down and centered from side to side. Close the bottom flap and place the second magnet on the top of the flap- it will automatically attach to the first magnet. Place a glue dot on top of the magnet and carefully close the top flap onto the bottom flap keeping your score lines square.
 I think you needed a video to help with those instructions.
It would have been better, for sure!
- A- adhere the thank you and then die cut a Starry Sky butterfly using the Build A Butterly Dies. Adhere with a glue dot and add a Fun Flower Resin Shape
- B-16″ of ribbon to make a belly band and attach the little sign with a glue dot to the band after tying
Thank you for spending part of your day with me!
SAL, Smile A Little
Karen
Welcome to my blog!

Sal Window to Products


