Gingerbread House Dutch Fold Card Contest
Hello Stamping Friends,
November’s stamping schedule was way wacko since Paul tested positive for COVID and we had to isolate for 14 days. (He is fine and said he has had worse colds than this.) Our regular club meeting was moved to the day we would have had the Zoom meeting (4th Tuesday) with a Mystery Card Challenge. So I created a new challenge – make a Gingerbread House using a Dutch Fold and bring it to club. We will vote and the top Gingerbread House will receive a prize!
There are a lot of Dutch Fold Cards on social media but the one that inspired me was Anna Helman’s Hen House:
She has all the instructions on Youtube which I posted here and we need only to change it to a gingerbread house. In the video the basics of the house structure runs from about the 2 minute mark to the 10 minute mark. From there your creative genius kicks in to do a gingerbread house.
Basics for a house-
- 11 x 5 3/4″ Card Base, Scored Vertically at 1 1/2″ and 3″ then turn and Score Horizontally at 2 3/4″ and 8 1/4″ (this gives you 2 3/4″ on each side). The vertical scores are the roof and lay horizontally on the house.
- Cut off the top section on both sides cutting along the 3″ vertical score line to the 2 3/4 ” horizontal score line and then cut to the top
- Burnish the folds; Bottom should have two folds like doors that meet in the middle and the top folds down from the 1 1/2 score line to the 3″ score line- this is the roof
- Make the gables on your roof by making a pencil mark 1 1/2″ from the right and 1 1/2″ from the left on the folded roof and cutting through both layers in a diagonal from 1 1/2″ mark on each side to the 2 3/4″ score line (the top of your door).
- Think Gingerbread House and have fun!
I pulled out my left overs from last year’s Paper Pumpkin for a front entryway to my house and die cut little windows with the Tailored Tag hole reinforcers. The icing on the roof and below the windows is from the Gingerbread Dies and the icing on the walls and the snow on the ground are from the Polar Bears Dies. The greeting, the tag, the little candies and the stamped entryway are all from the Paper Pumpkin. I had trouble keeping the front shut so I dug up one of my little reindeer paper clips from Stampin’ Up! retired products. A square of gold glimmer paper behind the star and two jewel doorknobs complete the front.
When you open up the roof you can see the extra chimneys that show on the front:
For the inside I used a greeting from the retired Wrapped In Warmth stamp set and die cut it out with a Hippo die. The greeting was mounted on two more of the little house pieces from Paper Pumpkin.
 Let’s look at the contestants since yours obviously can’t be entered.
It would be weird to win your own prize. Sort of defeats the purpose of a contest.
The winner of the prize was Jo Brooks:
The details, the wreath, the designer series paper and the glitter paper – oh my! Just beautiful!
A box of gingerbread cookies! Fitting don’t you think?!
Ann Hausmann made a gnome house:
Those little gnomes are so cute! And remember they had to figure out all the layers themselves. They just had directions for the base.
Well, they did have that and Sharon even did the pop ups on the inside of her house like the video showed:
She put an amazing amount of work into the inside. With most of her cards, the inside is as creative as the outside!
Lori went with a different roof line on an Early Espresso base, oodles of candies and puff paint!
Love those heart windows!
Thank you, friends for participating in a fun challenge.
I would love to see what you make as a gingerbread dutch fold card! Send pictures!
Thanks for stopping by to see some fun cards! Come back again soon.
SAL, Sparing A Little time to have some fun
Karen
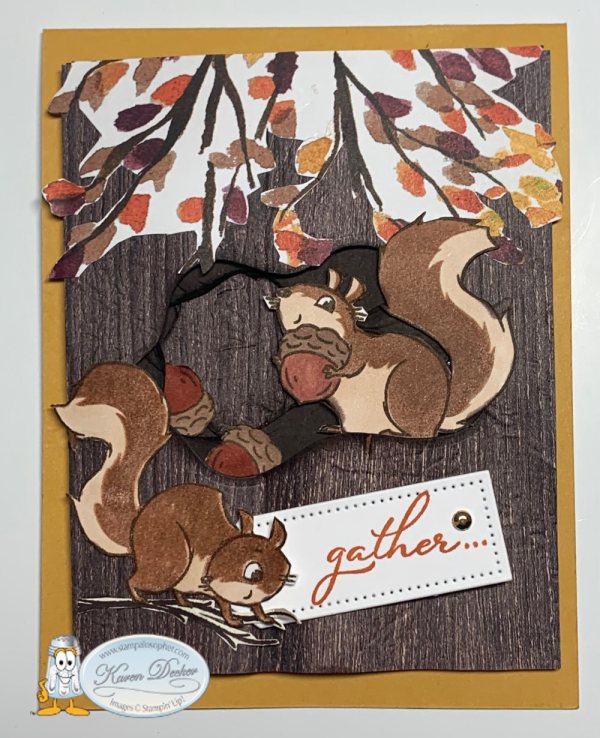
Gather Together with Nuts About Squirrels
Hello Stamping Friends,
This card is a case of one made by Lezards de Cilou. Hers was made as a much larger card but the idea was great so I made a normal A2 size card,.
Recipe:
Woodtone Designer Series Paper (DSP) is either ‘In Good Taste’ or ‘Beauty Of The Earth’ (Both are in the Annual Catty) or just use Early Espresso and Emboss with the Bark 3D embossing folder.
Stamp Sets: Nuts About Squirrels and Pretty Pumpkins
Inks: Soft Suede- squirrel outlines; Cinnamon Cider for stamping the color of the squirrels; Pumpkin Pie for greetings and one inside little leaf; Cajun Craze for a leaf; Crushed Curry for a leaf; Early Espresso for branches and veins on the leaves.
Blender Pens: Ivory for shading on the squirrels; Bronze for the top of the acorn; Lt Cajun Craze for bottom of acorn.
Marker: Pumpkin Pie to add dots to greetings
Dies: Layering Diorama Dies, Tailored Tag Dies
Embossing Folder: Cracked Paint
- Base: Bumble Bee, 4 1/4 X 11, scored at 5 1/2.
- Back Piece for a background: Woodtone DSP, 2 1/4 X 3 5/8, this is to be a background for your cutouts. Glue to base.
- Middle layer: Woodtone DSP, 3 5/8 X 4 5/8, die cut with smallest Layering Diorama Die, emboss with the Crackled Paint embossing folder and then distress and sponge the edges with Early Espresso- Turn this layer upside down so your openings are different.
- Very Top Layer: Woodtone Designer Series Paper; 3 7/8 X 4 7/8. Cut with the second from smallest Layering Diorama Die centering about 1 1/2″ top and bottom. Emboss with the Crackled Paint Embossing Folder. Sponge the cut out to add shadows and glue to the back piece you glued on the base.
- Tree Branches at top: DSP from Beauty Of The Earth, 1 3/4 X 4, fussy cut the edges
- Inside Layer: Basic White, 3 7/8 X 4 7/8, Stamp greeting, then the little leaves in bottom corner. The stamp set has a two time stamping for the leaves- the leaves are stamped and then the veins are stamped over top, I used Pumpkin Pie ink, Cajun Craze Ink and Crushed Curry Ink and then stamped the veins in Early Espresso.
- Squirrel, acorns and tree branch – Basic White, 3 3/4 X 5
- Stamp the squirrel outline in Soft Suede twice with the Stamparatus
- Stamp the two step coloring of the squirrels with Cinnamon Cider stamped off once, reinked and stamped off a second time
- Color in the squirrel with Ivory Stampin’ Blends
- Stamp two additional acorns and color with Bronze on the top and Lt. Cajun Craze on the bottom
- Stamp the tree branch with Early Espresso and fussy cut
- Greeting: Basic White, 1 1/2 X 3, Mask half the greeting with sticky note, ink, remove mask and then stamp. The inside gets the other half of the greeting doing the same thing. Then add three little dots with the Pumpkin Pie Marker. Cut the front with the smallest Tailored Tag Die. Hide the circle under the squirrel’s head.
After making a couple I determined the best way to add the layers was dimensionals around the opening of the middle layer and gluing the sides with glue runner or Tombow. Then the top is popped up with adhesive strips.
Using the Layering Diorama Dies is not as complicated as it looks and there are so many creative applications online. The Nuts About Squirrels carries over to next year so that is good news for you demonstrators wanting to use it for your classes.
 . That was cool! I bet the others sent you great swap cards as well!
They did and we should take a look so we have a scrapbook of ideas for the future!
Cindy’s card is a wonderful Thanksgiving greeting that you must see even though it is not a swap. Look at the many lovely Designer Series Papers she used and the Pretty Pumpkin stamp, linen thread and gold gems! The pumpkin is glossy and beautiful in real life. I think she used the baby wipe technique for the colors and then embossed with clear embossing powder. It sparkles!
Ann’s beautiful card uses the Beauty of the Earth Designer Series Paper, Scalloped Contour Dies and Beautiful Trees dies.
Lori’s helping me with Christmas cards with her swap using the Playful Penguin Designer Series Paper and Misty Moonlight card stock, Layering Diorama Dies, Curvy Christmas sentiment, Christmas Whimsy card kit for star stamp, and fussy cut little creatures from the Designer Series Paper. So cute!!
Jo used the Days To Remember stamp set with the Brushwork Alphabet and lovely Designer Series Paper and sequins:
Joy used a Pale Papaya card base with a layer of Blackberry bliss (love that combo) and then weaved strips of the Beauty of the Earth Designer Series Paper on a Pale Papaya layer embossed with the Tasteful Textile embossing folder. She used the Pretty Pumpkins Stamp set with the bundled Detailed Pumpkins dies for the pumpkins and the greeting is from the same set.
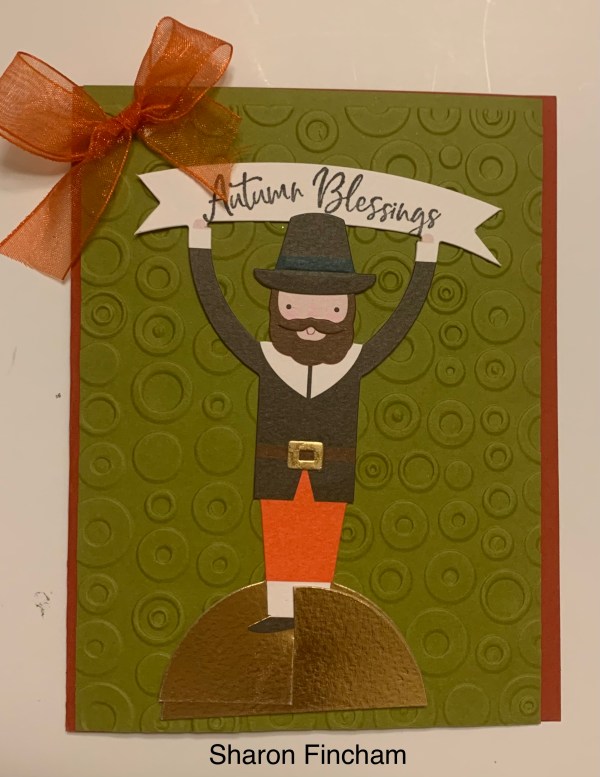
Sharon’s card uses fun table name markers from her stash to make a cute Thanksgiving card:
Lucille’s card is lovely with lots of sparkle and stitched leaves on a Bumble Bee base with an Old Olive layer. The ‘hugs’ is die cut and the oval is a stitched oval.
 ‘A pinch of creativity to spice up your crafting life!’
SAL, Sending A Lot of cards to inspire you
Karen. (Click on little Sal to go to the online store)

 .
. 

 .
. 


 .
. 
 .
.  .
. 


 .
. 


