
Hats Off Spinner Card
Hello Stamping Friends,
July is slipping away quickly and we have two specials that you don’t want to miss:
- For every $50 dollars spent in July you receive a $5 coupon code by email to be used on a purchase in August
- Sign up to join the fun and become a demonstrator – hobby or business – and get $72 of additional free merchandise. That is a total of $197 of merchandise for the joining fee of $99
Scroll down to the prior post for all the details! If you are reading this on your mobile device, click on the little SAL image at the top to be redirected to the full blog. This month’s hostess code is QHJHTKJQ
My hostess, Nicole, requested a masculine spinner card for her party which challenged my creativity. After giving the idea some thought I used the “Guy Greetings” stamp set on page 36 of the new catalog. It is available in wood mount # 138825, clear mount #138828 and photopolymer #137178.

And created this:

Yes, I did cut the stamp with the six hats into six pieces. The Designer Series Paper, DSP, beneath the Very Vanilla top layer is the new Foil Frenzy paper. The catalog picture doesn’t do it justice:
The Hats Off To You! from Guy Greetings is embossed with copper embossing powder and uses an upside down cutout from the Hearth and Home Thinlits:
 And of course one must put a feather in the cap and ‘Jar of Love’ had a great stamp, the one at the bottom right, which just needed a little extra feathering with a Chocolate Chip marker:
 To cut out the spinner path, you need a framelit or punch that is just a little narrower than a penny. The Bunch of Banners framelits had the perfect one, the little one at the bottom right:
Since the card is 6 1/2″ long it took four cuts across to make the spinner opening but well worth the time. Cut a 7/8″ wide strip of sticky note and place it at the bottom of the Very Vanilla layer to guide your four cuts.
 The inside brings in the foil paper behind another hat just like the spinner on front and adds the classic car and greeting! Scroll back up and check out the variety of greetings this set offers.
- Base – Early Espresso 6 1/2″ X 6 1/2″ scored at 3 1/4″
- Foil Frenzy DSP 6″ X 3″
- Top Layer -Very Vanilla, 5 1/2″ X 2 1/2″ , sponged with Crumb Cake ink and distressed with a finger nail (or distressing tool)
- Inside Layer – Very Vanilla 6″ X 2 7/8″ , sponged with Crumb Cake ink
- Spinner – Scrap of Very Vanilla for 3/4″ punch and Scrap of DSP for the 1″ punch- make a second one for the inside
- Stamps – Guy Greetings and Jar of Love
- Tools – 1″ circle punch, 3/4″ circle punch, Bunch of Banner Framelits, Hearth and Home Thinlits, Chocolate Chip Marker
- Inks – Early Espresso, Chocolate Chip, Crumb Cake, Soft Suede, Basic Black, Versa Mark and Copper Embossing Powder
- Embellishments – 3 Candy Dots or pearls colored with a brown Sharpie
- For Assembly – Foam Adhesive Strips (see page 203 for this great new product), two pennies and Stampin’ Dimensionals
- Envelope Punch Board for a perfectly sized envelope
Adhere your Very Vanilla top layer to the DSP layer and cut the path for the spinner on both layers at the same time. I used temporary glue to adhere the two layers for cutting the path, then took them apart, decorated the top and then glued them together permanently. For the spinner to work it is critical to mount these two layers to the base using Foam Adhesive Strips (or a lot of Dimensionals).
For temporary glue just use a bit of snail and pat it with your finger and the oils in your finger will keep it from sticking too hard.
For the spinner, place a dimensional in the very middle of a penny and place a second penny on top. Even though the dimensional isn’t round it works perfectly. Then place another dimensional on the top penny and add your hat spinner made from a 1″ circle punch of DSP and the hat stamped on a scrap of vanilla, punched with a 3/4″ circle punch and adhered to the DSP. Beware – don’t get your dimensionals mixed up when you lift the slot to slip the bottom penny inside the path. If you use the dimensional between the hat and top penny it won’t spin.
What do you think?
The catalog can be viewed in pdf form from the catalog tab at the top of the blog. If you would like a hard copy mailed to you, contact me at [email protected].
SAL (Sun A Little– on a beach or a boat or…..)
Karen Click on SAL to go to the online store

Happy Fourth of July!
Happy Fourth of July Stamping Friends!

May you have a wonderful day enjoying friends, food and fireworks and may we all remember that ‘freedom is not free’ and the many who have gone before and are serving now to preserve our freedom! Thank you to all those and thank you to a mighty God – may “One nation under God” be forever true!

This bookmark uses three of my many favorites in the catalog and the new Lemon Lime Twist ‘In Color’ paper. The greetings, front and back, are from “Crafting Forever” . The butterfly is from the ‘Move Me’ Thinlits and has a lovely matching stamp set. I will be posting a card using that set in the near future. For those of you who sell cards, the “Crafting Forever’ stamp set has a separate copyright stamp for using on your cards. The branch is from a long time favorite I hope never retires – “Thoughts and Prayers”. Here are the details:
- Base= Basic Black 2 1/2″ X 6 1/4″
- Front= Lemon Lime Twist 2 1/4″ X 6″
- Butterfly= Basic Black 2 1/2″ X 2 1/2″ Cut with Big Shot and Move Me Thinlits -Two butterfly thinlits used together
- Circles for the top= Basic Black 3/4″, Lemon Lime Twist 1/2″; punched with the 3/16″ hole punch (Crop A Dile)
- Words= Crafting Forever Stamp Set
- Dots on background= You Move Me Stamp Set
- Flowering Branch= Thoughts and Prayers stamp set
- Ribbon= 6″ Ombre Lemon Lime Twist, 6″ Black Baker’s Twine
- Three Rhinestone Basic Jewels
And for a few Fourth of July cards I went back into history and found one I had made by creating two sizes of tubes with card stock and then cutting very thin slices of the tube and mounting them to create a fireworks kind of look:

Remember Paper Pumpkin’s cute pinwheels a few years ago? I mounted them on a decoration I found at the store to make a fun wall hanging:

So celebrate the Stars and Stripes that represent our great country!

SAL, (Salute A Legend)
Karen
Wedding Wishes Card & Mother’s Day Box
Hello Stamping Friends,
 It’s May in the Rockies! I think we started the fountain a little too early. No, that is not a real jack rabbit, but the garden statue sure shows up nicely in the snow! The sun melted every flake the next day and the lawn loved the moisture so we are thankful!
Thank you to those of you who ordered in April with the hostess code! Sharon did earn her Big Shot and if you missed her party with all the fun thank you gifts, I will be mailing you a thank you gift for your online order!
May’s hostess code is: 29SANZNQ It is the last month for the Occasions Catalog and the Annual Catalog and many items are already sold out. You can go to the online store and click on Retiring items on the left side to view images of the retiring items. The Clearance Rack has been stocked with other items as well so stop by there while you are visiting to see if anything is a must have! Online Store
Use the hostess code and receive a gift from me if your order is under $150! Order over $150 and you earn the hostess dollars!
Sharon’s party focused on the Floral Boutique Suite on pages 76-77 of the Annual Catalog. The bundle is still available at 10% off and the Designer Series Paper (DSP) is still available, though inventory is low. The Washi Tape and Baker’s Twine is sold out – so sorry.
For Sharon’s thank you gift I used the gift bag punch board and made a medium sized bag with the Floral Boutique DSP and then filled the bag with the Washi Tape and Baker’s Twine.
 Sharon had recently purchased the Pansy Punch, #130698, and the Flower Shop stamp set, #130942, so I made her a 3D flower using those products. I will explain how to make a pansy punch flower later in this post.
For her thank you card, I used the Detailed Floral Thinlits Dies with the Floral Phrases stamp set. The border stamp was a great way to enhance the greeting on the inside of the card:

 Would you like to host a party? I will plan something special for you as well!
Thank you card:
- Base: Thick Whisper White Card Stock 4 1/4″ X 11″ Scored at 5 1/2″
- Top Layer: Night of Navy 4″ X 5 1/4″ with thinlits positioned on each end and cut, then each end cut with the border thinlit.
We made two projects at the party, a wedding card and a mother’s day box using the Window Box thinlits on page 43 of the Occasions catalog. The bundle is still available and, though the Window Shopping Stamp set and Window Box Thinlits carry over to the new catalog, they won’t have the 10% discount.


 The little blue flower on the top of the box is from the Flourish Thinlits set #141478. It coordinates with the Flourishing Phrases stamp set which has greetings for many occasions. Check out page 49 of the Annual Catalog. The 3D flower is made using the pansy punch.
3D Flower:
- Using regular Whisper White card stock 2″ X 7″ punch four pansies
- Sponge the edges with Night of Navy ink
- Punch a hole in the center of each flower. I used a business hole punch and punched about three times to make a nice hole
- Using your bone folder curl the petals a bit for softer looking petals
- The 5 petal pansy becomes the base, the first layer
- Make a cut between two petals to the center hole and then glue one petal on top of the other; this is the second layer-4 petals
- Cut out one petal, save it for the center, and glue one petal on top of another to make the third layer-3 petals
- Cut out two petals, save them, and glue one petal on top of another to make the fourth layer – 2 petals
- Roll the two petals you cut out- 1 petal
- Roll the one petal to make a center
- Place a glob of hot glue on the Silicone Craft Sheet #127853 and quickly layer your flowers, the glue should come up through the holes in the middle of the flowers. (Some crafters layered the flowers first then placed them on the hot glue.)
Wedding Wishes Card:
- Detailed Floral Thinlits #141482
- Floral Phrases Stamp Set #141767 (Can be bundled for a 10% discount through May 31)
- Card Base: Thick Whisper White #140272 cardstock 5 1/2″ X 8 1/2″ Scored at 4 1/4″
- Night of Navy cardstock #100867 cut at 5 3/8″ X 4 3/16″ ( I call it 4 1/4″ (minus a hair))
- Use the smaller thinlit and the border thinlit and cut the right hand side of the Night of Navy
- Glue the cut piece to the card base flush to the left
- Using just the border thinlit, cut the card base to match the Night of Navy top
- Fussy cut along the fold line to make it a bit neater
- Cut an outside 2 1/4″ circle with the circle framelits and a 2 3/4″ X 2 3/4″ piece of Night of Navy
- Using a 2 1/4″ X 2 1/4″ piece of Whisper White stamp your greeting, then cut to make a 1 7/8″ circle with the Stitched Framelits specialty set #145372, the 2nd circle in from the center
- Cut a piece of the Floral Boutique Designer Series Paper at 4″ X 3 1/4″
- Layer the circles and then center them on the DSP and attach
- Wrap the DSP and circles tying a bow with 14″ Bakers Twine and then attach to the Night of Navy layer
- As you trim the Bakers Twine save a little bit and separate the strands to make little antennae for the butterfly
- Stamp a butterfly with the Papillion Potpourri stamp set #123759 and punch with the retiring Bitty Butterfly punch #129406
- I put one glue dot on to attach the antennae and then another to attach to the card
- The inside is the Standard Layers (click here) Night of Navy 5 1/4″ X 4″
- Whisper White top layer of 5″ X 3 3/4″
- Helpful Hint: Mount all three of the stamps on one block to get them nicely squared and then stamp the inside greeting
Imagine the different Designer Series Papers we could use to make this a birthday or graduation or………
Mother’s Day Window Box:
- Window Box Thinlits #142762
- Flourish Thinlits #141478 – use Night of Navy 2″ X 3 1/2″ and cut one flourish
- Pansy Punch #130698 – see instructions for flower above
- Thick Whisper White cardstock 11 X 6 (cut two box bases) See prior post instructions by clicking here
- Designer Series Paper; start with 3 3/4″ X 4″ and then cut just a top with Window Box Thinlit then cut off all the tabs; I had several to make so I used grid paper and made a template of just the top so I could quickly cut off the edges-store this template with your framelits for the future
- Every other side, three of the six sides, was made using #2 of the Stitched Shape square specialty framelits and a piece of DSP that was 2″ X 2″ (Note: #2 means the second one from the center)
- The other three sides used the # 2 Stitched Shape square and a 2″ X 2″ Night of Navy cardstock for the back border
- The top of the Night of Navy used a 1 7/8″ X 1 7/8″ piece of Whisper White and the heart cutout from the Window Box Thinlits layered with the retired #2 Regular Square Framelits Die. You layer both on the Whisper White and only need to cut once. The magnetic platform really helps with this cut!
- Before gluing all the pieces to the top of the lid, cut a 2″ piece of ribbon, fold it in half and glue it to the box lid. I used the retiring 5/8″ Organza #114319
- Cut a Delicate White Doilie # 141701 to fit the left edge of the top and attach your layers: the DSP, then Doilie, Flourish and finally the rose. I made an extra to store with the framelits for a template so future projects will take less time.
- I didn’t want to clutter the top with a greeting so I used the 2 1/2″ circle punch to punch a circle, sponged the edges and added a greeting. My Mother’s Day greeting comes from my stash of Paper Pumpkin stamp sets but the retiring Oh So Succulent stamp set on page 21 of the Occasions catalog #142992 and the That’s The Tag # 142755 retiring set on page 23 both have Mother’s Day greetings.
So now lets go find a beautiful piece of Navy satin and a lovely necklace, or perfume, or gift card to put in the box. Then let’s make a graduation box with a graduation cap instead of a rose what do you think?
SAL, Stamp A Lot this wonderful May month
Karen


Hey Chick!
(If you are opening this in your mobile device, click little SAL at the left to have a more readable version of the blog.)
Hello Stamping Friends,

Crocus’, daffodils, tulips….oh my!
And then come the iris to beckon our eyes…
“Look, look,” they all seem to cry,
“Spring is here, let’s dance with delight!”
Spring is starting but Sale A Bration (SAB) will soon be ending so the news I am proclaiming from the housetops (blogtops?) is:
Only 10 days left of Sale A Bration with one free item for every $50 purchase.
Terri is our hostess this month and would love to receive credit for your order if it is under $150.
The hostess code for Terri is: 7BTDD3SU
With a purchase of $150 you will receive 10% of the total order in hostess dollars and with purchases of $250 or more you receive an extra $25, a special offer during SAB, plus the standard 10%, so you receive $50 in free products plus one item for each $50 order.
One of the free Sale A Bration stamp sets is called “Hey, Chick” and Evelyn Bicknell from Melbourne, Australia created a pocket card using the stamp set that is awesome! She also sent a pdf instruction sheet so you can create your own Hey Chick card. Check this out chickies:
 Evelyn Bicknell

Hey Chick Pocket Card
Click on the blue link above for the pdf! Thank you, Evelyn!
Several of you have selected this set as your free SAB item. Send me a picture of your creation if you would like to share with our blog followers.
SAL, (‘Spring’ ing A Long)
Karen
Click the SAL computer image to go to the online store. Terri thanks you for your order and I thank you by sending a card with a little gift for each online order. In January my online customers received a set of In Color Doilies (page 175) and in February my online customers received the set of 20 Note Cards and Envelopes (page 176). For March it will be…………….a surprise! tee hee cheep cheep!
Window Shopping Bundle!
 Hurry Stamping Friends,
Don’t let the Window Shopping Bundle get away! It is on page 43 of the Occasions catalog and is just the cutest! It might get carried over in the big catalog come June 1st, however when Stampin’ Up! introduces a product with matching Thinlits it is bundled with 10% savings but not when it is carried over to the next catalog. The bundle is $50.25 which will qualify you for a free Sale A Bration product.
Remember, purchase $50 of anything from any catalog and get one item from Sale A Bration for free. Three additional items were introduced February 21:


Check out the sample items made with these products:

Click on the brochure picture below to see all the other Sale A Bration products. But hurry the Card Tin is already sold out and product is only available while supplies last!

Thank you, Deana, for a wonderful party to introduce the Window Shopping bundle and the Sale A Bration products.
Our project at the party was either a Birthday Box with matching card which uses the Window Shopping stamp set:

or a Thinking of You box and matching card:
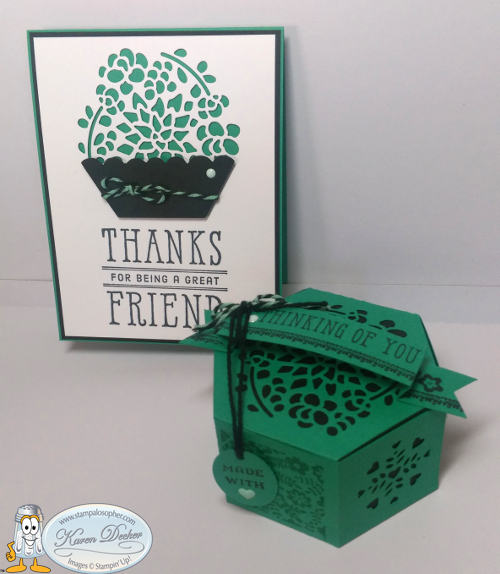
Notice the banners use the Delicate Details free stamp set from Sale A Bration:

The Emerald Envy box uses the third one down and the Dapper Denim box uses the second one down to be a bit more masculine. The flower and cupcake on the edges of the banner are part of the Window Box stamp set! The banner uses a 5 1/2″ X 7/8 inch piece of card stock and the little Thinlit from the set that scores and cuts the end! The video below will show that in detail.


For a thank you gift, I used the same Window Shopping Bundle and made a little St. Patrick’s Day basket.

Hmmm…. It did have chocolate in it at one time; at least the tea light and mints are still there for the picture. I used Cucumber Crush paper and the Mint Macaron ribbon which is still in the Clearance Rack. Why a tea light? Because the door prize was a tea light holder made with Watermelon Wonder card stock:
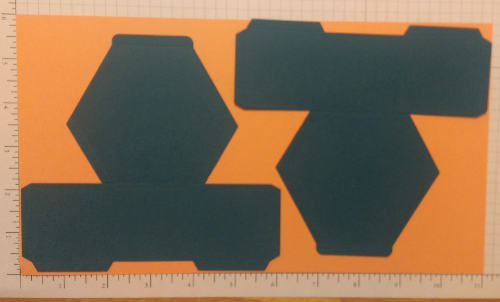
 To make the tealight you use two pieces of the main Thinlit just as you do for the box:
 Remember the middle heart is directional so punch your windows accordingly.
I demonstrated the basket pieces with the same color. You only need one piece of the main box Thinlit for the basket and one piece 8 1/2 X 3/4 for the handle:
 The Thinlit set makes a basket just perfect for a little Easter gift!

The regular box uses two Thinlit cutouts which fit nicely on a 6 X 11 piece of paper:
 The home office has a wonderful video for construction of the box so rather than recreate the wheel I will insert it here. If you are viewing this on your smartphone you may need to click on the little SAL image at the top of the post to go to the main blog where videos work.
Drum roll please: Presenting The Window Box Thinlit dies:

One more quick note – check the bottom of your Big Shot machine once in awhile. The bottom screws need to be kept tightened as well as the screw on the handle. The machine comes with a little tool to keep the handle tightened but you will need a phillips screw driver to tighten the bottom screws.

Cheerio but be back soon! (I just went to the high school’s performance of Oliver. It was exceptional and I can’t get the songs out of my mind- but who would want too?!)
SAL,
Karen (Click on SAL to go to the online store)
Happy New Year!
Hello Stamping Friends,
Today the Stitched Framelits are once again in stock! ITEM # 145372
 Item #145372, 12 framelits for $30! What a great product! Order the framelits, add $20 of other products and get a free product from Sale A Bration! Just saying…..
The new year brings new catalogs. We have a new Occasions catalog that runs through May 31, 2017 and a new Sale A Bration brochure with free products available to you with each $50 purchase; February 21 a few surprise products will be added, so buy now and then check it out later for something else that you might love! Click on either image below for the full catalog pdf. These catalogs are also in the catalog section of the menu bar at the top of the blog. Click on the little SAL icon at the top of this post to go to the full blog. The Holiday carryover product list is also on the catalog tab in the blog if you want to purchase any of those items and then get your free Sale A Bration item.

Jan 4, 2-17 – May 31, 2017

Jan 4 – March 31, 2017
Three of my stamping club members have agreed to host online Sale A Bration clubs Jan., Feb., Mar. Lucille is our hostess for January and the hostess code is R7QAJV2P. I will post the codes for Feb and March as we get within 30 days since the codes are only good that long.
Now for my New Year’s / Thank You cards. I couldn’t let the season slip silently southward (tee hee) without making sure everyone on my list received a greeting, but we were traveling in December and by 4:00 AM one morning I just had to give it up. Upon our return, I worked on cards for the New Year and decided the design would work just as well for Thank You cards with just a little tweaking.
I started simple with standard layers, Whisper White and Tempting Turquoise, Dazzling Diamonds and a few rhinestones:


Enter Sheri, my beloved stamping friend, and she suggested we experiment with embossing a so we tried the layers of Whisper White and Night of Navy that were so stunning with the Christmas Joy card (see my last post for measurements) and why not mix several embossing powder colors to make a really cool firework display. She looked a bit like a mad scientist as we got out several colors of embossing powder and began stirring them together. I think we combined the new green glitter and red glitter powders with yellow, copper and iridescent ice:

We added lots of color with the stamps and embellishments and embossed the year in copper. This was Paul’s favorite card! It was a bit too colored for my monochromatic tastes so we embossed with just copper embossing powder, (Pretend you are seeing brilliant Whisper White not the phone’s pink interpretation)…
 That wasn’t what I hoped for either so we tried a combination of embossing and stamping in Night of Navy. Bingo…. loved it..
 A little piece of copper metallic thread is tied around the Night of Navy Seam Binding ribbon and a glue dot placed underneath the left side to hold the bows out to the side. The inside:

(I tried a contrast button to make the image whiter which didn’t work very well. Sigh…..) Now a problem arose, I didn’t have enough Night of Navy cardstock to make the number of cards I needed so I went back to turquoise with a Basic Gray layer…..
 I used gray bakers twine I had left over from a Paper Pumpkin but there was not enough so I took Whisper White Bakers Twine and cut a length for each card I planned on making and then soaked the twine in a mixture of Tempting Turquoise Ink Refill and water. I hung the twine piece by piece on a hangar over the sink so any drips wouldn’t stain anything and let it dry overnight. Bingo again!
 For the inside I had two different designs, one for a thank you card and one for a New Years card:

The contrast button makes it look a little whiter but not how it looks in real life. For the inside of the thank you:
 And that my stamping friends is what happens as you design a card! Which is your favorite?
Stamp sets used: Jar of Love, Wonderful Year, Project Life Day to Day, Greenhouse Garden for the fireworks, Perfectly Preserved thank you, and Another Thank You stamp sets.
I am off to Amazon to find a light box. Watch for the next post on using the new watercolor pencils!
SAL, Shy Away Lengthy resolutions
Karen

Fun With Christmas Cards
 Christmas went by too fast this year! I am just not ready to give up the fun. The tree is still up and I hope to enjoy sitting in the window seat with snow falling on one side of the window and the Christmas tree on the other! Snow is predicted for tomorrow!
Maybe my sentimentality comes from one of the most incredible gifts we empty nesters can receive – a Christmas Eve grandbaby!

This is my youngest daughter, Amber, with Tyler and their new son Jaxson Christopher Buchholtz! He was born a little after 1:00 pm Christmas Eve!

Humor me with just one more picture of Jaxson with his eyes open, then I will move on to cards!

We are so anxious to get up to Renton, WA and hold this little one!
I promised more cards with the Cable Knit Embossing folder. Let’s start with the pullover sweater with the Christmas tree embossed into the card stock:

The Christmas tree is cut out with the Peaceful Pines framelits still available in the big catalog, see page 28 for the stamp set and page 192 for the framelits. The Warmth and Cheer Designer Series Paper (DSP) is retired but page 172 has a lovely set of lightweight Christmas Specialty designer paper. My favorite in that paper is the sheet music. It is lightweight which makes it perfect for making fancy envelopes.
Checkout the previous post, Elizabeth Stamp A Stacks, for all the details to making a cardigan; the inside of this card is also shown there to compare the new Stitched Framelits product with a regular circle. Did I make you look? There are lots of additional pictures from the post you would have previously seen in your email. I updated it yesterday and now there are details. If you view this in your email post but want to quickly go to the full blog just click on the little SAL image at the top of the post.
Next I wanted to do a much more feminine cable knit sweater.
 The collar is cut using the Lots of Labels Framelits, pg. 193, #138281. A must have set of framelits! The inside is the same just using the Warmth and Cheer DSP for the border and bow. If I did it again, I would put a piece of red foil for the turtleneck to make it look more like silk.
 My next challenge was to make a stocking cap similar to what I had seen on Pinterest.

The candy cane is removable in all of these cards if you wanted an ornament but are ready to throw the card away – (be still my heart, it happens)! A pompom is made for the top by wrapping the Candy Cane Lane Bakers Twine around a 1″ piece of cardboard 20 times, then run a 4″ piece of twine under all the loops at the top of the cardboard and make a tight double knot. Cut through the bottom of the loops and trim the longer ties to match the other lengths. Mount it to the top of the card using several glue dots to secure the pompom. I am loving our Thick Whisper White cardstock, pg. 175, #140272! I have always liked layers on the front side of the card and needed layers on the inside when I used Whisper White because it seemed flimsy otherwise with several layers on the front. Problem solved with Thick Whisper White cardstock!
The stocking cap started with two pieces of Thick Whisper White 4 1/4 X 5. Do you remember MyDigitalStudio? After failing to make a nice cardboard template by hand that had perfect curves, I went to MyDigitalStudio (which I need to transfer to My Memories Suite before I upgrade the computer) and opened a new project, selected the ornament punch, turned it upside down and sized it for my card. I printed it out, laid it on cardboard for a more permanent template and Voila! a perfect stocking cap! So how do you attach the front to the back when you don’t want to lose your shaped design? I am glad you asked! Let’s look at this picture of the inside which uses the oval stitched framelit, the Wrapped In Warmth greeting and the tails of the bow punch with red foil paper to bring in the shiny red to match the holly berries on the outside. The berries and leaves on the front are from the retired Stocking Accents Bigz die since I didn’t have the Holly Berry builder punch.
 Do you see the score line at the top of the cap? Okay, don’t look quite so close, it is a bit crooked, but you get the idea- you score about 3/4″ from the point on the inside and fold that down to glue the top on. Use Tear and Tape to secure the top since it will be opened 1000s of times as people admire your card.
For the cable bottom on the front start with a 1 1/4 X 4 1/4 piece of Thick Whisper White cardstock, spritz, leave off the bottom acrylic plate, and run through the Big Shot. Then fussy cut the extra to get just the cool cable for the bottom. I used Tear and Tape on the sides and very bottom to attach it to the front and leave a pocket for the candy cane.
If you would like to knit a stocking cap sign up for my knitting class. My knitters received a little gift in a bag created with our Gift Bag punch board and lovely designer series paper (DSP). See page 184 of the big catalog, item #135862. It is another must have!
 The knitting club played bingo using the bingo sheets I made years ago with the Stampin’ Up! bingo sheet and My Digital Studio. We did the typical white elephant pick a gift or steal a gift and they had fun. I made a miniature octokitten this year for the little girls next door who are too young to join my knitting class:

Back to showcasing cards….. On page 35 of the Big Catalog is the Joyful Nativity stamp set and this card is a case from Pinterest that used smaller layers on the front leaving a 5/16″ white border on the card which is very effective! And with the Thick Whisper White cardstock I didn’t feel I needed layers on the inside. Get a jump on your Christmas cards for next year and make a dozen of these quick and simple cards with product that is still available!
 It is so pretty with the Night of Navy contrast on Whisper White. This picture doesn’t do it justice at all.
Main Card – Thick Whisper White 8 1/2 X 5 1/2 scored at 4 1/4.
Night of Navy Layer – 4 7/8 X 3 5/8
Top Layer – Whisper White 4 3/4 X 3 1/2
Scrap of Whisper White to stamp angel – 1 1/2 X 1 1/2 Fussy cut and mount with dimensionals
Copper Metallic Thread – about 6″ ( I put glue dots on the back of the angel to help wrap the thread)
 This is Whisper White paper and the Night of Navy stamping is stunning in real life. I am going to make a photo booth this year to help my pictures look better. The greeting is from the Warmth and Cheer stamp set.
For my Messianic Jewish family I used the retired Jewish Celebration stamp set:


Like always, I couldn’t get cards done for everyone and only had a limited number of box cards so when we returned from our trip I made Happy New Year’s day cards to complete my holiday greetings to everyone. I will give you (and myself) a much needed break and post those the next time. Hmmm…. and now I need baby cards! Whoopee….. One more picture? Here’s my middle daughter, Stacia, the new Auntie, with little Jaxson…..

I’m going to check plane tickets again – maybe there is some fabulous deal today- I already checked yesterday, and the day before, and …..
SAL, (Sing A Lullaby)
Karen
Sale A Bration is going on right now. Buy $50 and get a free item from the Sale A Bration catalog.
The hostess code is: R7QAJV2P with Lucille as our hostess. We will do a Jan – Feb – Mar online club this year since we will be going to Renton, WA sometime and going over to the Western slope to see Dad as often as possible. Thank you for your understanding and support!
Elizabeth Stamp A Stacks
Merry Christmas Stamping Friends,
December isn’t quite normal for us this year as our father was diagnosed with terminal cancer and we have been driving over the mountains as often as possible to be with him and with mom and the family. We are headed back again today but have the joy of spending a Christmas Eve with family! I posted the three cards we made at the Elizabeth Stamp A Stack for the post that went out before Christmas but have now added all the details of construction. If you love one of the cards and would like to make it next year be sure and go to the store and order the supplies before they are discontinued. The bundles that are discontinued may not necessarily mean the stamps themselves are discontinued but it would be good to get them now for next year if it is something you love! You can check out the retiring list on the website. Click the computer image at the end of the post.
Santa hitched up Rudolph, loaded the sleigh with ornaments and started decorating the trees at the North Pole! It is a Z fold card and the trees, sleigh, sleigh top detailed layer and Rudolph are all in the Santa’s Sleigh Thinlits bundle – page 24 of the Holiday catalog. The North Pole sign and the greeting come from the Christmas Magic Stamp Set – page 22 of the Holiday Catalog. The houses are the Candy Cane Lane DSP (Designer Series Paper)! The greeting uses the new red glitter embossing powder. The santa is from the retired Jolliest Time Of The Year set.
It was so popular I am going to make my first attempt at selling cards on Etsy with this one!

The base is Cherry Cobbler cut at 11 X 4 1/4 and scored at 2 3/4 X 5 1/2.
Left and middle DSP (designer series paper) top mats= (2) 3 X 2 1/2
Top right DSP mat 5 1/4 X 2 3/16; the houses made it a bit tricky so there wasn’t much wiggle room on the cuts.
The following Whisper White pieces are run through the Big Shot with the Softly Falling embossing folder and then fussy cut along the top to look like snow piling up:
Bottom right below the houses: 2 X 5 1/4 in Whisper White, embossed and fussy cut along the top
Middle: 2 1/2 X 1 7/8 then cut the left 1 7/8 side down to 1 3/8 to create the hill going from the right hand side to the left hand side.
Z Fold Strip: 10 3/4 X 1 1/2 in Whisper White, embossed and fussy cut along the top and scored at 5 3/8 and 8 1/8.
Santa and the North Pole sign were stamped on a piece of 3 X 4 Whisper White using Black Memento ink and then colored with Real Red, Garden Green and Crumb Cake markers. Clear and red colored rhinestones were put on the wreath of the North Pole sign.
The Base of the sleigh is cut using the sleigh framelit from a Basic Black piece 2 3/4 X 4 1/4
The Gold Sleigh overlay is cut with the detailed sleigh framelit from Gold Foil paper 3 1/4 X 2
Trees – I stamped in Memento black and then cut with a framelit- two full and one partial using Always Artichoke 4 1/4 X 5 1/2
The deer is stamped in Memento black and then cut with a framelit using Soft Suede 3 X 2 1/4
Bow: Red Foil Scrap cut with a framelit from the same Santa’s Sleigh set
Red Glimmer Bakers Twine 12″. Use glue dots to position the twine around the tree and into Santa’s hand.
Gold Thread 8″ again I used glue dots starting the thread under where the deer’s bow will be, then through a hole punched in the sleigh, and back behind the neck of the deer and into Santa’s hand. I tap the glue dots with the embossing buddy to prevent sticking to the card when closed.
The ornaments are not Stampin’ Up! but could have been stamped from the Wrapped in Warmth stamp set, Be Jolly By Golly or any of the many stamps we have that have little ornaments. For the sake of time at the Stamp A Stack I purchased a set of sticker ornaments. There are six ornaments in the sleigh. And don’t forget to add a colored pearl for Rudolph’s nose!
The next card was a case from Juanacreates using the Star of Light bundle on page 9 of the catalog.


This star was centered on a #5 Banner Framelit but the saying just barely fit. The #6 Framelit was so big the stamped saying at the bottom wouldn’t have fit so we made a template from cardboard that was 2 3/8″ wide and used it to cut the top white banner.

The star was moved over so that the beautiful tail was completely visible.

The star is a layer of silver foil paper and dazzling diamonds glitter paper, two more silver foil stars and a rhinestone on top! The star could be removed from the card and hung on the tree for an ornament.

These are the layers using the fabulous framelits. The good news is that this set and framelits carrys over!

And what a set it is with awesome greetings and various sizes of stars! I love it and will use it again.
The base is Night of Navy 4 1/4 X 11 scored at 5 1/2
The Banner is Whisper White 2 3/8 X 5 1/4 cut using a handmade template. Hmmm… I wonder if the triple layer banner punch would have been just the right size.
The little silver banner is Silver Foil paper 1 3/4 X 1 1/4 cut using Framelit #2 of the Banners Framelits.
Emboss the greeting at the top of the Whisper White Banner with white embossing powder and then sponge with Marina Mist going down about 1 3/4 inches on the banner and then sponge the top with Night of Navy. Wipe the greeting with a paper towel when through sponging.
The tails to the top of the star are embossed with white and the tails on the banner are stamped in Night of Navy. The greeting at the bottom is embossed with the white.
The little stars are cut with a smaller framelit using Silver Foil paper. A 3 X 3 piece will be enough to cut out the large background star. Turn your star framelit diagonally to cut the silver outline star and one of the smaller detail stars. The silver foil star on top needs a piece 1 3/4 X 1 3/4. The Dazzling Diamond detailed layer needs a piece 3 X 3.
The inside is a standard 4 X 5 1/4 Whisper White layer. The instructions will be clear as you look at the stamp set and important to follow so that you leave room for the greeting in the middle.
- Stamp the star in the upper left corner first – tail of 4 diamonds down, 3 diamonds to side. Don’t use the longest tail of the star stamp.
- Right Corner next – Stamp top star tail using the 3 larger stars that are in amongst the small stars to guide you in positioning the tail
- Turn the stamp upside down and stamp lining up the thin tails to match
- Now you can place the Peaceful and Bright greeting close to the bottom of the tails leaving room for Merry Christmas
- Finally, stamp the Merry Christmas
It is worth the extra effort to create this stunning card.
The third card was to highlight the Cable Knit Dynamic Textured Impressions Embossing Folder, page 13 of the Holiday catalog, #143537, $10. I am a knitter and loved using this embossing folder. I made pullover sweaters with Christmas tree fronts and a white stocking cap and this cardigan for the Elizabeth Stamp A Stack. (I will post the other creations on the next post).

The new product: Stitched Framelits came in while I was doing my personal cards so I am able to show you the difference a little stitching makes. Here is the one we did in Elizabeth without stitching….. and one with stitching…..


The set has four circle, four square and four oval stitched framelits. It will be available to order again on January 16th. Item #145372. Thank you Dawn for this great set of measurements!

The Cable Knit folder is a new 3D type folder and requires a different set up before running through the Big Shot. You spritz your paper with a bit of water before running it through the Big Shot and you don’t use the bottom acrylic plate.
The main card base is Cherry Cobbler 11 X 4 1/4 scored at 5 1/2
Once again we got out a piece of cardboard and made a template for the sweater front. Starting with a piece that was 5 1/2 X 4 1/4, we marked over 1″ from the right and from the left for the shoulders. We marked the middle of the V down 1 1/4 inches and over 2 1/8 from the side and then fussy cut from the 1″ marks to the middle V mark. The template will be stored with the Cable Embossing Folder for making more!
Garden Green of 5 1/2 X 4 1/4 was cut and then the V neck cut with the template. Spritz and emboss.
The pocket was cut on Garden Green with another cardboard template that was 1 3/8″ X 1 5/8″ with a 1/4″ diagonal on each side of the bottom creating a 5/8″ bottom edge.
Using the Work of Art stamp set and the Stamp A Ma Jig I stamped a Cherry Cobbler turtle neck right in the middle of the card base.
I cut 1/2″ strips of Garden Green and used the retired Crimper to create the ribbed pieces. Just score your strips on every groove of the Simply Scored Scoring Tool to get the same effect. Strips needed:
Ribbing: Bottom Front and Inside: 4 1/4″ V neck pieces 2 1/4″ Front Button strip 4 1/8″ Pocket 1 1/2″
Use the Bow Punch and our lovely Warmth and Cheer Designer Series Paper to make the front and inside bows. Use a piece that is 4 3/4″ X 2″ and punch twice. Use the tails for the inside bow with a regular 3D bow on the sweater.
The Merry Christmas wish is from Teeny Tiny Wishes and stamped on a piece 3/8″ X 2 1/2″ and then the top of the strip only is slid in the retired Jewelry Tag Punch.
Use a piece of black twine 8 1/2″ and a needle threader to thread the twine through two little bells and tie it on the candy cane.
The candy cane is stamped on a piece of Whisper White 1 1/2 X 2 1/2 using the retired Scentsational Season Stamp Set with matching framelits. The Candy Cane could be taken out and used for an ornament.
The deer is from the Santa’s Sleigh stamp set with matching framelits and is being carried over! Yay! Soft Suede 3 X 2 1/4
The greeting is from the Wrapped in Warmth stamp set and stamped on Whisper White 3 X 3 then cut with the # 6 circle framelit or the largest of the new stitched framelits and popped up in the middle with dimensionals. I stamped to the bottom of the cardstock so I had room for the bow.
Rudolph’s nose needs a colored pearl and with three buttons held on with several glue dots, you are done!
We had two great Stamp A Stacks with these cards. I made each guest at the first event a candy cane sleigh for a thank you gift. It has a Kit Kat base, then a pack of gum, a tin of mints, two chocolates and then another chocolate on the top.
 And a snowman for a door prize:

At the next event I made little mugs out of Designer Series Paper for thank you gifts:

Aren’t they cute? Thank you Traci Cornelius for this pattern on Pinterest!

Base: 4 1/2 X 8 3/8 Scored 1 1/2″ on bottom long side of your Designer Series Paper. It is directional so be careful here.
Turn your paper lengthwise on the Simply Scored and score at each inch: 1, 2, 3, 4, 5, 6, 7, 8 leaving a 3/8 inch tab at one side. Remove the section of tab at the bottom of the mug. Cut each score line to the 1 1/2″ horizontal score line. Put Tear and Tape on 3/8 inch side tab and lay flat to join sides. Put more Tear and Tape on front and back of half (4) of the bottom tabs and join with the opposite tabs that have no sticky tape being careful not to push the mug out of shape. Cut a #5 circle framelit to glue on the bottom and then attach to a doily!
Handle: 1 X 4 1/2 attached with Tear and Tape
For a fee of $20 you had six cards, two of each of the above, and a fun take home gift, possibly a door prize, and a wonderful afternoon stamping with friends! Don’t you wish you had come?
Shall I do another?
Have a wonderful Merry Christmas and remember the most important gift you can give is the gift of your time – time spent worshiping Jesus and time spent being with your family!
SAL, Soak in A Lot of Love
Karen
Paper Pumpkin November 2016
Hello Stamping Friends,
Thanks to Paper Pumpkin, I am eight cards closer to completing my Christmas cards!

I chose to add a Basic Black background (4 1/4″ X 3″) to the layers instead of the velum layer over the base as the kit instructed. I needed a little star and found the one in The Newborn King retired set to be just the right size. A medium size rhinestone gave emphasis to the star and added that little sparkle I like to have on cards. The kit had white sequins for the sky that now go to my stash!
For the inside I used the Peaceful Pines stamp set – still available, see page 28, and a scripture verse from the Every Blessing retired stamp set.


It feels good to look at the whole set of cards and know you only have a few dozen left to make!

My next set of cards will be the Stamp A Stacks that we did in Elizabeth!
SAL,
Karen
Welcome to my blog!

Sal Window to Products


