
Home » Posts tagged 'Very Best Occasions Stamp Set'
Tag Archives: Very Best Occasions Stamp Set
Santa’s Express Christmas Cards
Merry Christmas everyone!
Have you ever started a card design by wanting to match the envelope liner?
 That is really backwards! Were you able to do it or did you give up?
I did succeed! I purchased the Santa Express Memories & More Cards & Envelopes from the mini thinking it would be a great way to save time and make 20 Christmas cards. The cards are a bit bigger than our standard A2 size which I also liked. I know this is blurry but the pictures in the mini were so small!

The Poppy Parade (or Sweet Sorbet) card envelope liner is striped but the card is polka dots, whereas the Shaded Spruce card envelope liner is polka dot but the card has a bit of speckle like snow on a solid green front.
I am going to post these cards for ideas to help those of you who might have just a few, hopefully not 20, Christmas cards yet to make.
Two at a time!! I started by working with one red and one green and I cut off one inch on the right front side of each. I used the polka dots cut off from the red card to make the inside right side of a flap card on the green card with the green strip as its flap. For the inside left side of the red card I used a 1″ X 6 1/4″ strip of polka dots from the Santa Express DSP which matches perfectly. There was no red stripe in the Santa Express DSP paper to match the envelope liner but the Sweetest Christmas DSP had a stripe that I used to tie in the envelope liner.
. You lost me. How about a picture?

 .
. . 
 .
.
Do you see how the polka dot strip on the green card right front comes from the red card base? I used the green cut off strip to make the flap for the card by cutting off 2″ and scoring at 1″ so it glues behind the polka dot strip. The 2″ part I cut off I used on the flap of the red card.
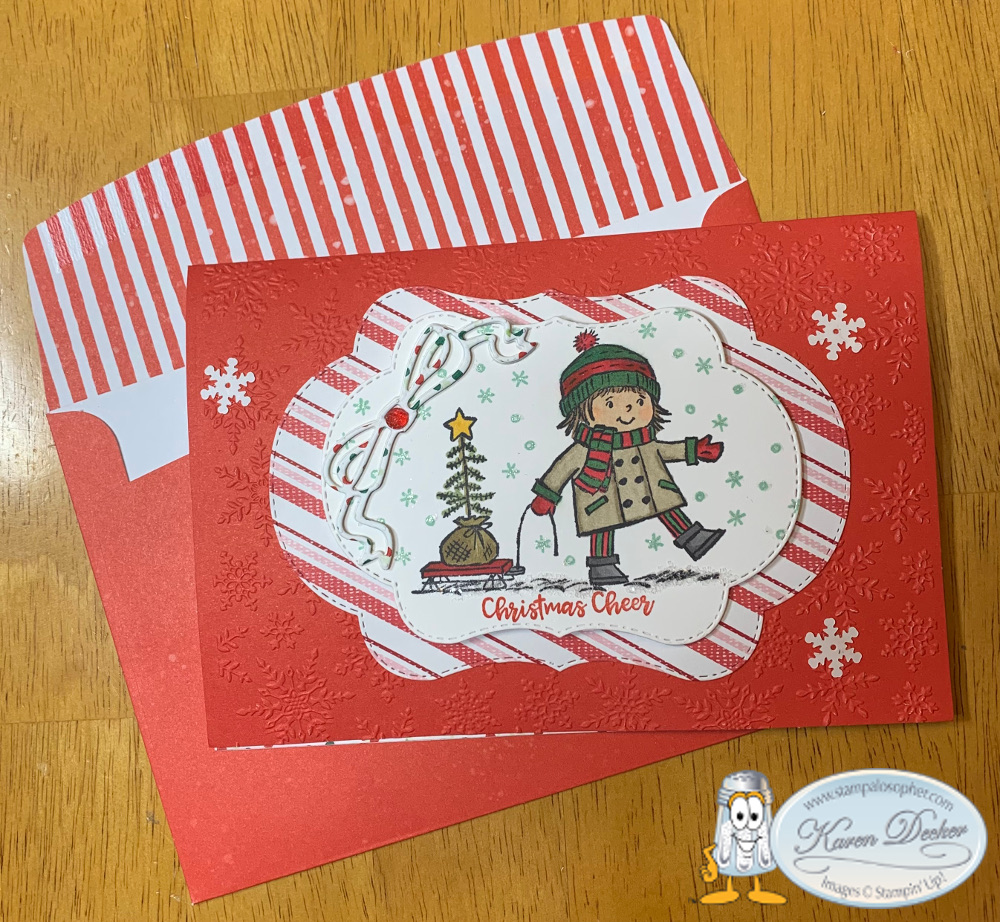
The red card uses a 1″ X 6 1/4″ strip of the striped paper in the Sweetest Christmas DSP for the right side and another strip 1″ X 4 1/4″ scored at 1″ for the flap. Stamp and corner round the flap, and glue it halfway down on the inside strip before gluing that strip down. (I loved that the other side had little candy canes!) The flaps are stamped with Versa Mark and embossed with white embossing powder with the greeting ‘Christmas Cheer’ from Sweet Candy Canes. The ‘Candy Cane Wishes and Mistletoe Kisses’ greeting is also in the Sweet Candy Canes stamp set and cut with the Candy Canes die which has those two larger holes at the side which I used for ribbon. The holes are large enough for a real candy cane to fit through with the greeting stamped vertically.

I cut one candy cane from the Sweetest Christmas Designer Series Paper (DSP) for each card and cut two evergreen boughs from Shaded Spruce using the dies from the Christmas Banners Die set. I cut a So Saffron Stem from the Banners die set and also five red berries in Real Red which I sparkled up with Wink of Stella. I stamped two mistletoe boughs from the Sweet Candy Cane stamp set and cut them out with the Candy Canes Dies. I punched three little white berries with a small hole punch and layered them above the mistletoe.
The layer under the candy cane and greenery is 2 3/4″ X 5 3/4″, one in Poppy Parade and one in Sweetest Christmas DSP.
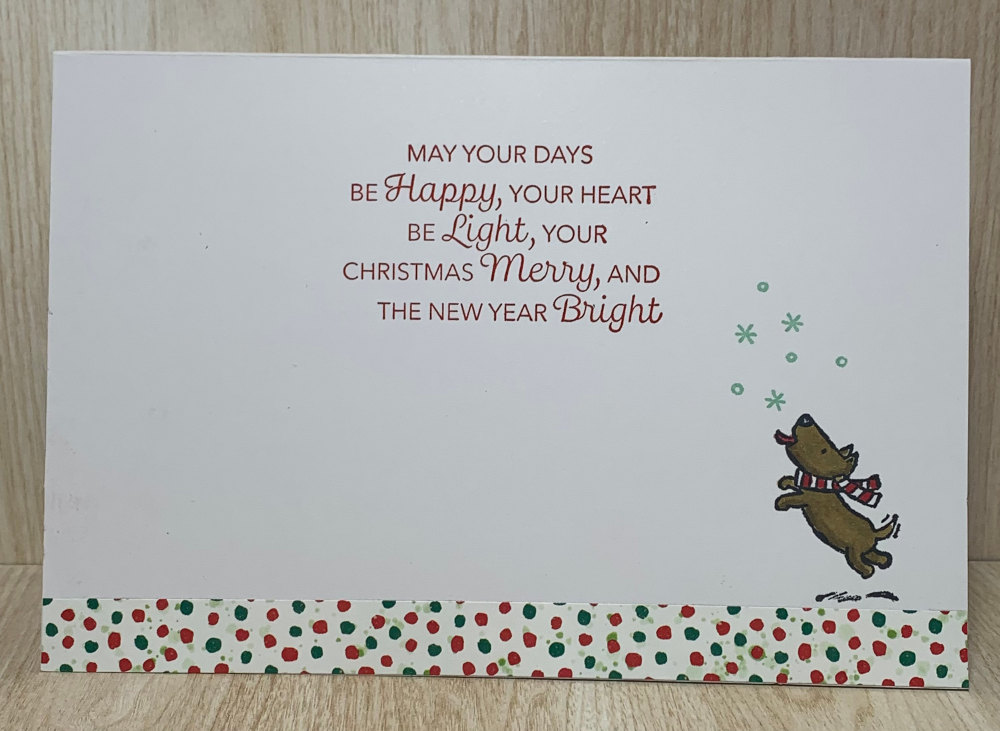
The inside greeting is my favorite for this year-“May your days be happy, your heart be light, your Christmas Merry and the new year bright”- from the Very Best Occasions Stamp Set, a great set for your stamp collection with greetings for birthday, love, gratefulness, thinking of you and Christmas!

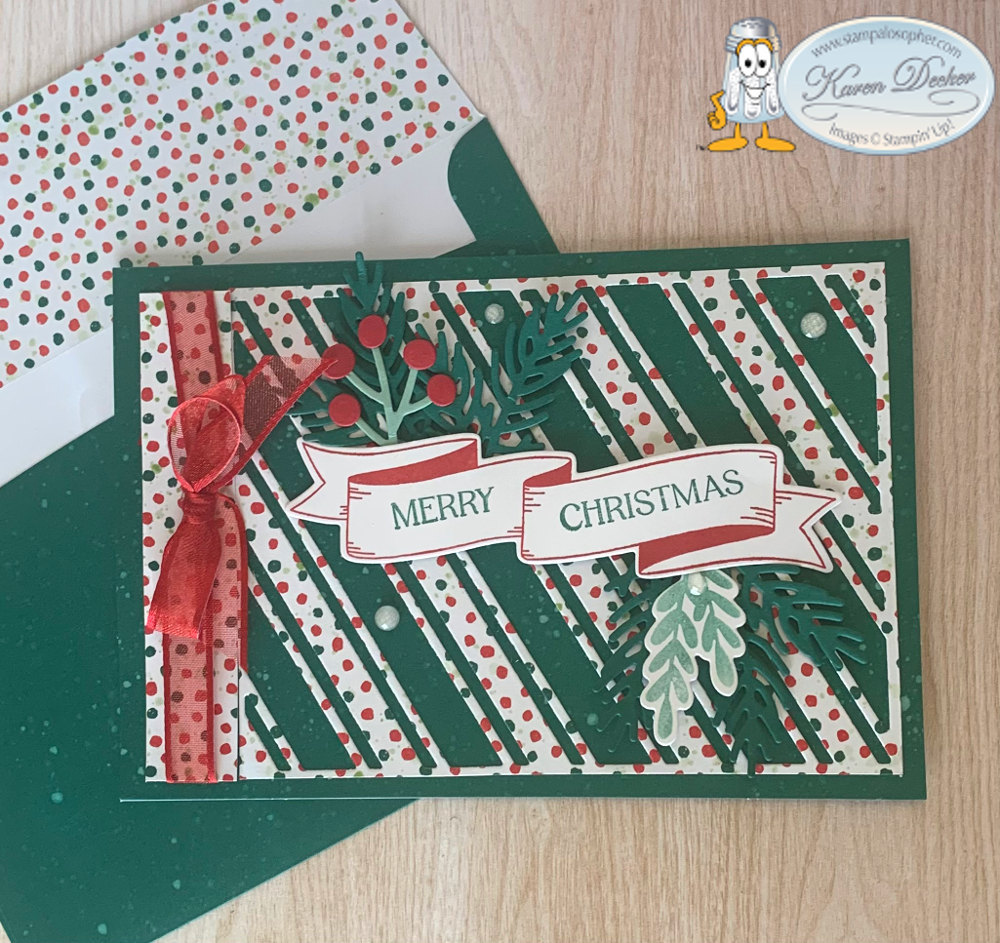
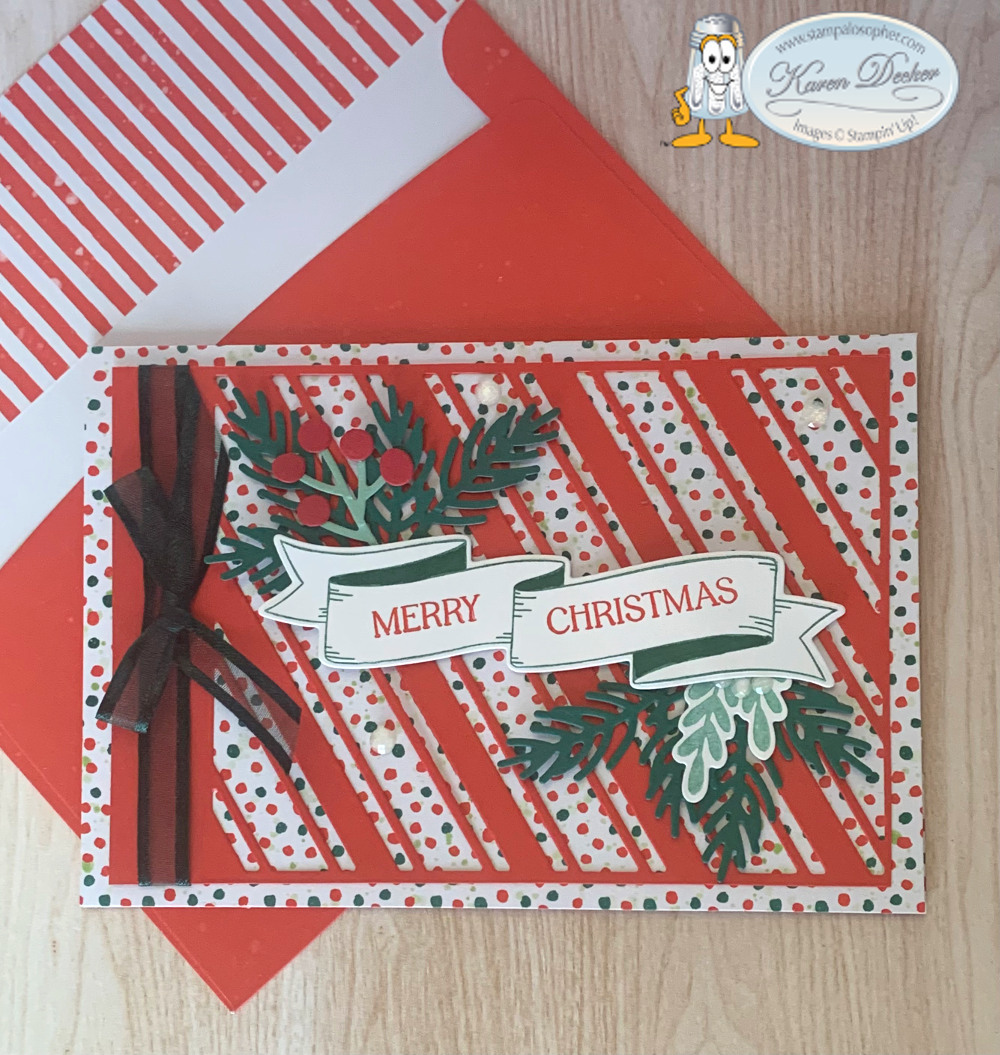
These next two cards use the Candy Canes Die that makes stripes!


These card bases are larger than a standard A2 so the cut out wouldn’t cover the full base so start with a piece of DSP for the green card and poppy parade for the red card and cut them at 5 7/8 X 3 7/8 which leaves an uncut left side perfect for wrapping ribbon around. The banner is from the Christmas Banners Die. It is the best banners stamp and die set yet. ( I think I have about three sets from the past.) I did use a Shaded Spruce Stampin’ Blend to color in the green a little darker.
The last cards I want to show you use retired products. The Seasons of Fun set has a little girl pulling a sled and my daughter just sent me a picture of our little granddaughter pulling her baby sister in a sled.

Did you know if you layer Lt Mossy Meadow and Lt Shaded Spruce you get Garden Green?
For the red card, I folded the dotted side to the back and embossed the front with a retired embossing folder. I used the Stitched Seasons Framelits to cut the layers and also to cut the bow in polka dots to match the back. ‘Christmas Cheer’ is in the retired Itty Bitty Christmas stamp set.
And here is the matching green card:

I cut the bow out of the color I wanted and then two other layers of basic white, gluing all three layers together to give the bow a bit more dimension. Be sure and use your double back sticky sheets to do this so you don’t have a mess of glue.
One last example using the same Stitched Seasons Framelits and the matching Blended Seasons stamp set:


And that, my dear stamping friends, is how you start with an envelope and then tie in the card!!
Merry Christmas everyone! Have a wonderful day celebrating the birth of Jesus!
Karen

Thanksgiving Card with gift card holder
Thank you/ Thanksgiving Card
I used the Handmade Wishes stamp set for the greeting on this card.
I tried several coloring techniques with the Leaf Fall embossing folder but liked the embossed look without coloring the best:
 .
.
 .
.
I used a combination of gold and copper embossing on the greeting. The outside is gold, the inside is copper.
 .
.
 . Sorry, I still can’t see the difference.
Sigh…… it’s one of those days! The software I use to add the watermark froze up and the camera isn’t catching the colors. But you need to see the Handmade Wishes stamp set before it goes away and, more importantly, you need to see this die:
 .
.
This Mini Pocket Envelope Die! It is the perfect size for gift cards and look at all the other dies that are included:
 .
.
A miniature oval, branch of leaves die, scalloped rectangle, tags and tiny dies to punch circles or a slot for twine or ribbon! And check out the little bow you can make with two of the dies. You need this die – trust me – no more manually cutting and scoring to make a gift card holder, it is all done with the die.
 .
. Recipe for Thanksgiving Card
- Base: Thick Very Vanilla, 8 1/2 X 5 1/2, scored at 4 1/4
- Layer 1: Thick Very Vanilla, 4 3/4 X 3 1/2, (X2) outside and inside
- Layer 2: Thick Very Vanilla, 4 1/2 X 3 1/4, embossed with Leaf Fall 3D embossing folder
- Inside Gift Card Holder: Designer Series Paper (retired), 4 1/2 X 5, die cut with Mini Pocket Envelope Die; stamp the very top of the gift card holder in Versa Mark with ‘For You’ from Handmade Wishes and emboss with copper embossing powder.
- Greeting: Very Vanilla, Scrap, stamp with border from Handmade Wishes stamp set in Versa Mark and emboss with gold embossing powder. Stamp ‘Endlessly Grateful’ from Very Best Occasions stamp set and the scrolly from the Handmade Wishes stamp set in Versa Mark and emboss with copper embossing powder. Punch with the Handmade Tag Punch
- 7″ of ribbon folded in thirds and attached to the back of the greeting with glue dots
The small leaves I used on the inside are from the retired Square Pilllowbox dies and the front open leaf, die cut in gold, is from the retired Stitched Seasons Framelits dies. The two leaves at the bottom left of the greeting are from the retired Gathered Leaves Dies with the larger leaf die cut in copper foil and the smaller in brushed metallic foil.
SAL, Share A Love
Karen
Welcome to my blog!

Sal Window to Products


