


Lions & Dragons – Oh My!
Hello Stamping Friends,
Let’s have some fun with Lions (dandelions) and Dragons (dragonflies)!
January’s hostess code is : UEEZKD2D for use if your order is under $150.
Yesterday I was live on Facebook with January’s club cards. Each club member had kits with all the supplies so this time my presentation was different with just the construction of the card without going from the beginning to the end and listing all the sizes of the card cuts, so this blog post will fill in the gaps!
Dragonfly Z Fold Club Card Introducing The Dandy Garden Suite

This suite is on Page 25 of the JJ catalog (Jan-June mini)!


Recipe:
Base: Bumble Bee, 5 1/2 X 10 7/8, Lay the base horizontally at the 7 1/4″ mark and cut down 1 1/8 inch, then score the rest of the way.

Secondly, mark the left hand side down from the top at 3 3/8″ and cut the base from 1 1/8″ to the 3 3/8″ mark. (Note: the tip of the cut is at 1 1/8″).

Score the base at 3 5/8″ from the left. You now have two score lines: one at 3 5/8′ and one at 7 1/4″.
Your base is done!
Let’s mount our little dragonflies and the bumblebees on little strips of window sheets.
Window sheet strips (X2): 3/8″ X 1 1/4″
Bumblebees: Use the Dandy Wishes Dies little Bumblebee die to cut two bumblebees from the Dandy Garden DSP (Designer Series Paper). Color the back of the bumblebees with Mossy Meadow. Place glue dots on the top of one of the window sheets, one on the front and one glue dot on the back, and then adhere your bumblebees back to back. The “Garden Wishes” stamp set has a bumblebee image to stamp if you would rather have a stamp set than a die set.
Dragonflies: The Dandy Garden DSP has sheets that match up with the Dragonfly punch (which is bundled with the ‘Dragonfly Garden’ stamp set for a 10% discount) and you will punch out two matching small dragonflies and mount them on your window sheet strip with a glue dot on the window sheet front and on the back.
Back Layer of the Z fold: Dandy Garden DSP, full rectangle – 3 3/8″ wide X 5 1/4″ tall. The DSP is directional.
Middle Layer of the Z fold (which is on the back of the base): Dandy Garden DSP, Start with a piece of DSP, 3 3/8″ wide X 4 1/8″ tall, Mark down 1 1/8″ on the right hand side and cut from the tip of the left hand side to the mark on the right hand side. Flip your base over and place your bumblebee where he will be on top of a dandelion at the back when you fold the card flat. Use a glue dot to position the bumblebee and then adhere the DSP.
Front Layer of the Z fold: Dandy Garden DSP, 3 3/8″ wide X 3″ tall to start. Mark 1 1/8 ” down -this time on the left hand side and cut a diagonal from the tip of the 3″ to the 1 1/8″ mark. Before adhering, wrap your linen thread around the DSP and tie a bow.
Note: On both the middle and the front layer, you can place your DSP where it will go, and make your marks for your diagonal cuts without measuring so that if your diagonal cut is not quite perfect your layer will be and will have a nice 1/8″ border.
Greeting Border: Bumblebee, 3 1/4″ X 3 1/4″, cut with the Largest Square Stitched Shape Die (2 5/8″)
Greeting Top Layer: Whisper White, 2 1/2″ X 2 1/2″, cut with the 2nd largest Square Stitched Shape Die (2 1/8″). I stamped the greeting from Dragonfly Garden, “May Good Things Grow All Year Long”, in green, and then did a stamp off of the dragonfly cluster across the greeting in Bumble Bee ink.
Embellishments: One little ladybug mounted with a glue dot. 16″ of Mossy Meadow Braided Linen Trim.
Alternative Cut: Diagonal Z fold with the diagonal from the back to the front.


The base of this card uses just 1/2 of a piece of cardstock so you can make two cards from one sheet.
Base: Bumble Bee, 5 1/2″ X 10 7/8″ scored at 3 5/8″ and 7 1/4″ with a diagonal cut from left to right at the 5 1/2″ cut down to 1″ from the bottom on the right.
Note: I have a 1/8″ border on the right, left and tops but did not have a border on the bottom.
Back Layer: DSP, 3 3/8″ wide X 3 1/4 ” tall, cut diagonally left to right from the 3 1/4″ tip to 1 3/8″ down from the top.
Back Greeting: Shimmer White, 3 3/8″ wide X 1 7/8″ tall, For this greeting I stamped the “Thank You For Your Kindness” from Dragonfly Garden in blue and then added a punched out dragonfly.
Middler Layer– goes on the back of the base: DSP, striped in this case, 3 3/8″ wide X 3 7/8″ tall , diagonally cut from the right to the left from the tip to left marked at 1 1/2 “. Tip: place the top of your layer with a nice 1/8” border and trim the bottom since it is flush to the bottom.
Front Layer: 3 3/8″ wide X 2 3/8″ tall, cut diagonally from the left to the right marked at 1 3/8″ from the top. Now wait — don’t adhere yet.
Dragonfly: Dandy Garden DSP, punch two large dragonflies and mount them with glue dots on a strip of Window Sheet 3/8″ X 1 1/4″. Use another glue dot to adhere the window sheet to the front of the base.
After the Dragonfly is adhered – adhere your front layer.
Embellishments: Die cut a bumble bee from DSP and adhere to front; adhere a ladybug trinket with a glue dot to front; tie a little bow with 8″ of Mossy Meadow Braided Linen Trim and adhere it to the back.
Which do you like better? A rectangle back or a diagonal back? Leave a comment with your vote by January 25 for a chance to win the ladybug trinkets!
Sand and Sea Club Cards Introducing The Sand & Sea Suite

This suite is on page 41 of the JJ catalog.

I used the Whale Of A Time Designer Series Paper instead of the paper in the suite so I had a smaller background behind the shells. The cards shown above have three different backgrounds from the Whale of a Time DSP:

Which do you like best? #1) little fishes amongst the seaweed, #2) seahorses, #3) the coral reef
Leave a comment with your vote by January 25 for a chance to win The Opal Rounds embellishments!
Recipe:
Base: Pretty Peacock, 5 1/2″ X 8 1/2″, Scored at 4 1/4″
Layer 1: Whale of a Time DSP, 5 3/8″ X 4 1/8″
Layer 2: Garden Green, Start with 5 1/2″ X 4 1/4″ and cut with the largest Seaside Seashell Die to make a base.
Layer 3: Granny Apple Green, Start with 5 1/2″ X 4 1/4″ and cut with the largest Seaside Seashell Die, then cut out all the little vines and glue them to the Garden Green base. This gives you a nice contrast of greens. Note: you can cut into the seashells to give more area to adhere the vines since the seashells will be glued on top.
Layer 4: Pearlescent Specialty Paper, Start with 5 1/2″ X 4 1/4″ and cut with the largest Seaside Seashell Die, then cut out all the seashells and glue them on the base over the greenery.
Greeting: Shimmery White, Start with 1 X 2 1/2″, stamp the greeting, and then cut with the rectangle stitched die to make a perfectly sized rectangle. Cut one end, stop halfway, reposition the die on the other end and cut that half. I demonstrate this in the video.
Inside: Shimmery White, 5 3/8″X 4 1/8″
Inside strip: DSP cut from the same piece as the background, 5/8″ X 4 1/8″
Here are two examples of what I did on the inside:


So you can vote and really see the backgrounds here are up close images of the cards:
#1 – Little fishes

#2 – seahorses

#3 – Coral Reef

Remember it is Sale A Bration time with free products for each $50 or $100 order!!
January’s hostess code is : UEEZKD2D for use if your order is under $150.
SAL, Share A Love
Karen

Thank You or Sympathy Cards
Hello Stamping Friends,
January’s Hostess Code: UEEZKD2D Use this if your order is under $150. At $150 you receive the hostess rewards.
 . Lions and Dragons – Oh my! (Dandelions and Dragonflies-tee hee)
That image is a sneak peak of tomorrow’s Facebook Live to make January’s club cards. Join me at 9:30 AM at:
http://www.facebook.com/stampalosopher/videos
Not quite yet, Sal, I have a few more classes to watch to be able to have you join us. Soon!!
Thank You Cards
Are you wishing you had a quick and simple card layout for thank you notes? I have one from a Mystery Card Challenge in our Blended Stampers Group on Facebook. I used it for my club Zoom Mystery Card challenge #8.

I used ‘Feels Like Frost’ Designer Series Paper with coordinating bases, the Stitched Nested Labels and Metallic Mesh Ribbon.
‘Love & Thanks to a Dear Friend’ is from the Prized Peony stamp set with an inside greeting of ‘Your sweet friendship refreshes the soul’ also from Prized Peony. The ‘Thank You’ is from ‘Beautiful World’ using a Stampin’ Marker to color just the thank you of the stamp. Note: Always use a marker not a blend when coloring the back of a stamp since the blends are alcohol and would stain the stamp.

Here is a close up:

 .
.
 .
.
Now you can see the trick! You score at halfway-5 1/2 , and again at 6 3/4. Then you glue the 1 1/4″ section between the 5 1/2 and the 6 3/4 scores to the back half of the card. Punch out little notches on this glued section and you have a unique placement for your ribbon. I used the ‘Tailored Tag’ Punch.
Here are cards made by club members:


 .
.
This was the Christmas card I made for the Blended Stampers group. We could use all our left over Christmas paper and make this year’s cards!!

For sure!
Did you overlook the beautiful ‘Touched My Heart’ hostess set in the back of the Annual Catalog? I used it to make Sympathy and Thank You cards in December casing Dawn Michels’ post on Pinterest.

 .
.
 .
. The base is Just Jade and the brick background comes from Tasteful Touches.
Base: Just Jade, 8 1/2 X 5 1/2 Scored at 4 1/4
First Layer (X2): Whisper White, 5 1/4 X 4
Top Border: Just Jade, 3 1/4 X 3 1/4
Top: Whisper White, 3 X 3
Bow: 8″ of 3/8″ Old Olive/Pretty Peacock reversible ribbon
Stamp the heart, the bricks and the greetings in Soft Suede and color the leaves with Just Jade.
The inside greeting is from the set ‘Kindness and Compassion’ which is retired.
 What……Breaking your own rule of not using retired products?
Once in a while, what you want to say overrides the self imposed rule!


This was a swap card using ‘His Love’ stamp set. I made it months ago and it has been sitting on my desktop waiting to be posted. It seems a good place to post with these cards since it would be good for encouraging someone.
Base: Mint Macaron, 4 1/4 X 11, Scored at 5 1/2
Layer 1: Ornate Garden DSP in Mint Macaron with Gold Foil, 4 X 5 1/4
Layer 2: Mint Macaron, 3 X 4 1/2
Layer 3: Whisper White, 2 3/4 X 4 1/4, Embossed with Dainty Diamonds Embossing Folder
Ribbon: Pool Party Sheer 3/8″ Ribbon, 4″ to wrap the layer and 8″ to make a bow.
Medallion: Die Cut with Tasteful Labels a Large Circle in Gold Foil, 2 1/4 X 2 1/4 needed, a small circle with the Tasteful Labels Die, 1 1/2 X 1 1/2, in Whisper White, and punch a 1 3/8 circle from the matching DSP for the middle of the medallion.
Daisy: Punch a large daisy in the DSP and another with the Gold card stock. Use the small daisy punch with DSP for the top of the daisy and embellish with a Gold Gilded Gem.
For the inside: Stamp off the Bible and then stamp it on the card stock. (This is sometimes called ‘second generation’ stamping- you stamp off your freshly inked stamp on scrap paper before stamping on your card stock to create a lighter image.) Stamp ‘Always’ in full strength ink on top of the Bible.
I hope these cards have given you a ‘pinch of creativity to spice up your crafting world’.
That tag line is how I came to be!
Indeed! Thank you for your time in visiting today. If you don’t have a demonstrator, I would be honored to help you out with your crafting needs.
SAL, (So At Last – the new year begins)
Karen
January’s Hostess Code: UEEZKD2D Click on Sal in the computer to go to my onsite shop.
Dove of Hope Ornament & Gift Box
Hello Stamping Friends and Followers,
Remember to click on the header if you are reading this is in your mobile device so you access the full blog where the videos work.
December hostess code is: F3ZE2UD2
Yesterday was a delightful time with virtual stamping and a virtual party!! I host a Christmas party each year for my club members to thank them for their faithful support. I opted for a Zoom party this year and it was fun! The theme was Snowmen and I was able to find snowmen gift bags and snowmen boxes and a snowman mug, and snowmen plates and napkins and kitchen towels and a snowman buddy to keep them company. So if anyone is looking for a way to connect this Christmas season, read on for a few ideas and CASE (copy and share everything) what you can. Leave me a comment if this helped and add your ideas for others to read.
Christmas Party Bag:

- Snowman Bag
- Snowman Buddy to sit beside you
- Dryer Sheets (just because everyone needs these for cutting out the intricate dies and cleaning up glitter)
- Snowman round box filled with cotton balls for the game
- Sleep Mask and plastic spoon on top to blindfold yourself for the cotton ball game
- Hot Chocolate holder with a candy cane and snowman Ghirdellis (tradition)
- Microwave popcorn holder
- Snowman mug, plates, napkin, and cleanup towel
- Chex Mix and Honey Roasted Nuts
- Christmas Feud Game Cards packaged with two plain white face masks to stamp
- Christmas Song Bingo Card with packet of buttons for bingo markers, and craft supplies-red and green sparkly pipe cleaners, bells and ribbon to make a pipe cleaner ornament. I saw this on Pinterest.
I purchased and downloaded the Christmas song Bingo cards on Etsy and used Spotify on my phone to create a playlist for the songs that were on the Bingo cards.
I purchased the Christmas Feud cards from Etsy.
The plain white face masks were at the Dollar Store as were many of the other items. It was amazing to see what these creative crafters did to decorate their face masks. Give a creative person a blank canvas and just watch them go to work!
Masks were scored on basis of : Participation, something with the snowman theme, image was recognizable, someone said oohhh or ahhhh, it made us laugh.
The round boxes were filled with cotton balls and the party goers were instructed to use the sleep mask (Walmart) to blindfold themselves, place the top of the plastic spoon in their mouth and see how many cotton balls they could dish out of the round box and place in the lid in two minutes. Points were given for each cotton ball that made it to the lid.
Three rounds of Bingo were played with scores of 3 points for the first bingo, 2 points for the second bingo(s), 1 point(s) for the third bingo(s).
Family Feud was scored as per the game cards.
I kept a running list of scores and then the person with the lowest score got to choose from the first white elephant gift, then up the line to the top score with each person able to keep or steal.
Here are some close ups just for fun:


Recipe for a hot chocolate holder:
- Pacific Point, 8 1/2 X 5 1/2 Scored lightly at 4 1/4 and then diagonally from 1 3/4 at top to 2 1/2 at side. The front is stamped randomly with the tiny snowflake stamp from the Snowflake Wishes stamp set in Whisper White. Use tear and tape to glue the diagonal to the inside and to glue the bottom and side of the holder.
- Bottom Strip: Snowflake Splendor Designer Series Paper, 1 1/2 X 4 1/4.
- Whisper White: 5 1/2 X 4 1/4, die cut three snowflakes from So Many Snowflakes Dies. Stamp in Pacific Point ink the outer ring of the greeting with the Warm Hugs stamp set as well as the greeting from the Warm Hugs set. They are both die cut with the Warm Wraps Dies and glued together. The coffee mug can be stamped right through the circle, stamped again to color the mug and then the steam is stamped in smoky slate.
- Small Rhinestones were added to the center of the snowflakes and two on the greeting.
- Insert bow wrapped candy cane and hot chocolate. The ribbon I used is retired.
My darling Paul made all of the hot chocolate holders after I gave him a prototype so I could make snowmen popcorn holders. Thank you, my love.
Look at the different plaids on these snowmen!

I loved choosing scarf and hat band colors from the exceptional, gorgeous, amazing Plaid Tidings 6 X 6 paper. The paper will be retiring on January 4. It is in the mini on page 57 and is $11.50 for 48 sheets. Item #153527.
Recipe:
- Base: Whisper White, 5 1/2 X 8 1/2, scored at 2 1/8 and 6 1/4. Check your popcorn before scoring!
- Nose: Pumpkin Pie, one petal of the Large Daisy Punch
- Eyes: Stamp directly on base with the largest of the Sweetest Time holly berries. Use a sticky note and punch two circles and you can have perfect alignment each time and no masking:

 It looks like you were trying to make an eyebrow and not doing too well.
No, Sal, that is just the other two berries on the holly berry stamp. I chose that stamp because it has the little white semicircle to add twinkle to the eye. I usually use my white marker but this looked better and saved an extra step. I found that if I started with the eyes I could line the sticky note up exactly where I wanted the hat brim which helped me glue the brim on straight. The top of the hat then lined up perfectly at the back on the white base so I could glue it on quickly. Back to the recipe:
- Mouth, Black Marker and a 2 1/2 inch circle template to draw around. Be careful and replace it once in a while or the black ink will build up and get ink on your snowman. Yep- found that out the hard way!
- Hat Brim: Basic Black, 4 1/2 X 1 1/2
- Hat Top: Basic Black, 2 3/4 X 3, this gives you 7/8 inch on each side of brim
- Hat Band: Plaid Tidings Designer Series Paper (DSP), 1/2 X 2 3/4
- Scarf: Matching Plaid Tidings DSP, 5/8 X 5 1/2 (X2), make little cuts at the ends for fringe
- Back: Matching Plaid Tidings DSP, 1 X 5 1/2, Note- put adhesive on the white base on the right hand fold, attach the strip, place adhesive on the left hand side of whisper white base and then place popcorn in the holder and fold the right over the left. I found the popcorn bags weren’t all consistently filled so I had to flatten them as best I could before putting them in their holder. This one got an extra little strip because my glue went outside the band. I also had to glue a matching strip over the back of the scarf since I ran my glue clear to the end of the scarf.

If you just add a couple glue dots to hold the popcorn bag, the recipient shouldn’t have to ruin the holder and it can be regifted.
but I like it with extra matching DSP on the back of the scarf.
It does match nicely and if you have the time it is great! If you are scrambling three days before a party-maybe not an option, but definitely better than trying to get the glue off the back of the scarf! Where’s your snowman, Sal?
Yes, but I will have to get you one of the face masks the ladies made!
Dove Ornament and Gift Box
My goal is to be consistent with ‘Take A Break Tuesday’ facebook live at 9:30 on the second Tuesday of each month. Check it out-


Mini Paper Pumpkin Gift Box:
Recipe:
- Mini Paper Pumpkin Box from Annual Catalog page 152, #153069, $7.50 for 10
- Mats (border) for box: Copper Foil Sheet, Top= 3 5/8 X 5 3/8, Short Side= 7/8 X 3 5/8 (X2), Long Side=7/8 X 5 5/8 (X2)
- Designer Series Paper: Brightly Gleaming, Top=3 1/2 X 5 1/4, Short Side= 3/4 X 3 1/2 (X2), Long Side=3/4 X 5 1/2 (X2)
- Greeting on Box Top: Whisper White, 4 3/4 X 3 1/2, Die cut with Celebration Labels Dies, third largest
- Inside Heart: Whisper White, 3 X 3, punched with heart punch or die
- Memento Black Ink, Old Olive Ink and a sponge dauber

I cut out the copper layer for the inside of the box from the copper rectangle mat we used on the top and die cut it with the third largest Celebration die. I also cut out the Designer Series Paper for the inside using the 4th largest Celebration die and the rectangle I cut for the top of the box. No need to waste that beautiful paper that will be hidden by the Whisper White top layer!
If you still have some of the retired copper embossing powder from the previous catalog you could emboss the “peace, love, joy” and the inside greeting in copper for a nice touch!
Dove Ornament
I found this ornament on Pinterest made by Andrea Sargent of Valley Inspiration with Andrea. Thank you, Andrea!
Recipe:
- Dove: Whisper White, 3 3/4 X 5 1/2, die cut two detailed wings and one body
- Dove: Vellum, 3 3/4 X 5 1/2, die cut two plain wings, one body and one of the small plain tail pieces
- Olive Branch: Old Olive, 1 1/2 X 1 1/2, die cut with small olive branch die
- Gold Hoop: Page 156 of Annual Catalog
- Gold Cording: 11″, page 31 of the Mini Catalog
- Glue dots, Tombow liquid glue and mini dimensionals. The vellum is glued to the whisper white with liquid glue in just the areas that are solid, the peace branch is glued to the beak with liquid glue, the wings are then mounted with mini dimensionals to the body and the dove is then attached to the hoop with glue dots at the tail, the branch and the front wing only, making sure the glue dots are stretched and rolled to not have any excess between the dove and the hoop.
- Fold the gold cording in half and loop it over the hoop and then tie it in a knot at the top, cutting off the excess.
 And with Christmas only 16 days away, do you think anyone will make any of these?
Sal, these would all be perfect for Christmas craft fairs next year and those projects must be started months ahead of time. Consider me ahead of things instead of a procrastinator!
I know.
Have a wonderful day ladies and click on over to the online store where you can see what products from the mini are on sale and which are discounted – some 50%!
The Clearance Rack has also been refreshed with new products so check those out. They go quickly!
December hostess code is: F3ZE2UD2
SAL, Sing A Lot of Christmas carols
Karen
Happy Thanksgiving!

Happy Thanksgiving Dear Stamping Friends! I am blessed to know each and everyone of you!
Love,
Karen
Curvy Christmas Card
Hello Stampin’ Friends:
I created this month’s swap card combining the Curvy Die with a greeting from the Curvy Christmas Stamp set and using the Plush Poinsettia Specialty Paper and Poinsettia Dies:
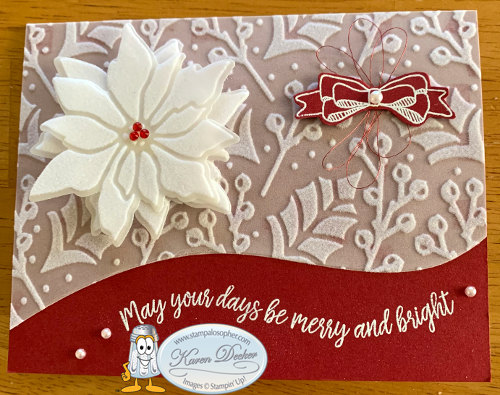
With the Curvy Dies, I could either turn the die to create little dots all the way across or use the edge with no dots. I chose no dots since the paper was embellished enough. The Poinsettia Die cut out plush poinsettias from the designer paper and all the poinsettias on the DSP are the same size so I could have enough die cuts to layer two poinsettias.
Recipe:
Supplies:
- Curvy Christmas Stamp Set for the greeting and the bow
- Curvy Dies
- Plush Poinsettia Specialty Paper
- Poinsettia Dies
- Wrapped In Christmas Stamp Set for inside greeting
- Cherry Cobbler Ink for inside greeting
- Red Rhinestone Basic Jewels and Pearl Basic Jewels
- White embossing powder and Versa Mark
- Heat tool
- Specialty Vellum Adhesive or glue dots and regular adhesives
Cuts:
- Base: Whisper White, 8 1/2 X 5 1/2, scored at 4 1/4
- Layer 1- make 2: Cherry Cobbler, 5 1/2 X 4 1/4
- DSP: Plush Poinsettia 5 1/2 X 4 1/4 cut with the Curvy Die to leave red base 1/2″ on the left side and 1 3/4″ on the right side from the bottom.
- Two Plush Poinsettias cut out from the DSP with the Poinsettia die
- Bow: Cherry Cobbler, 1 X 2 embossed with versa mark ink and white embossing powder, with red thread (retired) swirled underneath the bow
- Inside Layer: Whisper White, 5 X 3 3/4
- Inside Strip: Cherry Cobbler 4 X 1 with 4 X 3/4 layer of the plush DSP
A reasonable question, Sal. With the inside of the card having a full white base section at the top, you have room to write a long Christmas note. Writing on the dark Cherry Cobbler is hard to read. I think it brightens up the card as well and I love the extra weight that layers add to a card so it is not as flimsy. Necessary? Not at all.
SAL, Share A Lot
Karen
Snowman Theater Card
Hello Stamping Friends,
Thank you to all who patiently watched the Tuesday Facebook Live that had about 4 technical glitches. Sigh….. I did subscribe to some new streaming software so next Tuesday will rock!
There are two videos since it didn’t refresh after one of the crashes. Also, the videos wouldn’t go to full screen so when you view the videos there is an extra screen in the background. Look below that screen for the scrolling bar so you can scroll past the parts where I am battling the software.
But this is your tenth video shouldn’t it be getting better and easier?!
Good point, but every time Facebook changes something I have to figure out how to do what I used to do or perhaps I click on something new and mess things up! Who knows!
Video 1:

Video 2:
 .
. Let’s take a look at still pictures in case the video made you dizzy!
This is how your recipients will see the card out of the envelope-curtains closed:
 .
. Drum roll for the snowman – don’t you wish we could make him sing!
 .
.
I refer to the mechanism as a “C Fold”:
 .
. And I called the strips on the back of the front – suspenders! The curtains of your mechanism slide through the suspenders.

The back of the card with room to sign your name:

A close up of the curtain and the background trees before we add the snowman:
 .
.
Mr. Snowman up close:

Note the slots on the sides where you will insert the I-beam:
 .
.  .
. The I-beam is folded like this on only one side to slide through the slot. It is then opened up to make a stop:

The Blue Version:
 .
. I will include this picture because it shows one of the beautiful So Many Snowflakes Dies cut once with the solid color and then again with the Designer Series Paper:
 .
. Recipe:
Supplies:
- Snowflake Wishes Stamp Set (bundle with the dies for 10% savings)
- So Many Snowflakes Dies, page 37 of the mini
- Snowflake Splendor Designer Series Paper (DSP) page 37 of the mini
- Winter Snow Embossing Folder for the curtains, page 37 of the mini
- Rectangle Stitched Die, 4th largest
- Smallest of the stitched shapes circle or a 1 3/8 inch circle punch for the finger holes
- Blue Adhesive Backed Gems, page 37 of the mini
- Word Wishes Dies for Merry Christmas, page 183 of the Annual Catalog
- Snowman Builder Punch, page 167 of the Annual Catalog
- Pine Tree Punch, page 166 of the Annual Catalog
- Garden Gateway Dies for the little red bird, page 181 of the Annual Catalog
- Coastal Cabana Ink and sponge dauber, Whisper White ink
- Stampin’ Blends: Dark Pumpkin Pie, Dark Basic Black, Dark Soft Suede
- Snowflake Sequins, page 64 of the mini catalog
- Pearl or Rhinestone jewels colored black with Stampin’ Blend
- Fine Tip Glue to cover the snowman and then glitter if you like
Cuts:
- Base: Coastal Cabana, 81/4 X 11; cut 1/4″ off a full 8 1/2 X 11 sheet then cut that sheet at 5 1/2 and 4 1/4. You will have( two) 5 1/2 X 4 1/4 pieces for the front and back and (two) 5 1/2 X 4 pieces for the C-fold mechanism.
- Score the two 5 1/2 X 4 pieces at 1 1/4 and 2 3/4 on the long side then burnish your folds to make a C – fold.
- I-Beam: Coastal Cabana, 1 1/4 X 4 1/4; Place horizontally at the 1/2″ line on the Stampin’ Trimmer and make a 1/4″ long cut down from the top and 1/4″ cut up from bottom. Turn and do the other end. Then lay the I-Beam vertically on the Stampin’ Trimmer at the 1/4″ line and cut from 1/2″ to 3 3/4″. Repeat on the other side.
- Suspenders: Coastal Cabana, 5 3/4 X 5/8 scored 3/4 inch on each side; these are glued to the back of the front on each side as shown above
- Front: DSP, color A, 5 1/2 X 4 1/4
- Back of Stage: DSP, color B, 2 7/8 X 4 1/4
- Back sides of Stage, glued over the mechanism: DSP color B (make 2), 1 1/4 X 4 1/4
- Sides of Stage: DSP, color B, (make 2) 1 1/2 X 4, glue on mechanism before cutting I-Beam slots
- I-Beam Strip: DSP color B, 3 1/4 X 3/4
- Greeting Frame: DSP color A, 4 1/2 X 2 3/4, corner rounded on top right and bottom left
- Inside of the Greeting Frame: DSP color B, 4 X 2 1/4
- Merry Christmas Die Cuts: Whisper White, 4 1/2 X 1 1/4, use slightly smaller adhesive sheet backing before cutting. You could also use the cut our from the front rectangle.
- Optional curtain: color as desired; 4 X 2 3/4 embossed with Winter Snow Embossing Folder. I embossed the long portion of the mechanism C-fold with the Winter Snow Embossing folder and then drug the Whisper White ink across the snowflakes for contrast
Glue the front base and the front DSP, color A, together, placing liquid glue only on the outer edge. Do not get glue on the inside. (They should be the same size 5 1/2 X 4 1/4). Place the 4th largest rectangle stitched die 3/4″ from each edge and cut. The cut out is 2 3/4″ X 4″ Use the DSP cut out to punch three trees for the background with the Pine Tree punch:

If you prefer the words to match the base, cut a piece of double back adhesive sheet (page 162 of the Annual Catalog) just a little bit smaller than the rectangle cut out – 2 1/2 X 3 3/4 and glue to the rectangle stitched Coastal Cabana you just cut out. Then place the Merry Christmas dies from Word Wishes dies on the other side of the Coastal Cabana and cut.
For the side slits for placement of the I Beam: First glue the DSP stage sides on the middle section of each mechanism. Stand the mechanisms up in their C shape so that you see the smallest side is to the back, the middle faces inward, and the curtain goes to the front. Scroll back up to the picture that shows the C Fold. This is important so you make both slits at the bottom of the stage. Place the long curtain portion at the 3 1/2″ mark on your Stampin’ Trimmer. Double check that your mechanism’s score lines are at the 3/4″ mark to the right and 3/4″ mark to the left of the middle section where you are cutting. Start your cut up 1/2″ from the bottom of the mechanism and cut 1″. Now carefully move the piece 1/16 of an inch to the left and cut again 1/2″ from the bottom, cutting up 1″. Use your scissors to cut the little 1/16 portions out to make a nice slit.
The video next Tuesday will be a theater card with the Peaceful Nativity silhouettes. I will show the construction of the I-Beam and the I-Beam slits in that video. A picture is worth a thousand words and I think I just gave you enough of both! I hope you will make many versions of this card. It is really fun!
Here is the Nativity version of the Theater card:

It uses the ‘Brightly Gleaming Designer Series Paper’ and copper foil cut outs with the ‘Nativity Dies’. You do not make an I beam for this card so that you can see the palm trees and sheep on one side and the palm tree and donkey on the other. The theater curtains are embossed with the ‘Dainty Diamonds’ embossing folder and then versa mark is rubbed across the panels and copper embossing powder applied and heated.

Our hostess code is : BX2TBPDE with Cindy as our hostess.
Join me on my Facebook page at 9:30 AM for Take A Break Tuesday, the second Tuesday of each month! Facebook.com/stampalosopher/videos
SAL, (Sharing A Lot)
Karen
Have A Hoot Fall Card
Hello Stamping Friends,
Remember to click once to open your email and then click on the heading to open the blog post.
The ‘Have A Hoot’ stamp set is so cute!

For today’s card, I paired that set with the ‘Gather Together’ set with its awesome greeting- smiles & love for the season– yes, please.
At ‘Take A Break Tuesday’, I introduced the card and did a little advertising for the 15% off DSP sale and for my Color Cards that I am getting ready to make for a customer. At about the 16 minute mark the internet crashed.
Here is the intro:

It stopped right where I was adding a garland at the top of the Pumpkin Pie layer using the Ornamental Envelopes stamp set. So it is time for words: After stamping the garland in the middle, then the right and left sides, I used a Rich Razzleberry Stampin’ Marker to add little tiny berries to the garland. There is a stamp in the Ornamental Envelopes set with berries, but it is best used with the large leaf garland in the set.
The greeting and the two little pumpkins behind the smiling pumpkin are from the ‘Gather Together’ set which can also be bundled with ‘Gathered Leaves Dies’ for a 10% savings (and a die to cut out those two pumpkins among others).
For the inside I used the pumpkin stamp in ‘Celebration Tidings’ which can be bundled with ‘Celebration Labels Dies’ for a 10% savings. This set also has that unique little heart!
 .
. Silly camera! This is the same Basic Gray base, same lighting, same time of day and yet this one looks like it has a purple base. Sigh….. the base is Basic Gray.
Recipe:
- Have A Hoot stamp set with Peek-A-Hoot Dies (page 62 of the Mini)
- Ornamental Envelopes stamp set (page 40 of the Mini)
- Celebration Tidings & Celebration Labels Dies for the heart and inside (page 58 of Mini)
- Gather Together with Gathered Leaves Dies for the pair of pumpkins and greeting (page 47 of the Mini)
- Stitched Shapes Circle Die & Rectangle Stitched Die
- Inks: Early Espresso, Memento Black, Rich Razzelberry, Smoky Slate-for sponging edges
- Stampin’ Write Rich Razzleberry Marker
- Stampin’ Blends: Mango Melody, Soft Suede, Pumpkin Pie, Smoky Slate
- Base: Basic Gray, 5 1/2 X 8 1/2 scored at 4 1/4
- Layer 1 (X2) : Cherry Cobbler, 5 3/8 X 4 1/8
- Layer 2 (X2) : Pumpkin Pie, 5 1/4 X 4
- Layer 3: Plaid Designer Series Paper (DSP), 1 3/4 X 5 1/4
- Inside Strip: Plaid DSP, 5 1/4 X 3/8
- Card stock for stamped Images: Whisper White, 5 1/2 X 4 1/4, Stamp and die cut the owl in the tree, the owl behind the pumpkin, the greeting and the pair of pumpkins. The pair of pumpkins is glued direct to paper and the three other images are popped up
- Ribbon: 6″ of the Early Espresso Faux Suede (page 161 of the Annual Catalog-AC)
- Embellishments: Gilded Gems X 3 (page 157 of AC)
Tip: When you use your Stampin’ Blends on very small areas like the tree trunk, just dot with the small tip, don’t try to color. The dots bleed together and you have less chance of coloring outside the lines- though we do have the Color Lifter Stampin’ Blend if you need to fix it. To make your Blends last longer, don’t use them like a color crayon with pressure on the point; they blend with very little pressure and your tips will last longer.
I sponged the edge of the circle and the edge of the greeting with Smoky Slate ink first and then Rich Razzleberry with both sponge daubers inked and then stamped off on the grid sheet before sponging- we call this second generation stamping or stamping off, sponging in this case. While designing the card, I sponged a practice circle with Smoky Slate first but that didn’t look cheerful so I sponged a different area with Rich Razzleberry but that was too purple. I noticed that where the two overlapped on my practice sheet, the color looked perfect!
Don’t overlook the Gilded Gems in the catalog! They are faceted and just beautiful. The catalog, page 157, doesn’t do them justice. This picture shows the larger gem as well as the sponging mix of colors.
 .
. The faux suede ribbon is another product that the catalog, page 161, just doesn’t show the ribbon’s beauty.

Did you know you can look at previous catalog pdfs, clear back to the 2014-2015 annual catalog? That is the year I started blogging. When you see a reference to a page in a catalog, just look at the date of the post and then you can go to the catalog tab and find the catalog with the same timeframe as the post and view the product.
Last but not least, I need your order by November 1 if you would like a set of Color Cards. The set consists of 12 cards with one card for each of the color families including neutrals, one card for each of the In Colors, and a card comparing greens, comparing reds & pinks, comparing blues & grays, comparing oranges & yellows, and a card comparing purples and browns. I spotlight them in the video if you would like a better look. The cost is $1per card ($12) plus shipping. Email me at [email protected].

What a great tool the color charts are to help choose colors to match DSPs like the plaids!
They are predicting snow on Sunday here in Castle Rock! We finally stayed home and worked on the yard, cleaned out the garden and fertilized. It is looking so beautiful!
 .
. 
 .
.  .
.
Thanks for joining and giving me some of your precious time! I hope I have brought a “pinch of creativity to spice up your crafting world” and helped you know me better as I let you have a peek into my world!
Sal, So A-Loving this season and my fellow crafters
Karen
Sights & Sounds of the Season
Hello Stamping Friends,
If you are viewing this post in your mobile device, click to open the email and then click again on the header to go to the website so the videos and links work.
Joy is our hostess this month and the hostess code is: 9YGY2BAX
We made a spur of the moment trip to Estes Park last weekend and it was so worth it, even though I am now far behind on my to do list.

The fall colors were exceptional and there had been a river site cancellation at Manor RV park just minutes before we called! Saturday was picture perfect!
 Did you put a pumpkin outside Jasper to decorate?
That would have been fun, Sal, but the neighboring RV had plenty of decorations to enjoy. (By the way, Sal is referring to Jasper, our motorhome, it’s a Jamboree, so of course, being a Stampin’ Up! demonstrator, we needed to have alliteration in the name just like all our Stampin’ Up! colors). Here’s Paul and Jasper on the river site.

So let’s get down to business!
 If we must…. sigh…
Yes, we must! Select Designer Series Papers are on sale- click on the image to view:

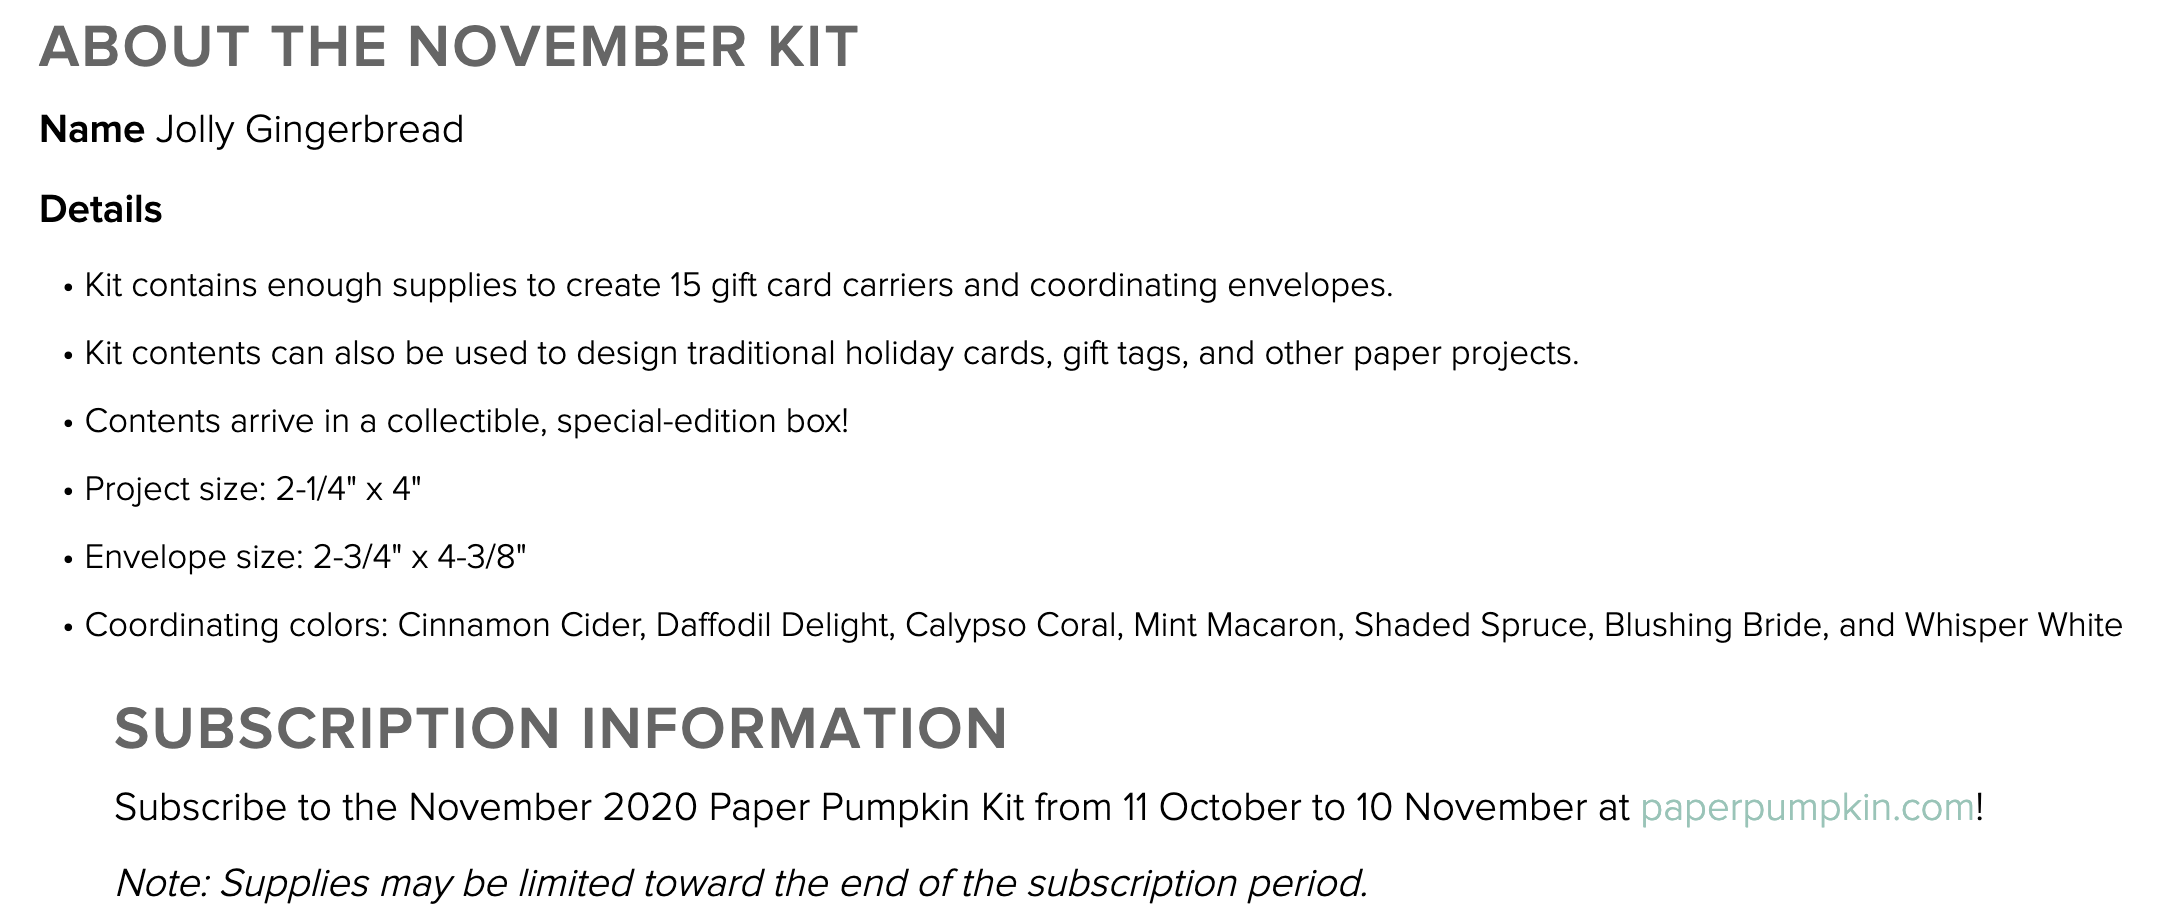
And we have a sneak peak of the November Paper Pumpkin- I see a gingerbread house stamp, I hope, and what looks like a house we can decorate and candies…. oh my!
Click on the Jolly Gingerbread image to join or visit page 71 of the Holiday catalog to get a prepaid subscription with the benefit of adding other supplies from your wish list! Use hostess code: 9YGY2BAX and our current hostess, Joy, will be on her way to earning free products.


Last year the Paper Pumpkin had tags and I made cards out of all the tags, click to view that post, and I have heard the sales of gift cards are expected to go up this year! I am certainly running out of ideas and may send a few myself.
FYI: There is a “Joy to the World” Facebook page for those of you who purchased October’s kit.
Event notice: If my kit arrives I will have a ‘Take A Break Tuesday’ Facebook Live next Tuesday, October 20, 9:30AM to look at the October Joy To The World kit and create cards.
Should I change my pumpkin to a snowman?
Oh no, Sal, not yet! But we do want to get a head start on Christmas Cards, so today’s post includes two cards representing Sights and Sounds of the Season. We love looking at poinsettias and hearing the silver bells!
Click here to view the Facebook Live:

Cherish The Season


This layout started with the picture in The Mini Catalog, page 33.
Recipe:
- ‘Cherish The Season’ stamp set
- ‘Sounds of the Season’ dies
- ‘Garden Gateway’ Dies for arch
- ‘Peony’ Dies Border
- ‘Toile Christmas’ stamp set for the greeting
- ‘Christmas Cardinal Dies’ to cut the banner
- Real Red Sheer Ribbon 10″
- Rhinestone Basic Jewels, 3 small, one large
- Inks: Garden Green, Versa Mark, Cherry Cobbler
- Clear Embossing Powder
- Base: Real Red, 4 1/4 X 11 scored at 5 1/2
- Front Sides: Designer Series Paper: Tis The Season, 1 X 5 1/2 (make 2)
- Middle Layer Background: Red Foil, 2 1/2 X 5 1/2
- Swag Base: Whisper White, 2 1/8 X 5 1/2; Die cut the top with the arch from Garden Gateway Dies, and die cut the bottom with the Peony edge die
- Pine Boughs: Garden Green, 1 1/2 X 6; Make 4 little and 4 large boughs
- Bells: Silver Foil, 2 1/4 X 4 1/2 Make one set of four bells and and an extra little bell for the inside; cut the 4 strips (all on one die) for the front four. Use Scotch Tape on the back of the two bells you will color before die cutting and then another piece after cutting. Color the holly leaves with Dk Shaded Spruce Stampin’ Blends and the berries with Lt Cherry Cobbler Stampin’ Blends – color twice for depth of color.

- Front Greeting: Whisper White, 4 1/4 X 1 1/4; stamp Christmas Wishes from Toile Christmas, first in Versa Mark and then in Cherry Cobbler. Sprinkle with clear embossing powder, then heat and cut it out with the Cardinal Die Set. Tip: with clear embossing powder, you have the ability to emboss in any ink color you have.
- Inside Layer: Whisper White, 3 3/4 X 5
- Strip on Inside: Tis the Season DSP, 1/2 X 5
- Stamp set for inside: For Unto Us stamped in Garden Green
In the video, I use Shaded Spruce for the back of the swag instead of the red foil, and I had another card made with Garden Green. Which color do you like the best?
I vote for the Red Foil but I like the greens as well and that would be cheaper!
Poinsettia Petals


Layout cased from Vincenza Montereale on Demonstrator Planning Place.
Recipe:
- ‘Poinsettia’ Dies
- ‘Poinsettia Petals’ stamp set
- ‘Ornate Layers’ Dies
- ‘Stitched Rectangles’ Dies
- Beaded Pearls
- Shimmer Paint
- Stampin’ Spritzer
- Ink: Balmy Blue, Versa Mark and White Embossing Powder
- Base: Thick Whisper White, 8 1/2 X 5 1/2, scored at 4 1/4
- Large Ornate Layer: Balmy Blue, 4 1/4 X 5 1/2
- Flocked Vellum Specialty Paper Layer: 5 X 3 5/8, cut with the 2nd largest stitched rectangle die
- Small Ornate Layer: Balmy Blue, 5 X 3 1/2 , cut both the ornate layer and the center cut out at the same time using the 3rd smallest rectangle die
- Blue Sprigs X2: Use Balmy Blue rectangle cut out from the previous step
- Poinsettia and white sprigs: Whisper White, 5 1/2 X 6 1/4; make two each of the medium poinsettia and two each of the medium large poinsettia and cut three sprigs in white
- Small poinsettia and the Leaf: Balmy Blue Glimmer Paper, 2 1/4 X 2 1/4, Die cut one small leaf and two small flowers.
- Inside Layer: Balmy Blue, 4 X 5 1/4
- Strip: Balmy Blue Glimmer Paper, 3/4 X 4
Thank you for spending some time with me here on the blog and thank you to those who created their club cards with a Facebook Live instead of meeting here at home. The positive side is that there is no waiting as we share the tools, so we accomplished in two hours what normally takes four hours at the house.
Would you like to be part of club? You can pay $5 for the club cards and be our guest! We swap with each other, those who can, and we meet by Zoom on the last Tuesday of the month to share our swap cards, visit with each other and do a Mystery Card challenge.
I would be honored to be your demonstrator and support you however I can as I bring “a pinch of creativity to spice up your crafting world!”
That’s the part where I came in!
So true and let us all be SALs in this crazy world bringing Salt And Light to everyone we meet!
Virtual Hugs,
Karen
Click on Sal in the computer to go to the online shop and be sure and use the hostess code 9YGY2BAX if your order is under $150 (at $150 you earn the hostess dollars yourself).
For The Love of Fall
Hello Stamping Friends,
I do so love fall! However, I would really like fall to come before winter, yet yesterday and today we have had snow here in Castle Rock, CO, so it looks like winter.
Maybe it is all those Christmas cards you are making that brought on winter.
Now Sal, let’s just call it coincidence and Colorado’s unpredictable weather, okay?
We have two fall cards for you today and a Facebook Live video if you prefer videos over words, though the recipes follow.


Someday I will teach Sal to push the ‘Go Live’ and ‘Start Streaming’ buttons so I can look at the camera. I have heard there is a way to edit the Facebook Lives and delete the first part so that is a skill I need to learn.
Before I post the recipes for the cards let’s take a moment to look at the Stampin’ Up! news for the month:
The Stampin’ Cut and Emboss machine is available for purchase!
Stampin’ Cut & Emboss Machine
This machine has a wide 6″ (15.2 cm) platform that works with all Stampin’ Up! dies and embossing folders. Includes 1 Base Plate (Plate 1), 1 Die Plate (Plate 2), 2 Cutting Plates (Plate 3), and 1 Specialty Plate (Plate 4). #149653, $120.
Here are four videos (less than two minutes each) to show you the details of the new machine:


Magnetic Cutting Plate
Thin, fully magnetic sheet with self-healing cutting surface. Magnetic Cutting Plate (Plate 5) holds dies securely in place, even nested dies. This slim, portable sheet replaces a Cutting Plate in your sandwich, making it even easier to take with you. Use with the Stampin’ Cut & Emboss Machine. #149656 $24
What a beautiful machine! The mini version of the machine is not available yet, but we hope soon. All the plates are available to purchase separately and the specialty plate works with our 3D embossing folders just like the blue plate we had in the past.
Paper Pumpkin for September- You must subscribe by tomorrow! Click on the image:

Name: Hello Pumpkin
Details:
- Kit contains enough supplies to create 20 cracker box treat packages.
- Each cracker box treat package can be customized to celebrate Halloween, Thanksgiving, the autumn season, or all three!
- Coordinating Colors: Bumblebee, Basic Black, Cajun Craze, Cinnamon Cider, Mossy Meadow, Old Olive, Pumpkin Pie, white
September’s kit is a must-have for those who love to celebrate all things spooky. But, for those who don’t enjoy the Halloween haunts, the multi-occasion stamp set combined with a variety of die-cut and reversible paper pieces offers many ways to customize your fall crafts!
The Hello Pumpkin Paper Pumpkin Kit includes enough supplies to create projects celebrating Halloween, Thanksgiving, and the autumn season. Make them all the same, or mix ‘n’ match!
While this kit was designed to offer a unique treat packaging experience to subscribers, the supplies can easily be used to create cards for any autumn occasion. Don’t worry—we’ll be sure to provide plenty of project inspiration to spark your creativity!
The Clearance Rack has been restocked:

Join our team of “Carin’ Crafters” and get more products!
- In addition to the regular starter kit (for $99 USD/$135 CAD, new recruits choose $125 USD/$165 CAD-worth of products) new recruit will also receive enough cardstock pieces to make 16 cards, a pack of Rhinestone Basic Jewels, the So Much Love stamp set, and the Queen Anne’s Lace stamp set—all for their first event.

There is so much going on in September, and I just attended Leader’s Summit so I have lots of ideas to make being a part of the team fun. I would love to have you JOIN NOW!
I want to see how you made that cool pumpkin!
Good plan, let’s get started with my favorite part – teaching!
Simply Thankful
I am casing a card that Rosanne Mulhern of Heartfelt Stampin’ made last year but changing the products to current products and using the Mini Curvy Keepsakes dies to make a pumpkin instead of the Apple Builder punch she used.

- Stamp Set: Country Home
- Punches: Medium Daisy Punch, 3/8″ Circle Punch for the Black Eyed Susan
Dies:
- Mini Curvy Keepsakes Box Dies for the pumpkin and its stem
- Gathered Leaves Dies for the five leaves in different colors
- Banner Blooms Dies for the pumpkin vine
- Forever Flourishing Dies for the little crumb cake accents
- Rectangle Stitched Dies
Did you enter a challenge to see how many dies you could use on one card?
No, I am just stepping out of my comfort zone to make a collage type card. Wait ’til you see the wreath collage I made with the Forever Flourishing dies. Next post!
Recipe for Simply Thankful:
- Base: Basic Black, 5 1/2 X 8 1/2 scored at 4 1/4.
- Barnwood Layer: In Good Taste Designer Series Paper (DSP), 4 X 5 1/4.
- Black Layer: 3 1/2 X 4 3/4 cut with the Rectangle Stitched Die; TIP: use wax paper between the die and the cardstock. Emboss the greeting in white slightly to the right and then use Black Stampin Dimensionals to adhere.
- Pumpkin: Pumpkin Pie Cardstock 2 1/4 X 2, make 2 with the Mini Curvy Keepsakes Die using just the handle section not the slot section of the die. Before trimming down to size and making the bottom and top circular, lay one section 1/4″ over top of the second section and score a line following the curve of the section. Repeat on the other side. Score the line, color it with a Pumpkin Pie Marker and then sponge it. Do the same on the second section if you want to choose between the two sections for which one looks best for the top. Cut the bottom and top of each section to shape the pumpkin. Sponge all the edges of both sections and down the middle of the top section. Cut one section in half and glue each half behind the front section.
- Pumpkin Stem: Cinnamon Cider, 2 X 7/8, Cut with the handle of the Die. (This can be run at the same time as the pumpkin sections.) Cut in half, trim off excess and use a crumb cake marker to add a few lines.

- Pumpkin Vine: Garden Green, 1 X 2, make 2 with the Banner Blooms Dies.
- Medium Leaf: Cajun Craze, 2 X 2, the leaves are all cut with the Gathered Leaves Dies. Sponge the veins lightly and then the edges on all the leaves with their corresponding inks.
- Medium Leaf: Old Olive, 2 X 2, sponge
- Large Leaf: Daffodil Delight, 2 X 2, sponge
- Large Leaf: Merry Merlot, 2 X 2, sponge
- Small Leaf: Mango Melody, 1 1/2 X 1 1/2, sponge
- Black Eyed Susan: Mango Melody, 2 X 2 for each Medium Daisy Punch. You need six punched flowers so a 2 X 8 plus a 2 X 4 strip will work. Sponge the center with Mango Melody. Adhere two together with a glue dot.
- Inside of flowers: Early Espresso, 1 X 3, Punch with 3/8″ or 1/2″ circle punch. Adhere with a glue dot.
- Inside Layer: Mango Melody 4 X 5 1/4
- Bottom Strip on Inside: In Good Taste Designer Series Paper (DSP), 4 X 1/2.

Now the fun part of creating your collage! Start with the pieces on top of the pumpkin and work to the back. I used glue dots- lots of glue dots!
Other options for making a pumpkin are the Apple Builder Punch or using five circles or five ovals to layer together.
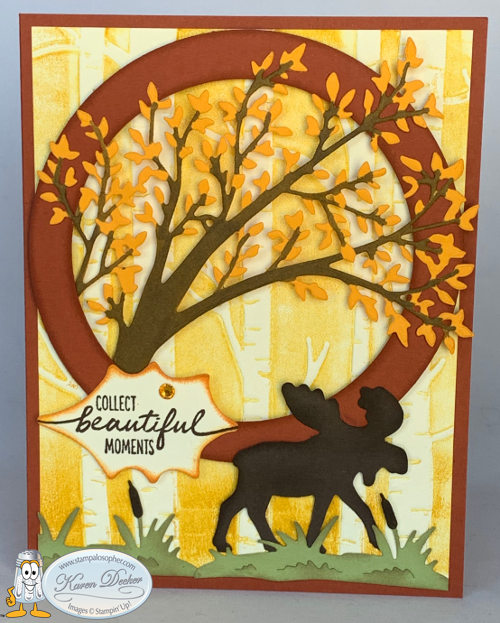
Beautiful Moments

- Stamp Set: Beautiful Moments
- Punch: Moose Punch
- Embossing Folder: Woodland
Dies:
- Circle Die for the frame
- Poinsettia Die for the oak leaf greeting
- Sweet Silhouettes Die for the tree
- Dockside Dies for the grass and cattails
Recipe for Beautiful Moments:
- Base: Cajun Craze, 5 1/2 X 8 1/2 scored at 4 1/4.
- Aspen Grove Layer: Very Vanilla, 4 X 5 1/4, Embossed with the Woodlands Folder after the folder is inked on the indent side with Crushed Curry. I turn the ink pad upside down and tap it on the folder.
- Tree: Mango Melody, 3 1/2 X 5, die cut with the Sweet Silhouette Tree Die. Tip: Use two folded up dryer sheets underneath your cardstock to make removing the little bits quite easy since they stick to the dryer sheet. The tree trunk and limbs are colored with the Dark Soft Suede Stampin’ Blend. The far left side of the tree has a limb that will need cut off so you can attach the trunk of the tree with a glue dot at the bottom left behind the circle frame. (I glued that little branch in the inside of the card as you see above.) Adjust the tree so that all the leaves will be inside the card borders. When you are completely done, place a small amount of Tombow glue on the silicon sheet and use a toothpick to add bits of glue to the leaves to attach to the circle.
- Circle Frame: Cajun Craze 4 1/2 X 4 1/2, Die cut with two layered circle dies to create the frame. Sponge the inside and outside of the frame with Cajun Craze and mount the tree at the bottom left behind the circle. Use Stampin’ Dimensionals to pop up the frame. You will need a dimensional at the thickest part of the trunk of the tree.
- Green grass and cattails: Pear Pizzaz, 2 1/2 X 3; die cut two grass sections from the Dockside Die. Color the cattails with Early Espresso and sponge the grass with Crumb Cake to give it that end of the summer look.
- Moose: Early Espresso, 2 1/4 X 2, punched with the moose punch and sponged on the edges.
- Greeting: Very Vanilla, 2 1/4 X 1 1/2 , die cut with the leaf in the Poinsettia Dies. Stamp with the “collect beautiful moments” from the Beautiful Moments stamp set, sponge the edge with pumpkin pie, then add an orange rhinestone. Glue to the circle but add a tiny dimensional to the left edge to attach to the aspen grove layer.
- Inside: Very Vanilla, 4 X 5 1/4, the little tree limb is glued to the inside corner .
Did I forget anything, Sal?
I sure hope not or you will have so many instructions you will lose your audience.
Paul, my DH, looks at these and says “another Karen card”. I keep telling him someday I will learn to make clean and simple cards but I always want to challenge myself. He suggested I call them Carin’ Cards to reflect a Caring Karen. He got a kiss for that! So I decided our team should be called Carin’ Crafters for the caring and sharing card makers that we are and yet a bit of a spoof on Karen vs. Carin’. What do you think?
Take a look around the new shop! We have new software to make the shopping experience better. I will be back soon to post the swaps and mystery cards we made in August.
SAL, Sighing A Lot as summer leaves us
Karen
Hostess code for September: SA9YHAC3
Welcome to my blog!

Sal Window to Products


