Hello Stamping Friends,
I have great news! The Stitched Seasons Framelits Dies are in the Clearance Rack:
These framelits and a matching stamp set were offered in August for a limited time and I held a class for those who purchased the bundle.
Check out the previous post – HERE
Even though the stamp set is not available the shaped and stitched framelits are great and we have many flower and leaf stamps that will work with the framelits. Even the little bell framelit could be cut out and drawn and colored in without having the stamp set.
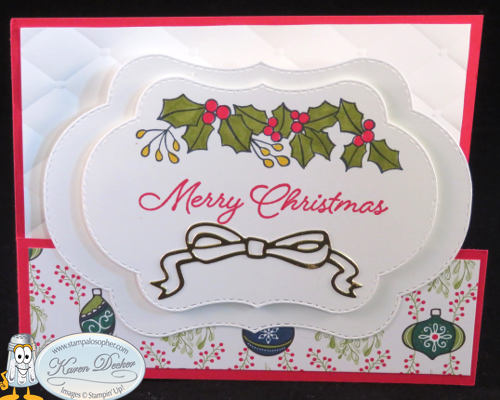
Christmas card: thanks to Tami White stampwithtami.com
- Card Base – Real Red 4 1/4″ X 11″ (the long way); don’t score until you cut. Line base up at 5 1/2″ and cut from top 2 1/2″ down then turn and cut 1 3/4″ over. Score the remainder at 5 1/2″.
- Inside – Whisper White 4″ X 5 1/4″ run through the Big Shot with the Tufted Embossing Folder
- Designer Series Paper – make 2 – 5 1/4″ X 1 1/2″
- Whisper White Frames: – Large 5 1/2″ X 4″, Medium 4 1/2″ X 3 1/2″ , Small 3 1/2″ X 3″
- Gold Foil Bow – 1 1/2″ X 3″
The large frame is glued directly to the front panel, then the medium frame is popped up on it. The small frame is popped up in the middle on the tufted layer. The inside greeting is from the Dashing Deer stamp set in the Holiday Catalog which carries over to the new year, YAY!
Spring Card: Thanks to Linda Cullen at craftystampin.com
- Card Base – Whisper White 5 1/2″ X 8 1/2″
- First Layer – Make 2 – Highland Heather 5 1/4″ X 4″ Use the Big Shot embossing mats(see page 221) to emboss the stitched image of the largest framelit for the outside layer
- Top Layer outside – Whisper White – Medium Framelit – 4 1/2″ X 3 1/2″
- Top Layer inside – Whisper White – 5 1/4″ X 4″ Cut out with largest framelit and add another fun cutout like the above Happy Birthday thinlit #143700 or the Pretty Label Punch #143715 stamped with the greeting from the Ribbon of Courage stamp set (page 114)
- Leaves – Granny Apple Green – 1 3/4″ X 3″
- Bow – 1/4″ mini striped Gorgeous Grape #146940 – 10″
- Glitter Enamel Dots #146934 (my new favorite embellishment!)
Fall Card: Thanks to Kay Kalthoff at stampingtoshare
This card uses designer series paper (DSP) in such a way that you see both sides of the paper. What a concept! You will want to remember these cuts when you have a DSP that you can’t decide which side to use because both sides are beautiful. Show off both sides like this!
- Base – Cajun Craze 5 1/4″ X 5 1/2″ Score the 5 1/4 side at 4 1/4″ making a 1″ flap
- DSP layer – Nature’s Poem DSP 4 1/4″ X 5 1/2″ Adhere under the 1″ flap
- Frame – Cajun Craze – Largest Framelit – 5 1/2″ X 4″
- Top Frame – Whisper White – Medium Framelit – 4 1/2″ X 3 1/2″
- Front DSP Strip – 3/4″ X 5 1/4″
- Inside Layer – Whisper White – 4″ X 5 1/4″
- Inside DSP Strip – 1/2″ X 5 1/4″
The leaves and spots were stamped in Soft Suede Ink and the spots were overstamped in Crushed Curry. The leaves were colored with water color pencils and then blended with an aqua painter. The outside of the framelit was sponged with Cajun Craze and glitter enamel dots were added for sparkle. A double bow of linen thread ( 20″) completed the card.
Do you see how the framelits are just about the best shape since the retired Top Note Die?!
I thought I had missed the chance to post these cards when I didn’t get it done in August but thankfully the framelits popped up in the Clearance Rack.
Our current hostess code is 6E7477K2 and if you buy $50 worth of product you can choose a free level 1 product or with $100 you receive a level 2 product!
SAL, Sing A Lot of Sale A Bration joy
Karen click on little SAL in the computer to go to the online store.


