Home » Posts tagged 'His Love Stamp Set'

Tag Archives: His Love Stamp Set

Joy Meadows June 2023 Shoebox Event & Get Well Card

.

What?!  Two posts in one week? Are you leaving again soon?

Not soon, Sal, but we are having a shoebox event next Tuesday with Christine as our hostess and it seemed wise not to get too far behind in my scrapbooking of cards!

Do you think anyone follows you anymore?

Well, Sal, on Facebook we call people who follow posts but never comment – stalkers- so maybe I have a few of those left.  I know I use the blog frequently for recipes and sometimes to remind myself that I can do this on those days when the mojo just isn’t there.

Enough of that – let’s look at this card and the fun products I used.  I saw the faith, hope, love die with daisies and said “That is my style”!  It is from inloveartshop.com

Hello?!  We lost you…

Oops, sorry, I went to verify the link and got lost looking at their site!  This die is currently still available for $4.99.  It is called ‘Inlovearts Sunflower with “Love, Faith, Hope” Word Cutting Dies’.

Recipe:

  • Base:  Daffodil Delight 5 1/2 X 8 1/2 scored at 4 1/4
  • Layer 1 (X2): Basic White 3 7/8 X 5 3/8, use Corner Rounder Punch on each corner
    • For the inside layer use Delicate Details stamp set for the bottom (it sort of matches the black die cut edges on front)
    • Use Thoughts & Prayers for the greeting
    • Use His Love for the praying hands
  • Layer 2: Basic Black 4 X 5 1/2, Place a dryer sheet under the paper and die cut with Ornate Layers Die
  • Words & Flowers:  Basic White 4 X 4 1/2 for 1 die cut – I used 3 for extra pop of the words
  • Daisies on Top:  Basic White 6 X 2, punch 3 daisies with small daisy punch
  • Middle of the flowers:  Daffodil Delight, 2 1/2 X 1, cut the three middles with the die in the set; note:  I left the die intact and did not separate the circles from the flowers
    • Use Places In The Heart stamp set for the little dots on the middles
    • Sponge the edges with Crushed Curry, a little heavy on one side
  • Embellish with the clear raindrop dots to look like morning dew

So you used the new die set and the ornate layers die and 4 stamp sets? 

And two punches, Sal, a corner punch and a small daisy punch.  What fun to not be tied to using just the current products.  I knew this day would come and I am loving it!  Now let’s look at what Joy had for us at her shoebox event; you will be thrilled!

This is called a Flying Seagull Fun Fold.  A video is at this link.

https://suestampfield.com/2023/02/flying-seagull-fun-fold-cards/#more-12186 

Joy’s second card is a Lattice Split Card!

.  

There is a tutorial by Brandy Cox here:

https://brandyscards.com/lattice-split-card-tutorial/

Lovely, Joy, your cards are prettier than the tutorials!  Thank you!

Does this bring a

pinch of creativity to spice up your crafting world!  

Have fun,

Karen


.


Thank You or Sympathy Cards

Hello Stamping Friends,

January’s Hostess Code:  UEEZKD2D  Use this if your order is under $150.  At $150 you receive the hostess rewards.

.    Lions and Dragons – Oh my!  (Dandelions and Dragonflies-tee hee)  

That image is a sneak peak of tomorrow’s Facebook Live to make January’s club cards.  Join me at 9:30 AM at:

http://www.facebook.com/stampalosopher/videos


Can I come?  

Not quite yet, Sal, I have a few more classes to watch to be able to have you join us.  Soon!!

Thank You Cards

Are you wishing you had a quick and simple card layout for thank you notes?   I have one from a Mystery Card Challenge in our Blended Stampers Group on Facebook.   I used it for my club Zoom Mystery Card challenge #8.

I used ‘Feels Like Frost’ Designer Series Paper with coordinating bases, the Stitched Nested Labels and Metallic Mesh Ribbon.

‘Love & Thanks to a Dear Friend’ is from the Prized Peony stamp set with an inside greeting of ‘Your sweet friendship refreshes the soul’ also from Prized Peony.  The ‘Thank You’ is from ‘Beautiful World’ using a Stampin’ Marker to color just the thank you of the stamp.  Note:  Always use a marker not a blend when coloring the back of a stamp since the blends are alcohol and would stain the stamp.

Here is a close up:

.

.

Now you can see the trick!  You score at halfway-5 1/2 , and again at 6 3/4.  Then you glue the 1 1/4″ section between the 5 1/2 and the 6 3/4 scores to the back half of the card.  Punch out little notches on this glued section and you have a unique placement for your ribbon.  I used the ‘Tailored Tag’ Punch.

Here are cards made by club members:

.

This was the Christmas card I made for the Blended Stampers group.  We could use all our left over Christmas paper and make this  year’s cards!!

Dreamer!!

For sure!

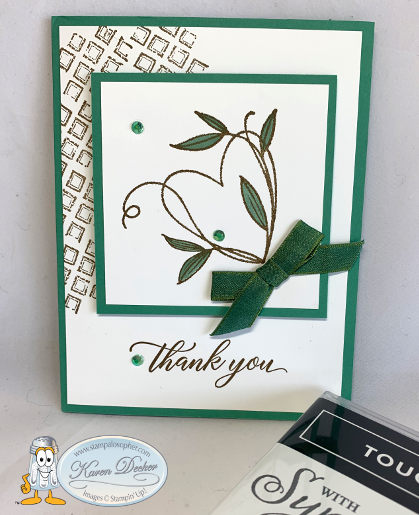
Did you overlook the beautiful ‘Touched My Heart’ hostess set in the back of the Annual Catalog?  I used it to make Sympathy and Thank You cards in December casing Dawn Michels’ post on Pinterest.

.

.  

The base is Just Jade and the brick background comes from Tasteful Touches.

Base:  Just Jade, 8 1/2 X 5 1/2  Scored at 4 1/4

First Layer (X2):  Whisper White, 5 1/4 X 4

Top Border:  Just Jade, 3 1/4 X 3 1/4

Top:  Whisper White, 3 X 3

Bow:  8″ of  3/8″ Old Olive/Pretty Peacock reversible ribbon

Stamp the heart, the bricks and the greetings in Soft Suede and color the leaves with Just Jade.

The inside greeting is from the set ‘Kindness and Compassion’ which is retired.

What……Breaking your own rule of not using retired products?  

Once in a while, what you want to say overrides the self imposed rule!

This was a swap card using ‘His Love’ stamp set.   I made it months ago and it has been sitting on my desktop waiting to be posted.  It seems a good place to post with these cards since it would be good for encouraging someone.

Base:  Mint Macaron,  4 1/4 X 11, Scored at 5 1/2

Layer 1:  Ornate Garden DSP in Mint Macaron with Gold Foil,  4 X 5 1/4

Layer 2: Mint Macaron,  3 X 4 1/2

Layer 3:  Whisper White, 2 3/4 X 4 1/4, Embossed with Dainty Diamonds Embossing Folder

Ribbon:  Pool Party Sheer 3/8″ Ribbon,  4″ to wrap the layer and 8″ to make a bow.

Medallion:  Die Cut with Tasteful Labels a Large Circle in Gold Foil, 2 1/4 X 2 1/4 needed, a small circle with the Tasteful Labels Die, 1 1/2 X 1 1/2, in Whisper White, and punch a 1 3/8 circle from the matching DSP for the middle of the medallion.

Daisy:  Punch a large daisy in the DSP and another with the Gold card stock.  Use the small daisy punch with DSP for the top of the daisy and embellish with a Gold Gilded Gem.

For the inside:  Stamp off the Bible and then stamp it on the card stock.  (This is sometimes called ‘second generation’ stamping- you stamp off your freshly inked stamp on scrap paper before stamping on your card stock to create a lighter image.)  Stamp ‘Always’ in full strength ink on top of the Bible.

I hope these cards have given you a ‘pinch of creativity to spice up your crafting world’.

That tag line is how I came to be!

Indeed!  Thank you for your time in visiting today.  If you don’t have a demonstrator, I would be honored to help you out with your crafting needs.

SAL,  (So At Last – the new year begins)

Karen

January’s Hostess Code:  UEEZKD2D   Click on Sal in the computer to go to my onsite shop.


Welcome to my blog!

Sal Window to Products

Subscribe to Blog via Email

Enter your email address to subscribe to this blog and receive notifications of new posts by email.

Join 158 other subscribers

Categories