
Baby Card & Baby Shower
Hello Stamping Friends,
Baby Emma is one month old today! This is the first picture we received on September 24 when she was born:

And here’s mommy:

This is my favorite of little Emma:

She is so adorable! Grandma and Grandpa were very excited and couldn’t wait to drive up.

We threw a baby shower and so many of our Stampin’ Up! supplies came in handy. Hopefully you will be inspired with all the cool things we can make with our tools.

Doing a card with safety pins was something I saw on Pinterest and with our beautiful papers and stamps I made an easel card. The Designer Series Paper- DSP- is the Petal Promenade and the stamp “Life is so much better with you in it” is from the Petal Palette stamp set. It is stamped on the DSP and punched with the Pretty Label punch. The ribbons are the 1/4″ Mini Striped Gorgeous Grape layered on 3/8″ Mini Ruffled Ribbon in Powder Pink and tied with Nature’s Twine in Grapefruit Grove.
I really like purple and peach and knit a baby hat to use for a diaper baby.


For the invitations I purchased invites at Hobby Lobby and then reconfigured them:

I added a Melon Mambo base and a flap of Pretty in Pink with a Stitched Framelit Oval on a Melon Mambo oval frame. The baby is the Moon Baby stamp set. The ribbon is the Tea Room ribbon combo pack. It comes in a two pack of Coastal Cabana and Very Vanilla with a copper edge. I used up all the Coastal Cabana but was delighted to find that I could use the Bermuda Bay Stampin’ Blends marker to color the vanilla ribbon for close to the same color. It is good to know that the vanilla ribbon gives us the option for many other colors! I embellished with sequins.

Save all your punches!! I used two retired punches on the inside of the flap for more details. I typed what I needed in Word and then punched it out and sponged the edges.

We compete with the Big Box stores for some things but it is so nice to have them for all the supplies we need.

For party favors I bought little jars and then decorated them with framelits and punches. The top is from the Window Box Thinlits dies and a circle framelit since it starts as a square. The words are once again typed in Word and then punched out. The Leaf Ribbon is tied around the top with a length of Linen Thread to hold the tag. The jar was filled with pink candy kisses that said “It’s a girl”- The Party Store had that special chocolate.

For activities we played Diaper Pong. (Thank you Pinterest). With Stampin’ Up! supplies we could make all the circles we needed and the lettering for the Diaper Pong. Thanks to my youngest daughter, Amber, who punched and punched and punched all the circles.

We set up a headband making station for guests to create a cute headband in various sizes, and add a tag with the size and their name.

For treats I used a retired cloud framelit to look like a piece of popcorn:
 What would we do without Pinterest?! I found a site where I could download Baby Bingo sheets for guests to have fun while the gifts were being opened. The green jar is for the diaper raffle tickets – another punch used!

For prizes I found a box of rose petal soap and pretty boxes on sale:

Baby Scrapbooking Kit:
“I wish I remembered…..” How many times I have heard mother’s lamenting how they can’t remember when the first tooth appeared, or when they first started crawling or the date of their first haircut. We think we are going to scrapbook every event but then life gets hectic and we can only guess when something happened. I had seen a memory can and revised the poem a bit to make a memory box. I added pens, cards and punched images on which they could make a quick note and then slide it in one of the envelopes. When they get out the scrapbook they will be ready to go! I adhered the poem to the inside flap of the box.

Memory Box
Baby books are great ideas,
But sometimes you’re too busy.
Living with a little one
Can put you in a tizzy.
Milestones pass too fast at times
To find the proper page.
So, jot a note of each event with
Date and baby’s age.
Those special times and chuckles
You’ll want to journal, too
So with a note placed in this box
They’ll all be here for you.

Happy one month birthday, Emma!

SAL, (Share A Love)
Karen

Ribbon of Courage Card for Breast Cancer Awareness Month
Hello Stamping Friends,
My congratulations to all the survivors of breast cancer and my prayers for all of you who are still in the battle. May you be strengthened with faith and hope!
This card is a case of Bryan King with a few changes. I stamped the ribbon directly on the paper though there are framelits that match the stamp set if you preferred another dimension. You can’t tell from the picture that the bottom two layers are glued together and then popped up and the same is done on the top two layers. It gives a very nice effect to the monochromatic card!

- Card Base: Blushing Bride – long way cut, 4 1/4″ X 11″ Scored at 5 1/2″
- Two sets of two layers glued together and then popped up:
- Bottom Layers: Blushing Bride, 3 3/4″ X 5″
- Whisper White, 3 5/8″ X 4 7/8″ (Edges stamped randomly with heart)
- Top Layers: Blushing Bride, 4 3/8″ X 3 1/8″
- Whisper White, 4 1/4″ X 3″


Patty is an amazing demonstrator who reached $1,000,000 in sales and was awarded the chance to design a stamp set. I love what she chose as her design! Stampin’ Up! even made a set of framelits so no fussy cutting!

I used the heart stamp to stamp randomly around the edges of the larger Whisper White bottom layer, adhered it to the Blushing Bride layer, then popped the two layers up with Stampin’ Dimensionals. The ribbon was stamped using the Stamparatus and this tool was perfect for stamping the image twice to get a darker image perfectly aligned. The greeting is stamped in Memento Black using the other Stamparatus plate. What a difference this tool makes! Check out my last post for all the new accessories for the Stamparatus and four video tutorials on how to make the most of this new tool.
SAL, Save A Life – it may be your own-by encouraging annual mammograms
Karen
Stamparatus Training Videos


SAL, Stamp A Lot with the Stamparatus
Karen
Standard Layers
Hello Stamping Friends,
Happy Fall! My thoughts and prayers go out for all of you and your loved ones affected by hurricane Florence.
I need to repost the Standard Layers document that I use almost daily to keep from making errors in calculations of card layers. I found it embedded in other posts and hard to find, so click on the blue to get a printable document. In the future you can just type Standard Layers in the search bar and it will direct you to here.
Standard Layers
SAL, (Stock A Lot)
Karen
Blended Seasons with Stitched Seasons Framelits
Hello Stamping Friends,
Introducing ‘Blended Seasons’ with ‘Stitched Seasons’ framelits that have lovely stitching on both the inside and outside of the cut! Amazingly beautiful! Let’s check out some cards made for spring and summer (notice the stitching on the outside of the cut!):

And here are two cards made for fall and Christmas (I love the font on these greetings. Here the stitching is
on the inside of the cut):

These products are available only through August 31!


 Isn’t this an amazing way to use all the layers with all the stitching showing?! This card is by Satomi at https://letsmakeacardsatomiwellard.blogspot.com.su. Note the new Gorgeous Grape 1/4″ mini striped ribbon, #146940, and the 5/8″ Polka Dot Tulle Ribbon in Whisper White, #146912.
 Mary Brown’s card is done in awesome colors of pink and green and using the “Tufted” embossing folder, #146335, for a great background.

The leaves in this set are awesome as they look like they are floating to the ground. Satomi made this card as well. Notice the grain stamped on the wood.
 I love Christmas bells and this one is perfect especially since it has a framelit to cut it out! Megan Daves’ card is lovely!

Tracy Elsom shows us how to make a quick and easy Christmas tag for gifts and goodies!
That is my fashion show of cards! It is a good thing I don’t have to be a judge and pick just one. They are all beautiful!
I will set up a special event to make three cards- (one with flowers, one with leaves, one for Christmas) free to anyone who purchases the bundle from me. If you are out of state, I will mail you the kits with instructions.
SAL, (Seasons Are Lovely)
Karen
Lilypad Lake, Waterfront and Holiday Home
Hello Stamping Friends,
So what have I been making? I have two cards that just beg to have a video to showcase them but I found out I needed a lapel mike, a C boom arm and a couple more lights. I will keep working at it. I wish I had a picture of our first attempt at the video. It was hilarious. We put a chair on the table and the tripod through the chair so the camera was directly over my work but alas everything was upside down and nothing in the camera manual showed how we could invert the video. Sigh…… Stay tuned, it will happen yet!
Lilypad Lake, High Tide and Waterfront Birthday Card


The ‘Lilypad Lake’ framelits cut out the waves and the sailboats; ‘High Tide’ gives us the birds and the sun. The inside is the ‘Waterfront’ stamp set with its watercolor look. I made another card using the retired ‘Holiday Home’ with the watercolor mountains in the background. The inside uses a greeting from ‘Beautiful You’ and a watercolor Colorado pine tree look with the ‘Waterfront’ stamp set! The ‘High Tide’ set provides the birds again!


 SAL, (Share A Love)
Karen
Graceful Glass Vellum Bookmarks & Delightfully Detailed Suite

Hello Stamping Friends,
A new catalog year has started and Stampin’ Up! is celebrating their 30th birthday! It is great to be part of a company that keeps on keeping on (and keeping up with modern trends)!
Thank you for supporting the catalog launch on Friday and Saturday and the craft sale. All the left over products that didn’t sell are now in a new tab on this blog that I titled “Bake Sale”.
The new hostess code is C2HE3X22. Our bimonthly club is July 10th and guests are welcome for $5 or a $25 order placed between now and July 10th.
For the make and take at the catalog launch I displayed several new products and the favorite was the Delightfully Detailed Laser-cut paper shown on pages 38-39. It is part of the Delightfully Detailed suite. Our wonderful home office has compiled a set of videos introducing the new catalog products and this is the video that showcases the paper we all loved.
Click here to see all the new products-the paper is toward the end:

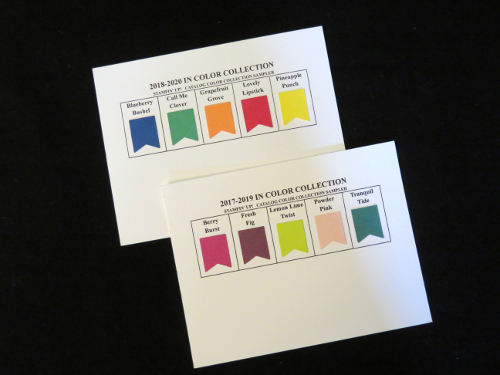
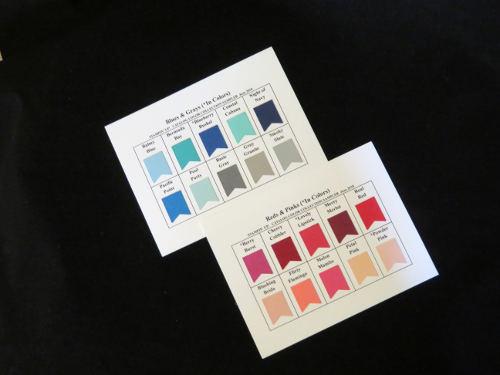
Of course, at every catalog launch we must make a ‘traditional’ bookmark for our catalogs and a color chart with the new In Colors so we can actually see them, punch them – love them! The bookmarks used the In Colors and the Graceful Glass Designer Vellum #146344, page 165.
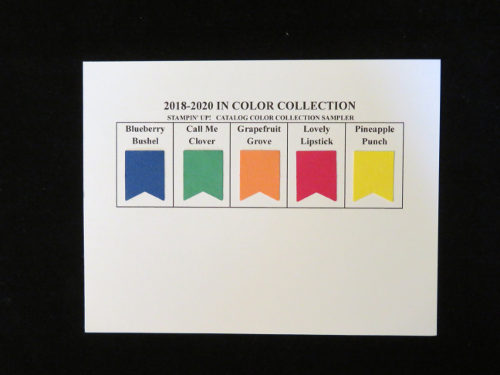
The ribbon is 5/8″ Polka Dot Tulle in Whisper White, #146912, and various baker’s twine including the new Nature’s Twine #146342 which has the Grapefruit Grove color-see pages 200-201.
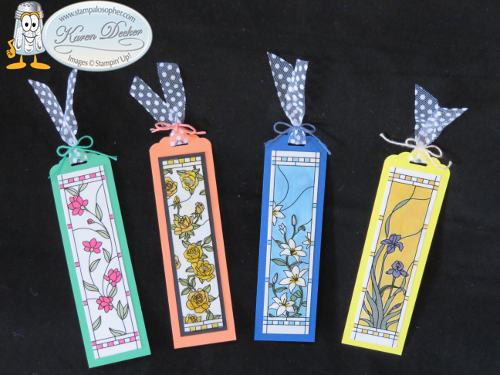
- Bookmark Base = 2″ X 7″ punched at the top with the Scalloped Tag Topper Punch #133324
- Whisper White for behind the vellum = 1 1/2″ X 6″
- Vellum = 1 1/2″ X 6″ (except the yellow roses which are 1 1/4″ X 5 1/2″)
- Black for the yellow roses = 1 1/2″ X 5 3/4″
The color charts use a 3/4″ length of cardstock punched with the retired banner punch.
To make vellum bright white, rub the backside of the vellum with a stylus #126189 on the Stampin’ Pierce Mat #126199:
 The front side:
 It also gives a 3D look and feel.
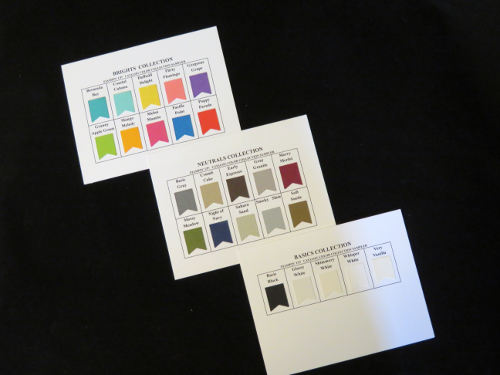
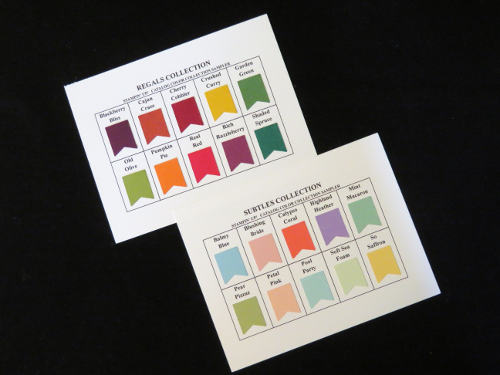
The color charts all had to be redone for the color revamp. This year I added a few extra color charts to compare color families.
Brights; Neutrals; Basics;
 Regals and Subtles;
 In Colors;
 Blues and Grays; Reds and Pinks;
 Purples and Browns; Oranges and Yellows; Greens;
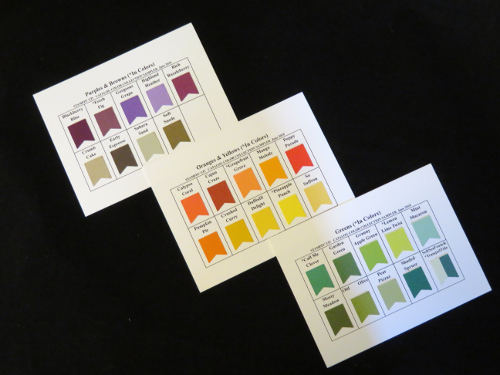 We have 13 greens so the last two had to be split.
There are twelve Color Charts. Email me if you would like the Excel spreadsheet or if you would like to order a set of cards. I will make them up for you for $8 – pick up at my house; or $10 -mailed within the USA. email: [email protected]
Contact me if you would like a catalog, I would love to earn your business and be your demonstrator.
SAL,
Karen
Tranquil Tulips


Hello Stamping Friends,
Spring has been gorgeous in Castle Rock this year! Usually our lilac buds get frozen with a spring cold front and we miss out on the beautiful blossoms. Not this year! They are fabulous and I didn’t even have to run out and cover the bushes with a sheet. We have several little yellow finch friends to entertain us as well. One flower I have never had much luck with is the tulip. The green stem will pop out of the ground but seldom produce a flower. So let’s make a paper tulip card!

These tulips have amazing art work built in to the stamps- white stripes on the blossoms, leaves with shades of green and a stamp for the middle.

I suppose with three grandsons I will get used to bugs in a jar but I would rather fill a jar with strawberries or flowers! I cased the layout of the tulips from someone on pinterest but made the bottom a flower box and added the ladybug and butterfly. I stamped the three butterflies on vellum and then rubbed the back of the circles on the butterfly’s wings with my stylus on the foam pad to make them bright white, then colored the back with my Daffodil Delight Stampin’ Blends marker. I was making six of these cards so I folded the wings of the two larger butterflies for a 3D effect like this:

I used many retiring items that you can still purchase for the next five days. The base of the card is Elegant Eggplant with a Rose Red layer. The tulips are Elegant Eggplant, Rose Red, and Perfect Plum with Wild Wasabi for leaves – all are retiring colors.


The label I used to create the stand for the Easel card is from the Label Me Pretty stamp set. 

The “Thank You” comes from another retiring set “Swan Lake” .
 Check out that cute little dragonfly! This set has so much potential and makes me feel peaceful just looking at the images. Another of the ‘Label Me Pretty’ images:

The “Love You” is from the ‘Banners for You’ stamp set….. I put a sticky note over the ‘I’ in the greeting, inked, removed the sticky and stamped. I liked the little dots on the stamp set but used a marker to make them bigger and added a few extra dots of my own. For both these greetings I punched a 1 3/4″ circle from the Wood Textures Designer Series Paper to match the flower box. I popped up both the greeting and the circle to have a nice tall easel holder. I tried out the third stamp with all the flowers around the Happy Birthday. I first stamped and colored the image but it lost too much detail so I colored the back of my stamp with regular markers, huffed on the colored stamp, and then came up with an image with more detail that I popped up on an oval cut out in the wood:

Did you notice the Versa Mark images on the sides of the popped up greetings? I used the hearts from the Ronald McDonald set to stamp around the birthday greeting since it is going to my daughter. For the others I used tulip images from the ‘Lovely Wishes’ stamp set in the Occasions Catalog.
 I recently attended a Mile High Stamp Camp with amazing Stampin’ Up! demonstrators. I wish I remembered the name of the lady who designed this card using the ‘Lovely Wishes’ set:

I needed a sympathy card so I took her design and used the ‘Petitie Pairs’ stamp set from the past for a tiny greeting to fit between the flowers. I have the old Ovals set so I sponged the edge to get the same look as the ‘Layering Oval’ set used above.
 The layering ovals, squares and circles carry over in to the new catalog. I didn’t think I wanted the ‘Ruffled Embossing Folder’ used here until I actually used it in the stamp camp. It is unique and not just for shingles on a house like I imagined and it carrys over. Five embossing folders are retiring but the one that I will miss the most is the ‘Brick Wall’ embossing folder. Remember this card from the past?

Let’s not think fall, let’s think spring and graduation! I needed a graduation card so I used the retiring ‘Marquee Messages’ set and a graduation cap stamp from a previous Paper Pumpkin. There are fun confetti products in the “other” store that you could use for the graduation caps:

This set lends itself to so many different occasions:
 And if you need a unique gift box for that special graduate’s gift card, I suggest the Window Box Thinlits dies #142762 topped with a square piece of cardstock, 4″X4″ and a tassle made from our solid black baker’s twine and a 1/2″ punched black circle glued on a large brad. We have a ‘Mini Tassels Assortment’ you can purchase and then dip in a bowl of reinker to make just the right color. Yes, it is retiring as well.

You would need the longer ones for the box above but these would be cute on a card front with a punched cap.
I can’t leave today’s ultra-long post without sharing three other cards. In the last post I showed my favorite retiring stamp set in use on an Eclipse card. Here is another card we made at a past club meeting with the ‘Awesomely Artistic’ set, and the ‘Wild About Flowers’ set which has greetings that are so ideal for retirement or new beginnings.


This is the ‘Birthday Blossoms’ set . Scroll down in the Recipe Box to find these cards with instructions.
 ‘Birthday Blooms’ . This pull up card was fun to make at club. Go to the Recipe Box tab to be directed to the original post.
To make this Easel Card:
- Base – Elegant Eggplant – 4 1/4 X 11 scored at 5 1/2 and 2 3/4
- Layer 1 – Rose Red – 5 3/8 X 4 1/8 (make 2)
- Layer 2- Whisper White – 4 X 5 1/4
- Layer 3 – Wood Textures DSP – 1 3/4 X 4 with a strip 3/8 X 4 and a scrap to punch the 1 3/4 circle for behind the greeting
- Cut Outs- top of tulips, ladybug, and greeting – Whisper White 3 X 5 1/2
- Butterfly – Vellum 1 X 1
- Ribbon – 1/4″ stitched edge Rich Razzleberry, 6″ to wrap around the flower box and 8″ to tie a bow
- Inks – Elegant Eggplant, Rose Red, Perfect Plum, Wild Wasabi, Memento Black, Versa Mark
- Stamp Sets – Tranquil Tulips, Swan Lake, Label Me Pretty, Sharing Sweet Thoughts, Lovely Wishes, Banners for You
- Enamel Shapes
- Pretty Label Punch, 1 3/4″ circle punch
- Stampin’ Blends- Daffodil Delight, Cherry Cobbler; Wild Wasabi Marker (ladybugs feet background)
Thank you for your time.
SAL, Share A Love
Karen

Awesomely Artistic Eclipse Card
Hello Stamping Friends,
I chose two of my favorite sets to make an Eclipse card – the stamp set “Awesomely Artistic”, and the color Island Indigo. In my usual monochromatic style I did cards for Mother’s Day, thank you cards and friend cards. Her are various fronts and insides of the cards -the inside could just as easily be the outside of a card.

The Glitter Enamel Dots, matched the Island Indigo perfectly and added sparkle. The dragonfly is colored with the Wink of Stella Glitter Brush, and the flower centers are a drop of glue from our Fine-Tip Glue Pen, with Dazzling Diamonds Stampin’ Glitter sprinkled on top. The For You greeting comes from the retiring stamp set “So Many Shells”.
Instead of Glitter Dots you could be a bit eclectic and use the stamp from the “Awesomely Artistic” set that has dots. The greeting, “From Across The Miles”, is a stamp in “Holly Berry Happiness”. I used a sticky note to cover up the Christmas Wishes words on the stamp, inked the stamp, removed the sticky note and stamped. Voila- a greeting to use any time of the year.

Or just stamp the flowers a little on the edge of your front layer:

The insides of the cards were fun to customize. My daughter is expecting her first child so this is her first Mother’s Day. A greeting in the “Special Celebrations” stamp set was perfect:

The Daisy Delight stamp set had the ideal message for the many thank you notes I needed after my father’s passing.
 For dear family and friends, the Occasions Catalog “Petal Palette”, has the perfect message:
 And of course Mother’s Day is coming up so I went back to the Special Celebrations stamp set for a special message:

Card Base: Whisper White 8 1/2″ X 5 1/2″ Scored at 4 1/4″
Island Indigo Layer: 5 1/4″ X 4″, Make two
Whisper White top layer: 5 X 3 3/4″, Make two
Stamping Order for the top is a bit critical so you don’t have the images running into each other:
- Stamp the greeting at the bottom
- Stamp the dragonfly
- Stamp the flowers
Color the dragonfly with Wink of Stella, then line up the Large Letters Framelits, #141712, spelling HUGS on your stamped top layer and run through the Big Shot. Adhere all your layers and then put Foam Adhesive Strips, #141825, on the back of the cut out letters and glue the letters back in their respective spaces. Helpful Hint: I adhered the letter framelits to a large sticky note and then placed the sticky noted letters on the top layer so I could use it over and over without realigning the framelits each time.
I checked Eclipse cards on Pinterest and found so many words that were used: HOPE, LOVE, YOU, WISH, BDAY, MOM, BABY, BOY, DAD, GIRL, GIVE, NOEL, (NAME), (DATE), JUST, FAITH, JOY, 4EVER, EPIC, BEST (friend). Graduation cards with dates are popular now using the retiring Large Number Framelit set, #140622. The Large Letters framelits will carryover to the new catalog but not the numbers set.
Have fun making your own Eclipse cards!
SAL, (Stamp A Lot, Smile A Little, Share A Love- and always be Salt And Light in your world)
Karen
Magic Shutter Easter Card & Mother’s Day Card
Hello Stamping Friends,
My Easter card this year was the Magic Shutter Card. There are many videos on pinterest by that name, though I found if I prop my smart phone up on a stand, I can scroll through the dimensions on a written post like this one as I construct the card. Then there is no stopping and starting a video and trying to take notes, just tap the screen and scroll to the next step. Do you like doing that?


The Delightful Daisy Designer Series Paper (#144137) matched with Wisteria Wonder card stock (#122922) does all the work of making the card beautiful. As you open the card the shutters open like the shutters on a camera for a great “ooooo….” moment. One designer put a picture of her child behind the shutters. With Teeny Tiny Wishes (#127802) this card could say Happy Mother’s Day or Happy Graduation or any of the other tiny wishes.
- The base is Thick Whisper White cardstock cut at 8 1/2″ X 5 1/2″ and scored at 2 1/8″ and 6 3/8″ Tip: After scoring the card base, gently fold the scores bringing the two sides to the middle to exactly match and then hold them in place and use your bone folder to firmly burnish the score lines.
Next let’s make the skinny panels on the fronts and the inside right and left. They are all four the same size. (Note: DSP means Designer Series Paper.)
- Wisteria Wonder = 1 7/8″ X 5 1/4″ make 4
- Delightful Daisy DSP = 1 5/8″ X 5″ make 4
Attach the DSP to the Wisteria Wonder layer and then attach each to the base.
Now let’s make the inside middle panel but it won’t be attached until after the shutters are attached.
- Wisteria Wonder = 3″ X 5 1/4″
- Delightful Daisy DSP = 2 3/4″ X 5″
Attach the DSP to the Wisteria Wonder. The circle in the middle is cut out with a 2 1/2″ layering circle framelit (# 141705) or the retired 2 1/2″ punch. Cut your circle out just slightly above middle. Tip: If you are using a punch, punch out a template on a sticky note and put it on your card panel to guide where you punch. Come down from the Wisteria Wonder top 1 1/4″ which will give you 1 1/2″ at the bottom of the circle cut out.

- Stamp the greeting on a Whisper White Strip 3 1/2″ X 1″ and punch it out with the Bow Builder punch (#137414). Attach it to the center of the circle cut out. The cut out will show behind the shutters so choose what you want to show, or match, as you glue on the greeting. Draw around the greeting with a Wisteria Wonder marker or sponge the greeting edges before gluing to the circle cut out.
You are not going to attach the middle panel yet, but you need to use it to guide where you glue the circle cut out. Hold the panel in place with a sticky note, put glue on the back of your circle cut out with the greeting, and carefully press your circle directly through the opening. Put the panel aside as you make the shutters.

Shutters:
- Wisteria Wonder = 4″ X 3 1/2″ Make two. Mark the center of one piece by coming down 1 3/4″ on the short side and over 2″ on the long side. Use a ruler and draw a line from the middle mark to the top and bottom corners on the short side. Cut out this triangle which you can then use for cutting the other shutter piece. (Save your template for future cards.)

Clip the pointy ends off the shutters. Score the uncut side at 1/2″.

Fold your score line and burnish well then unfold it and place the shutter right along the edge of the fold on the base. Put a piece of sticky tape on the 1/2″ edge.

Remove the sticky tape cover and then fold the side over pressing it onto the sticky tape.
 Repeat on the other side. Layer the shutter’s points with one point on top of the other shutter and one point below.
Most of the cards online use a belly band but I prefer a ribbon that stays attached. I used the retired ribbon punch and punched the edge of the fold on each side. The Pretty Label punch (#143715) would work almost as well. Close each side and punch a little slot in the Whisper White base. I marked 1/2″ up from the bottom with a pencil so both sides would be in line.

Run the ribbon (20″) through the slots. Now you are ready to mount the middle panel. Place an Adhesive Foam Strip (#141825) at the very top of the panel and the very bottom of the panel and then mount the panel over your shutters and ribbon. (You could use the Stampin’ Dimensionals as well but it would take quite a few.)
After the inside was done, I put pearls on each end and tested to see if they would interfere with the shutters. They didn’t –so it worked!
The Card Front
The “Celebrate” thinlit was a Sale A Bration free product that will be available in the new catalog June 1st!
- Three “celebrates” were cut out – two with Wisteria Wonder 3″ X 4 1/4″ and one with Thick Whisper White 1 1/2″ X 4 1/4″. The purples were glued on top of each other and the white was offset a little. I used Tombow liquid glue and drew a thin line of glue on the letters – counted to twenty to let it get tacky- and then glued it on. If you wait just those twenty seconds the glue won’t gush out on your project.
The butterfly is stamped with the “You Move Me” stamps (#144002) and cut out with the “Move Me Thinlits” (#143732).
- Whisper White 1 1/2″ X 3 1/2″ will do both the butterfly and the He Has Risen greeting. Stamp the butterfly first with the solid stamp in Crushed Curry and then stamp the wing detail in Tangerine Tango. (I love two step stamping sets, and the butterfly thinlits even have antennae!) I used a Tangerine Tango marker to draw a thin line on the antennae then attached the little beauty with a glue dot under one wing.
- The greeting is from the retired “Easter Message” stamp set and cut with a Stitched Shape Framelit (#145372).
My Mother’s Day card uses the current Lovely Words Thinlits (#143733) and the Whisper White 1/4″ Organza Ribbon from the Occasions Catalog Page 23 (#145590). The “For You” greeting is from the So Many Shells stamp set (#143695).

The little heart is from the Subtles Enamel Shapes (#141679).
 After I had taken pictures I added another heart on the greeting and one down in the bottom left.
What do you think? The Delightful Daisy Designer Series Paper (#144137) will be retired after May 31 and the retired list comes out on April 9 so it will only be available while supplies last. Click on the little SAL computer image to order this or any other products!
SAL, Share A Love
Karen
Welcome to my blog!

Sal Window to Products


