
Paper Pumpkin Alternatives & Tailored Tag Quilted Card

Hello Stamping Friends,
This post is for those of you who still have a November Paper Pumpkin kit that you never got a chance to use.
 Kind of like you never got around to posting the cards you made with the kit.
Yes, Sal, it has been a whirlwind of a month. Let me show you how I used the 24 Christmas tags to make cards.
I purchased the Night Before Christmas Memories and More Cards and Envelopes Kit so it really was like a typical Paper Pumpkin with cards and cool matching envelopes.
Snowflake Card
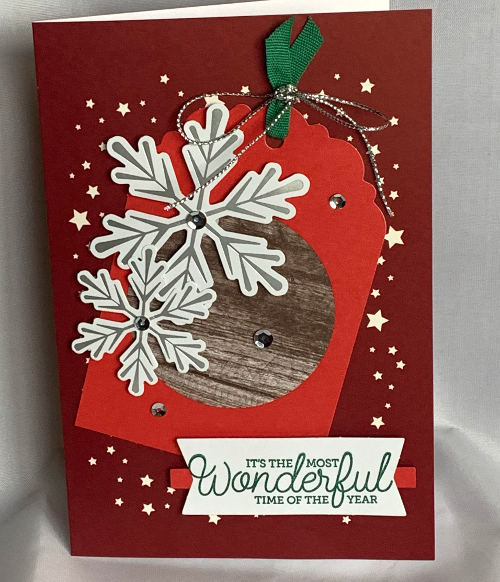
And when I ran out of the cards, I used the snowflake stamp from the PP and heat embossed white snowflakes around the edge of a Merry Merlot layer of card stock:

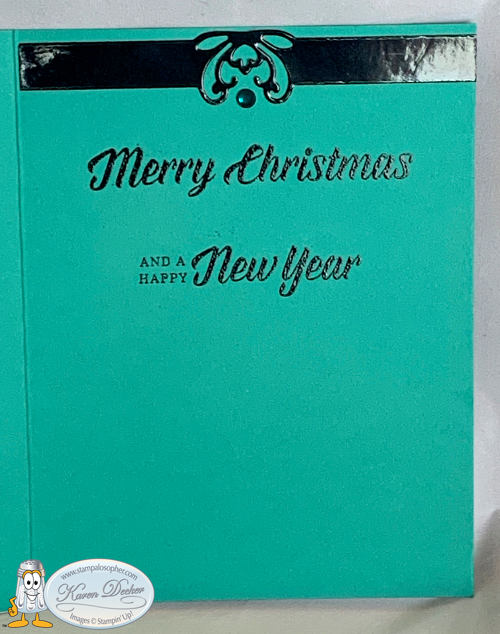
I have all my Paper Pumpkin stamp sets together and the ‘Wonderful time of year’ greeting was from a prior Paper Pumpkin (PP).
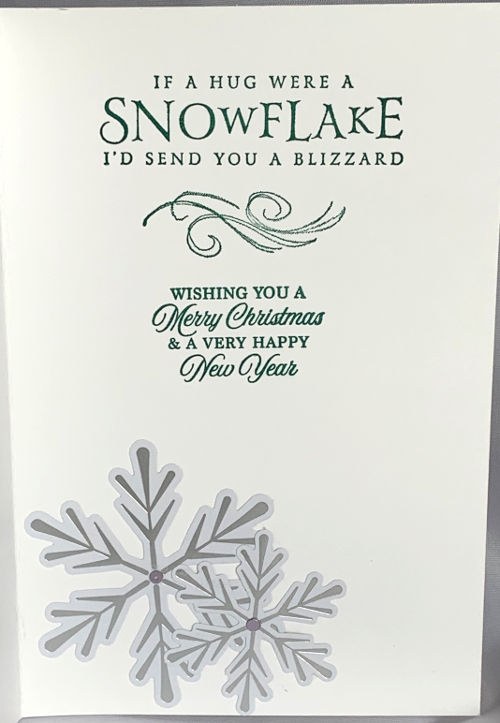
The snowflakes were in the November PP kit, the top greeting is in the retired “Beautiful Blizzard” stamp set and the Merry Christmas is from Octobers PP kit.
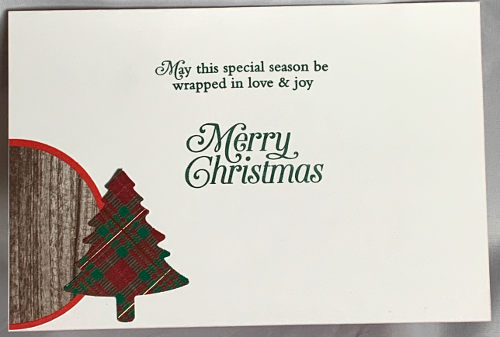
Deer and Tree Card
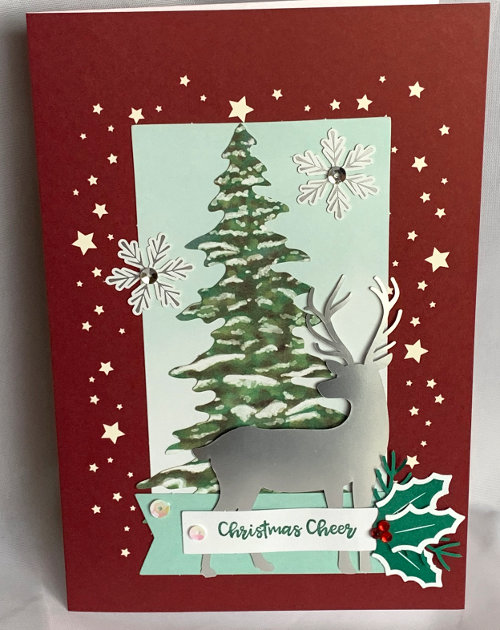
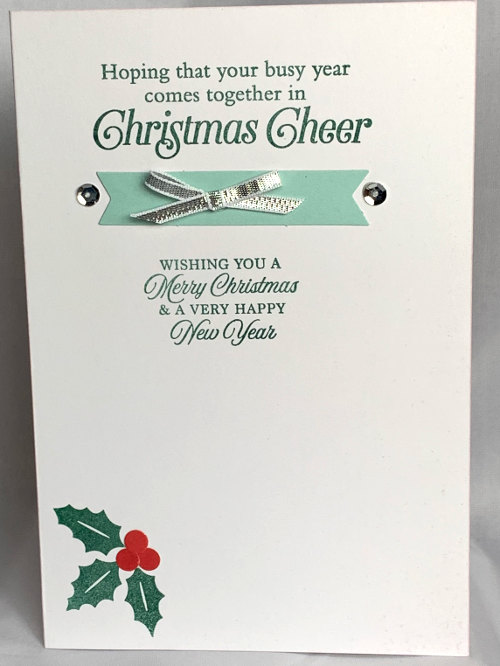
You know how I like to coordinate the greeting on the front with the inside and the “Itty Bitty Christmas” set had Christmas Cheer to match the “Perfectly Plaid” stamp set greeting that is so appropriate for Christmas time when we get so busy.
Sled Card
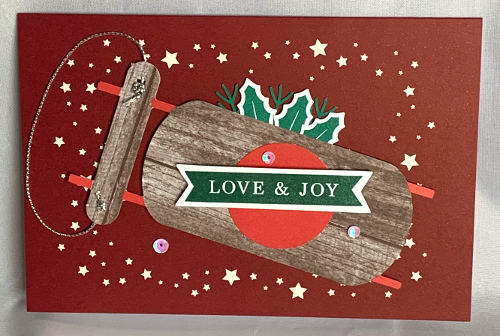
The outside greeting is from the PP stamp set and the inside is the “Perfectly Plaid” stamp set used again.
Birds Christmas Card

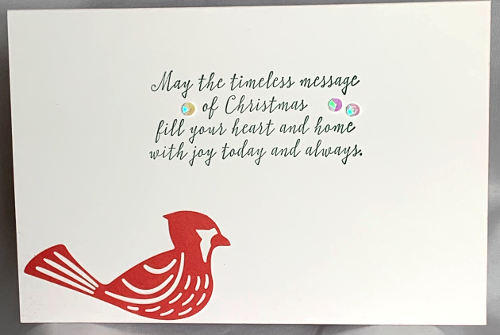
Joy to the world is from “Itty Bitty Christmas” and the inside greeting is from the “Still Scenes” snow globe stamp set.
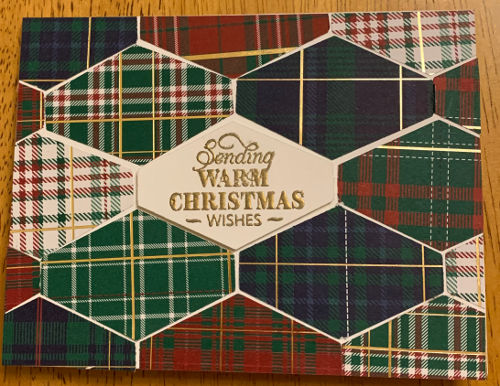
Quilted Christmas Card
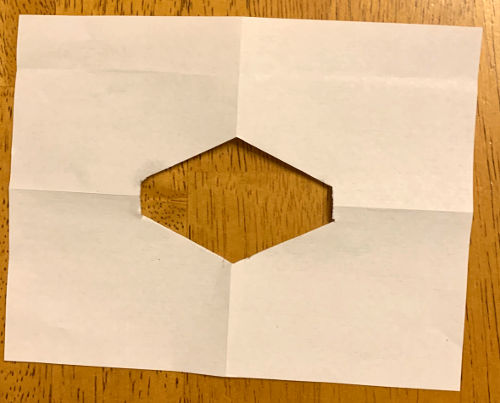
One more Christmas card I would love to show you is one my Mother-in-law made using the Tailored Tag punch and the plaid designer series paper with a greeting from the “Rustic Retreat” stamp set. Mom makes gorgeous quilts but has never tried her hand at cards so it was fun to show her that the two talents of quilting and cardmaking could be one.

We started by cutting a piece of copy paper to the size of the front and then folding it in half and then half again to find the exact center so we could punch a template for placement of the middle greeting.
From there it was like building a quilt:
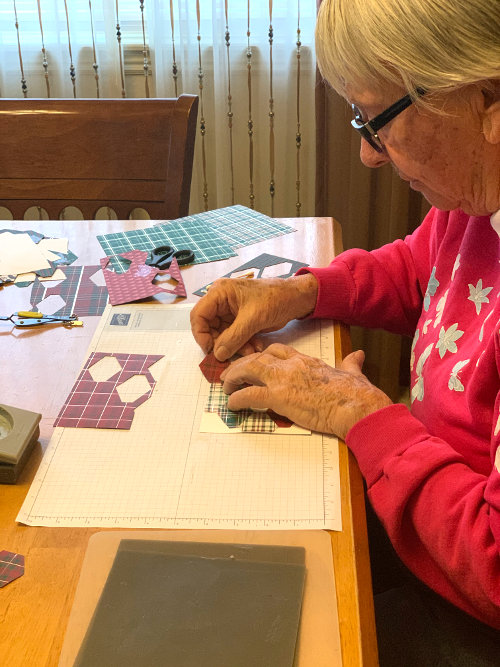
The following card is one I had started with using all the plaids but Mom’s eye for colors made the coordination much better than my collage of colors with a white border. Just think what we could do with all our left over DSP!
Thanks Mom!
SAL, Share A Lot – Only 356 days until next Christmas!!
Karen

Happy Thanksgiving!

Happy Thanksgiving Dear Stamping Friends!
Remember to set your scales back 10 pounds tonight!

Hugs,
Karen
Yummy Christmas Gingerbread House and Cuckoo For You
FPDMJ4X9
Hello Stamping Friends,
I missed posting our September club cards and one is a Christmas card! Now that it is getting down to the wire for Christmas cards you might be looking for the details to this card you made “way back when”!

I cased Bronwyn Eastley with a gingerbread house box card.
http://addinktivedesigns.com/product/yummy-christmas-box-card/
Things I recommend doing differently:
- add strips of window sheets to the back of each pop up
- Make two of each pop up to put front and back so the back is prettier
- cut that little point on the bottom middle front and back just a tiny bit – not cutting in to the black line – so the box sits squarely
- Use the Bronze Stampin’ Blend for the gingerbread man and the deer for a darker brown
- Use puff paint for the snow


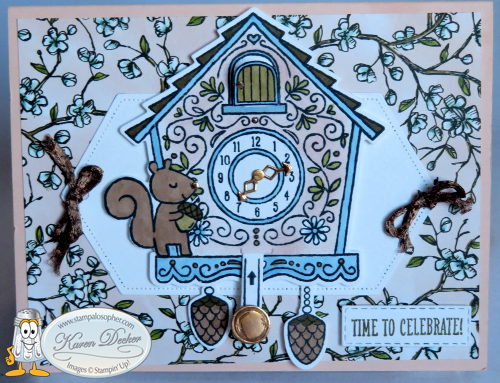
Cuckoo For You
With the ‘Yummy For Christmas’ and ‘Cuckoo For You’, we have two stamp sets that use the same set of dies!


Isn’t that so cool! The deer becomes a holly branch, the clock door becomes a gumdrop, the clock weight becomes a peppermint and the tree becomes a Christmas tree!
Christine Rohr posted a picture on Pinterest which used the Cuckoo For You and the Bird Ballad DSP. I cased and selectively edited it to come up with this card for club:

Push up on the little arrow and you see the little cuckoo bird!


Note: DSP means Designer Series Paper
- Base: Petal Pink 5 1/2 X 8 1/2 Scored at 4 1/4
- Layer 1: Bird Ballad DSP 5 1/4 X 4 Watch the direction on your DSP
- Strip of DSP for inside: 3/4 X 5 1/4
- Front Stitched Nested Label: Whisper White, 2nd largest label is 2 5/8 X 4 5/8 so start with 3 x 5 piece; emboss with the Subtle 3D embossing folder; then cut with the Stitched Nested Label. Use handheld hole punch to punch a hole on each side of the label for the ribbon. Mount the label 1″ down from top of base and 5/8″ from the sides of the base to the point of the Stitched Nested Label
- Ribbon: 1/4″ Copper Trim, 6″ , make two
- Clock and Parts: Whisper White 3 5/8 X 8 1/2; Stamp in Memento Tuxedo Black ink: clock, 2 pulls, 1 squirrel, 1 door; color with Stampin’ Blends: Old Olive on the vines, Bronze on the dots, roof-Dk Soft Suede, Clock Outline-Dk Balmy Blue, Pulls-Bronze & Dk Soft Suede, Squirrel – Bronze body, nut in Lt Suede, with a Dk Suede top, Door – Lt Suede, blue trim and be sure to cut off the white border of the door created when cutting with the framelit. Tip: When coloring with the alcohol markers in tiny areas just barely dot the area to color it. The ink spreads and you won’t be getting ink outside the lines.

- Mask the 2 flowers, the clock middle, the inside of door and sponge with Blushing Bride Ink.

- Clock Weight and clock hands: Copper Foil, 1 1/4 X 1 1/4. Stamp the clock weight in Versa Mark ink, emboss with copper powder and cut with the circle die. Cut the clock hands out of the foil and save the little pieces to use for the squirrel’s nose, the handle on the door, and the little dot right above the 12.
- Clock pull: left over from the Whisper White used for the clock and parts: cut one with the die. I used my Stamparatus to line up the lines with the arrows and the one word “cuckoo” so my stampers could easily stamp the images:

You stamp the arrow and lines image with the right side up and then stamp “cuckoo” on the back of the same piece. With the Stamparatus we could line up the one word “cuckoo” from the greeting “I’m Cuckoo About You” and didn’t even need to mask the edges. By using the grid sheet we can save it with the stamp set for the next time.
The odd looking die with a little heart on the top and the bottom is a piece that matches up with the hearts on the clock face to cut slots for the sliding mechanism in exactly the right places. There are YouTube videos using the two sliding mechanisms to make butterflies that “fly” and other fun tricks so the pieces are good for other applications.
Be careful to fold the score lines of the mechanism very straight so it slides nicely in the slots created by the second die. The slot is a little larger than the door -necessarily so- so that you can slide it in, but once it was in place, I cut two little strips of Whisper White and glued them to either side of the slot so the mechanism stayed straight.

Inside Layer: Whisper White 4 X 5 1/4 stamped in Soft Suede ink with the greetings in the “Special Celebrations” stamp set.
Front Greeting: Scrap of Whisper White run through the Big Shot part way with the Rectangle Stitched Framelit and then turned around and run through the other sider with the same Framelit to shorten it to just the right size for “Time To Celebrate”. I didn’t stop and made the whole Stitched Rectangle so I just ran it again to shorten it and then had a little piece left that was perfectly stitched that I used on this card:

My youngest granddaughter, Emma, was born on 9/24 at 7:12 AM. I moved the house over a bit, found some left over pink twine from a Paper Pumpkin, and stamped the date with one of the first photopolymer stamp sets made by Stampin’ Up!

The inside uses the “New Wonders” stamp set and a template of the ‘1’ cut out of cardstock and then sponged with Blushing Bride Ink. The fairies are colored to match the DSP with white and blue like the flowers and green like the vines. This card will be hard to top when birthday #2 comes around. My grandsons are turning 2 and 3 in the next few weeks and I will be working to make them something memorable. Do you think parents save hand made cards?
The next Christmas Stamp A Stacks are December 4th and 7th at my house at 9:30. RSVP by November 25- next Monday. Wow, where has the month gone?
SAL, Stamp A Lot
Karen


#Elfie Diorama Card
Hostess Code: FPDMJ4X9
Hello Stamping Friends,
It’s an Elfie day in the neighborhood, an Elfie day in the neighborhood, won’t you be my neighbor!


Yup! Elfie from my head to my toes! Ruger was the cutest elf of all!

‘#Elfie’ is a super cute stamp set (page 22 of the 2019 Holiday catalog). I am casing Michelle Andrews and the diorama card she posted on her blog: www.stamppraylove.blogspot.com. I changed the coloring and positioning and added puff paint to the bobbles on their shoes and hat. I used the ‘Birch’ background stamp set to add a faux wood frame look. The little elf in the stocking would be great on the back of the card but I can only expect my club to do so much fussy cutting.


The greetings on the front and back come from the ‘Perfectly Plaid’ stamp set on page 14 of the 2019 Holiday catalog.
- Base: Crumb Cake 4 1/4 X 11; Score at 5/8, 5 3/8, 6, 10 3/4, Use 3rd largest rectangle framelit to cut the front. Mask each section of the base and stamp with Soft Suede ink using the ‘Birch’ background stamp. Stamp the front and back greetings using Shaded Spruce ink. The Stamparatus helps you stamp the greetings and restamp them to get nice dark green images. Burnish all the score lines really well to assure the card moves well and lays flat.
- Back of the Diorama: Pool Party, 4 3/4 minus 1/16 (4 11/16) to allow for score lines X 4 1/4, stamp snowflakes in Pool Party Ink and adhere snowflake sequins.
- Elves: Whisper White, 4 1/4 X 5 1/2, Stamp in Memento Ink and color with Stampin’ Blends. Fussy Cut. Use a blender pen to dip in Pool Party ink and color the area between the elf and the Christmas ornament. Glue a strip of whisper white on the back of the two tall pieces for stability.
- Snow Mounds: Thick Whisper White, Make 2: 5 1/4 X 2 1/4; creatively cut a large right hand mound and a smaller left hand mound. Score each side of the mounds 1/4″ . Make a template and you can quickly cut out the snow mounds for each card kit.

The rectangle cutout uses the 3rd largest die in the Rectangle Stitched Framelits. It is 1/2″ down from the top leaving about 3/4″ on the bottom for your greeting. I was able to stamp the three elves and the package on one 4 1/4 X 5 1/2 ( 1/4 of a sheet) whisper white. I cut two little strips 1/4 X 4 to adhere to the back of the long elf images for a bit more stability. The snow mound on the left is 1 3/4″ at the peak and goes in front of the right hand snow mound which measures 2″ at the peak.


The snow mounds are glued together to make a box of sorts.

The snow mound “box” is decorated with elves and snow. Glue the elves to the snow mounds before adding snow. Make sure nothing is adhered to the pool party background or the card will not lie flat to go in an envelope. Burnish each fold really well to help the card move. Cut around the elbows of the ‘No Peeking’ elf and don’t cut off the words. The elbows go over the front frame and the words give you a tab to glue to the back of the frame. Likewise with the package – cut a little tab at the bottom to use for gluing to the front of the frame.
The Holiday catalog has ‘Shimmery Crystal Effects’ on page 41 which you will use to adhere the ‘Ice Stampin’ Glitter’ (same page). It is most remarkable how the Crystal Effects holds the glitter and so cool how sparkly the ice glitter looks! The puff paint (page 19) is so fun to add to the hats and shoes of the elves! We learned to hold the bottle almost horizontally and let gravity do as much of the work as possible instead of squeezing the bottle. The background is pool party stamped in pool party ink with the snowflake stamp set in ‘#Elfie’. The little teensy tiny snowflakes are from the ‘Snowflake Sequins’ on page 43 of the 2019 Holiday Catalog. (Or you may have some left from the October Paper Pumpkin).
Place ‘Tear and Tape’ on the outside edges of your snow mound box and adhere to the base in the middle on the right side. This leaves about 1/8″ on each side of the base. When you adhere the other side which has the seam, place tear and tape on the seam and then fold the right hand side over the tape to insure the box will lie flat. This is a view from the bottom:

That was a lot of directions. This is when I wish I made Youtube videos. Maybe next year……

Now that we know how to make diorama cards just imagine what other stamp sets we can use. My inspiration came from Lucille who had the absolute cutest little diorama card with doggies. Hmmm…….snowmen next – or deer??
The new hostess code is FPDMJ4X9 and Stampin’ Up! is going to have a three day Extravaganza sale November 20-22.

Click HERE if you would like a printable pdf.


 It’s an Elfie day in the neighborhood – won’t you be my customer? Contact me if you have questions or need a catalog. You can also go to the catalog tab at the top of the blog to see all the catalogs.
SAL, Silly And Loving it
Karen
Christmas Card Stamp A Stack
Hello Stamping Friends,
It is Friday! Hopefully you had a great week and are looking forward to a restful or fun filled weekend.
Here are cards from a Paper Pumpkin:

I did change the greeting. It comes from the very versatile Itty Bitty Christmas stamp set in the Holiday catalog.
NOEL Double Time Stamping:
Casing Mary Detharage at stampsnlingers.com:


Recipe:
- Stamp Sets: ‘Joy & Noel’, ‘Timeless Tidings’
- Ink: Memento Black
- Tools: Oval Stitched Shape Framelit and Oval die (retired) 3rd smallest in set or oval 1/8″ smaller than Stitched Shape Oval
- Stampin’ Blends: Real Red, Shaded Spruce
- Base: Real Red, 5 1/2 X 8 1/2 Scored at 4 1/4
- Layer: Basic Black, 4 X 5 1/8 -make 2
- Top: Whisper White, 3 7/8 X 5 – make 2
- Embellishment: 3 gold metallic pearls
Using the largest Stitched Shape Oval, cut out a piece from the middle of the black layer. Set aside.
Center the small oval framelit on the white top layer and cut the oval then return the oval to the layer and stamp the Noel. I used the Stamparatus so I could stamp until I got a really dark black image on the letters.
Color. I used the light Shaded Spruce for the stems and small leaves around the berries, both dark and light Shaded Spruce on the large leaves and Real Red dark and light for the berries.
Adhere the colored oval to the black stitched shape oval with snail and then pop up the ovals on the white layer.
Add gold metallic pearls.
The inside greeting, Merry Christmas and holly branch are from Timeless Tidings.
This card is a case of the catalog using the other stamp in the set:

Beautiful Baubles:
This card is a case of www.sandjunecrafts.com who cased June Keingstaer:


Recipe:
- Ink: Pacific Point and Versa Mark with silver embossing powder
- Stamps: Beautiful Baubles, Timeless Tidings
- Tools: Detailed Bands Dies, Aqua Painter, Gray Marker, Wink of Stella
- Base: Silver Foil Edged Cards & Envelopes (#147900)
- Layer: Pacific Point 5 1/4 X 4
- Top: Shimmery Whisper White 5 X 3 3/4
- Inside: Silver Foil Strip 4 1/4 X 1/4 and Pacific Point Strip 4 1/4 X 1/4
- Greeting: Shimmery White 2 X 3 and 2 ovals cut from Silver Foil using the Detailed Bands Dies. Deck the Halls is in Beautiful Baubles, the inside greetings are in Timeless Tidings
Start by creating two masks of the bauble on sticky notes. Stamp the left bauble in Versa Mark, mask it and then stamp the bow and string. Remove the mask and emboss with silver embossing powder. Mask that bauble and stamp the middle baubles and the right side bauble, bows and string. Emboss with silver. Use the Aqua Painter and dip in the Pacific Point and water color the baubles. Color the inside of the top little holder thingy gray and apply wink of stella. Add rhinestones.
Stamp the greeting, cut with the Detailed Bands Oval Die and attach to two silver ovals cut with the same die. Sponge the edge with Pacific Point. Use glue dots to attach to the foil and then dimensionals to attach to the top of the card.
Apply strips to the inside left and stamp the greeting. The card stock in the set is thick so you don’t really need another layer. The catalog also has gold foil cards and envelopes. Check out page168 of the Annual Catalog 2019-2020.
Note: I will add the catalog year in the future posts since I have gone back to reference posts from years ago and the page number is not the same. In the catalog section of my blog I have kept all the pdfs of catalogs since I started blogging so you can go to that section and find the catalog I reference. You can look at the date of the post to figure out which catalog but I will be more helpful in the future. Do you have other suggestions that would make my blog more user friendly?
Christmas Tree Special Fold:
Cased from Rachel Tessman at StampYourArtOut.com:


This is a Step Panel Card and folds to fit in a standard envelope.
Recipe:
- Ink: Shaded Spruce, Versa Mark and white embossing powder
- Stamp Set: Snow Is Glistening
- Tools: Snowfall Thinlits, 1 3/8″ circle punch and 1 1/4″ circle punch
- Base: Shaded Spruce 4 1/4 X 8 1/2; Score at 1/2, 1 1/2, 3, 4
- Step: Shaded Spruce 2 1/2 X 4 1/4; Score at 1/2 and 1 1/2
- Tree: Shaded Spruce 4 X 2 1/2
- Greeting and the snowflake background at the top of tree: Whisper White 1 3/4 X 4
- Back of the greeting and snowflake on top of the tree: Dazzling Diamonds Glimmer Paper: 1 3/4 X 2 3/4
- Designer Series Paper: 4 X 2 7/8
- Embellishments: Three rhinestones for the snowflakes and 14″ Silver Metallic Edge Ribbon
Fold each score line and use your bone folder to make nice folds on the base and the step. It is critical at this point to get a feel for where the base and the step are attached so you identify the bottom of each. Don’t attach until after you have stamped but you need to know the bottom.
Adhere the Designer Series Paper.
Stamp the tree and the bottom of the step and the base and white emboss. Use the trimmer to cut the tree leaving a tiny edge of green. This will be mounted last and the ribbon will be tied through the step and over the bottom of the tree which hides the seam.
Apply Tear and Tape to the 1/2″ fold on the base, it seems to be the front since stamping but it will be folded back to attach. Critical – don’t guess where it is attached- remove the top of the tear and tape, fold the 1/2″ flap over and then fold the card base flat to correctly attach the 1/2″. Do the same with the step- don’t guess where it is attached. Adhere it to the bottom of the base and then remove the back of the Tear and Tape on the 1/2″ fold and fold the step and base flat to get perfect placement of the step.
Stamp your greeting. Joy is in the Snow Is Glistening stamp set. Punch with the 1 1/4 punch. (Attach to the Dazzling Diamonds with glue dots), then pop up on the base with dimensionals. Die cut two snowflakes from the Snowfall Thinlits (one for the front of the tree and one for the back).
Punch a circle of Dazzling Diamonds glimmer paper with the 1 3/8 punch and die cut a dazzling diamond snowflake for the top of the tree. Add a rhinestone!
The back Whisper White piece is a rectangle with the 4 1/4 going vertical and the 4 on the horizontal. It seems square so you have to look carefully for a nice border placement. Die cut a large snowflake and a smaller snowflake in the corners, poke out all the little pieces and set aside for a minute. After cutting your snowflakes it is easy to see where the greeting will fit. Stamp the greeting, adhere the layer to the base and then place the snowflakes back in their cutout. Add rhinestones to the snowflake.
Tie the ribbon through the base right at the top so it covers where your tree is attached.
You just made a step card!
SAL, Stamp A Lot of Christmas cards
Karen
Mosaic Mood Pocket Card

Happy Halloween!!
Sorry – no Halloween cards this year from me. I ordered “Trick or Tweet” from the clearance rack but it sits unopened and unused for this year! Sigh…… A cold knocked me for a loop this week. Maybe if I get some energy and quit coughing I could make tags for tonight like Lisa Curcio posted on Pinterest:

I could make the doggy look like Ruger by elongating the ears and body!
This past summer I made a Mosaic Mood Hummingbird card for a Stamp A Stack; it is a case of Michele Reynolds at inspirationink.typepad.com with the addition of a different greeting that fit perfectly in the ‘V” fold and a different top and tab:


You could make it a celebration card or a birthday card or …..
Directions:
- Base X2 in Mint Macaron: 4 1/4 X 11 score each at 5 1/2; Cut one piece diagonally from center top at the score line to bottom right. Cut the second piece from the score line to bottom left. Glue the two pieces together with Tombow.
- Mosaic Designer Series Paper: 5 X 3 3/4 (plus a hair) 3 13/16 to be exact. Cut in half diagonally. Be careful with your cut cutting from right to left for right hand side and left to right for the left side. Adhere these pieces to the front flaps and then decide which side you want to be the main flap on the front. Some of the hummingbirds face right and some left so select your hummingbird to determine which DSP to use on which side of the flaps. Fussy cut him out and fussy cut a flower and two leaves. If you don’t mind fussy cutting, the paper has cute bumble bees and butterflies so they make a great addition to the inside or to put on a leaf.
- Use Tear and Tape to carefully adhere the first flap to the inside base nice and straight. Use 1/8″ tape or cut the 1/4″ in half. Then adhere the second flap over the first flap at the bottom. With Tear and Tape you can get a nice even bottom for your slider insert to stop on. Place a glue dot on the ‘V’ where the flaps meet making sure not to have any glue exposed to the base.
- Adhere the leaves to the back of the rose and then pop up the rose and leaves on the front. First place a large dimensional at the intersection of the flaps but not exposed to the slider, add several more dimensionals to the flower and place it on top of the dimensional you put at the intersection of the flaps. Pop up the hummingbird as well. I added a touch of Tombow to adhere his beak to the rose to prevent it from getting torn off.
- Slider: Very Vanilla 5 1/4 X 3 5/8, the middle is 2 5/8, mark the backside with a pencil to center the circle tab. The stamparatus worked beautifully to line up the greeting. I marked a grid sheet with the diagonals and where I needed to place the slider for stamping. I recommend saving these grid sheets for future use.
- Strip of Designer Series Paper for the top of the slider: 5/8 X 5 1/4. (One of the DSP designs was almost the 5/8″)
- Circle Tab: 1 1/4″ punch of the Designer Series Paper, glue this on the back of the slider with only the amount showing to reach the top of the base (1/4″) so the card will fit in the envelope.
The greeting is from the “Beautiful You” stamp set. It is in the annual catalog.
Note: The ‘Happy Birthday’ in the ‘Botanical Bliss’ stamp set matches this font pretty well to add to the slider.


I wish you could see the shiny parts on the paper. It is just beautiful! Here is a left facing hummingbird and garden green for the base with the “Botanical Bliss” happy birthday that matches the “Beautiful You” font.

When you run out of big flowers on the designer series paper, it is just as beautiful with two of the little ones!

Wouldn’t this make a fun Christmas pocket card using the Let It Snow Specialty Designer Series Paper and the Snowman Season stamp set? Send me a picture if you make a pocket card!!
Check out this lovely card made by the awesome Lucille Kearin:

The home office also announced this week that they are making available to everyone – not just demonstrators – the bulk Magnolia Lane Designer Series Paper:

At my Christmas Stamp A Stacks, December 4th and December 7th, we will be turning these magnolias into poinsettias to make a regal Christmas card. You won’t want to miss this one! RSVP by November 25th.
SAL, Share A Lot of treats with the little ones!
Karen
Christmas Stamp A Stack
Hello Stamping Friends,
October Stamp A Stack:
Here are pictures of the cards we made at the October Stamp A Stack. If you have questions leave your requests in the comment section.
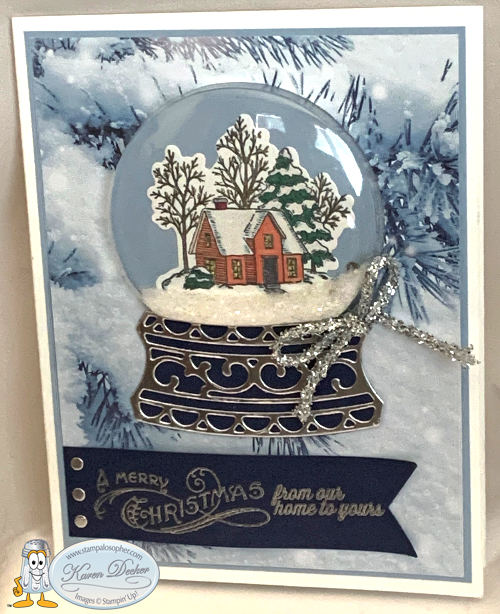
Still Scenes Snow Globe
Still Scenes Snow Globe with Feels Like Frost Designer Series Paper on a layer of Seaside Spray and a cardbase of Thick Whisper White. The banner and base background are Night of Navy. The greetings are from the Bells and Boughs stamp set and the Farmhouse Christmas.


TIP: Make yourself a template out of cardstock and you can cut multiples quickly:

- Base: Whisper White 5 1/2 X 8 1/2 Scored at 4 1/4
- 1st Layer and inside: Make 2; Seaside Spray 5 1/4 X 4
- 2nd Layer: Frost DSP 5 1/8 X 3 7/8
- Inside Top Layer: Whisper White 5 1/8 X 3 7/8
- House: Whisper White 2 1/2 X 2 1/2, Stamp in Memento ink and color with Stampin’ Blends
- Snow Globe Base: Night of Navy 3 X 1 3/4
- Snow Globe Base top layer: Silver Foil 3 X 1 3/4, Tip: attach to adhesive sheet then run through Big Shot
- Banner: Night of Navy 1″ (minus a hair) X 4″ Punch with Banner Triple Punch
- Embellishments: 8″ ribbon and three silver foil punch dots punched with hand held punch
- Snow: A little bit of Ice Stampin’ Glitter with a few of the Snowflake Sequins
Shrinky Dink Cardinal on Seasonal Wreath
Seasonal Wreath 3D embossing folder with Shrinky Dink Cardinal from Toile Christmas stamp set & Christmas Cardinal Dies. Strips of Red Glimmer Paper are scotch taped to the back of the top layer and the entire top layer is popped up on a Thick Whisper White base.


- Base: Thick Whisper White 4 1/4 X 11 scored at 5 1/2
- Wreath: Whisper White, 3 15/16 (4″ minus a hair) X 5 1/2, emboss with Seasonal Wreath Embossing Folder
- Strips of Red Glimmer Paper: Make 2; 3/8 X 5 1/2; use scotch tape to adhere to the back of the embossed wreath
- Cardinal: Clear Shrinky Dink paper, 2 5/8 X 5; Stamp cardinal with Staz On ink and color the back with alcohol markers
- Banner: Whisper White 1 1/2 X 3 1/2 Stamp greeting with Real Red Ink
- Inside Frame: Red Glimmer Paper, 3 1/8 X 3 1/8, Use circle framelit to cut circle. The two Christmas Cardinal Scrolly dies can be cut from the inside of the red glimmer paper circle
- Inside top greeting: 2 3/4 X 2 3/4 cut with one size smaller circle. I used circles 5 & 6 in the retired circles.
- Branches: Whisper White 3 X 3, Cut two large and two small branches. Place 4 glue dots in the bottom middle of the wreath and layer: one large to right, one to left, one glimmer paper scrolly die to left, one scrolly die to right touching in the middle to look like one, one small branch to the left and one small branch right about the middle to cover all the glue dots. Use glue dots to place the cardinal above the branches so he looks like he is sitting on the red glimmer scrolly.
- Embellish the wreath with red glimmer dots.
Noble Peacock Foil Christmas
This card uses the Noble Peacock Specialty Designer Series Paper with Noble Peacock Foil Sheets cut with the Detailed Bands dies and layered on an oval of Bermuda Bay. The top layer of DSP is bordered with a strip of black foil paper and another black foil strip is cut out with one of the Detailed Bands dies for the inside. The Merry Christmas is a separate piece that is popped up with dimensionals. The card base is Bermuda Bay. The outside Merry Christmas is actually a sticker I picked up from a Krazy Creations craft booth several years ago. The inside greeting is from the “Timeless Tidings” stamp set.


For those who felt the colors were better for a birthday card, the “Band Together” stamp set that is bundled with the “Detailed Bands Dies” (page 121) has a perfect birthday greeting that fits perfectly on the cut out center and was easily embossed with black embossing powder to tie to the overall shiny look of the foils. The inside greeting is from the current “Country Home” stamp set.


- Base: Bermuda Bay 5 1/2 X 8 1/2, scored at 4 1/4
- 1st Layer: Peacock DSP 3 7/8 X 5 1/2
- Strip to border 1st Layer: Black Foil 1/2 X 5 1/2
- Strip at top of inside: Black Foil 1 X 5 1/2 , cut with Detailed Bands Die
- Greeting Layer 1: Bermuda Bay die cut oval 2 1/2 X 3 1/2
- Greeting Layer 2: Turquoise Peacock Foil die cut with Detailed Bands die, trim edges so it covers from the black to the right edge, adhere directly to oval
- Greeting Layer 3: The Detailed Bands Die gives a great cut out to stamp a greeting and pop up with dimensionals
- Embellish: I used 9″ of turquoise sequin ribbon and loops of black thread to adhere behind the oval before gluing the oval directly to the DSP. Two Noble Peacock Rhinestones completed the card.
K-Cup Thank You Gift
For a little thank you gift I made a K-cup holder sitting on top of a pumpkin spice latte mix, the little squiggle below the thank you is in the “A Big Thank You” stamp set:

- Long Strip: Pumpkin Pie, 2″ X 12″ Score at 5″ and 7″ ( Tip: score at 5″ and turn and score other side at 5″), punch each end with Scalloped Tag Topper Punch.
- Inside Box: Early Espresso 3 15/16 X 3 15/16 ( 4 X 4 minus a hair on each side)
- Score each side at 1” and then make tabs at every other corner by cutting 1″ from the corner to the score line. Cut the tabs at an angle to make them easier to adhere. Use Tear and Tape to adhere sides.
- DSP: Make 2: 1 3/4 X 4 1/4
- DSP: Make 2: 1 3/4 X 7/8 (sides of the box)
SAL, Stamp A Lot of Christmas Cards
Karen
Vibrant Vases Tri-fold card
Good morning, Stamping Friends,
It probably won’t be morning by the time you get this post in your mailbox but currently it is still morning in Karen’s World!

Don’t you mean Stampalosopher? Karen’s World was your accounting firm.
Yes, indeed, it is a Stampalosopher World! Today I have one of two cards to show you that I created for a stint as a guest presenter in Grand Junction. The first was inspired by Joy Meadows and the very lovely card she sent for my birthday. Thank you, Joy!


Do you see how the front right hand flap is exactly the same size as the left side white layer with the same size black border? So cool! The white flaps inside and out are 3″ X 3 1/2″ with a black border of 3 1/8″ X 3 5/8″. The paper is from the SAB (Sale A Bration) Botanical Butterfly DSP (Designer Series Paper). One side had butterflies and the other had black and white designs like the dots Joy used here. I hope you stocked up on this paper during SAB! Her base is 9 7/8″ X 5 1/2″ scored at 4 1/8″ and 8 3/8″ . This leaves a right hand flap of 1 1/2″. The butterfly is from the Butterfly Gala stamp set which is still current and has a punch to match. See page 46 of the Annual Catalog.

But Karen, you can’t use retired Designer Series Paper!
I know, Sal, so I chose to use the Vibrant Vases and the Pressed Petals DSP with an accent color of Blueberry Bushel, one of the 2018-2020 In Colors that I will definitely need to stock up on before it retires next June.


Don’t you love the Pressed Petals DSP with the Blueberry Bushel? There is even a sheet of the DSP with plain burlap that I used for the right side little panel to coordinate with the background of the pressed petals.

And the Pressed Petals is part of the current “Buy 3 packs of DSP and Get One Free”!
That’s right, Sal, thanks for the input!
I used the Flourishing Phrases stamp set for the sentiments on the flap and the left side of the card and left the inside blank for a birthday, congratulations or just thinking of you sentiment. I needed a little larger flap than what Joy used for the butterflies so the measurements won’t be the same. The goal was to have the outside vases a bit plain with the inside vase truly “vibrant” to match the sentiments. The Vibrant Vases stamp set is a two-step stamp set with outline stamps for the vases and then a stamp-to-color for each vase and it even has a punch to match! Check out page 61 of the Annual Catalog. The yellowed images show what images are punchable. (Is that a word?)

I stamped the outside vases with the border stamps in Soft Suede and then stamped again with the stamp-to-color stamps after stamping off to lighten the image. I used the “H” acrylic block and spaced out the three vases and stamped with the outline stamps on a 6 X 3 piece of Whisper White. I then placed the (clean) stamp-to-color stamps on top of the images and took another “H” acrylic block and pressed it down on the stamps to attach them to the blocks in the perfect position. The stamparatus would have worked better but it was in use for the other card.

You could order a second one. I could help, page 184, #146276.
Thanks Sal. That might be a good idea for the next time. To make the inside vase truly “vibrant”, I stamped it in Blueberry Bushel, colored in the diamonds with Cajun Craze and Daffodil Delight regular markers and then took my Versa Mark ink and inked the entire image. I applied “Clear Embossing Powder” and then heated it to make the vase look like glass.
Stamp the greenery and flowers directly on the Very Vanilla card stock pieces – the flap for the outside and the Pretty Label punched piece for the left hand side. Adhere the vases directly to the paper since they are punched out and look 3D without dimensionals. I adhered the two larger vases close enough together so that I could adhere the middle little vase slightly on top of the larger ones and all three would fit on the 2″ shelf that was cut from Early Espresso card stock to a final size of 2″ X 1/4″ with the “Be Mine” stitched framelits. Hint: Start with a larger piece of Early Espresso and cut the scallop edge with the framelit and then place it in the Stampin’ Trimmer to cut to the 1/4″ shelf size. I cut a piece longer than the desired 2″ so I could cut exactly 1/2 of a scallop at each edge of the shelf.
She told me she was a “recovering perfectionist”! Maybe she needs more therapy. SHHHH……
Did you say something, Sal?
The shelf is adhered with the top of the shelf 1 1/4″ from the bottom of the Very Vanilla layer and 3/8″ over from the left and right sides. Stamp the greeting in Blueberry Bushel under the shelf.
It can be tricky to stamp the greenery at the right spot for the vases so stamp your vases and punch them out then trim off the bottom white edge of the vases. Punches generally leave a little edge all the way around the image just like what we teach in fussing cutting. You want the vases to sit directly on the shelf so trim off that bottom edge.
Temporarily place your vases where you want them on the shelf and use a pencil to lightly outline the top of each vase. Now make three more light pencil marks where you want your stem to attach to the tulip. The tulip is 3/8″. Vary the heights of the three tulips. Use a sticky note to mask the shelf and where the vases will be and stamp the stem and greenery in Old Olive. Then stamp the tulips in Cajun Craze and stamp-to-color in Daffodil Delight. I had a shadow on one of my leaves so I just hand drew another leaf to utilize the shadow.
Sheri always called that “Design Opportunity”!
That she did! And that it is! We sometimes use tiny butterflies or hearts to cover our shadows and it adds beauty to the card. I just ordered erasers from Amazon that are supposed to remove ink without damaging the paper. I will let you know if they work.
A Stitched Labels Die is used for the little greeting that says “so he made you” and the fancy die in that same set is used for the DSP cutout on the left side. The Pretty Label punch is used for the vase and flowers on the left side. This is one of those times when you want to punch first and then stamp so you can align the flowers and vase on the punched piece. Use the same procedure of placing the vase temporarily on the piece, lightly draw the top of the vase, mask with a sticky note and stamp the flowers with Memento Black ink, then adhere the vase, color the flowers in Daffodil Delight and the greenery in Garden Green. Adhere rhinestones colored with Cajun Craze Stampin’ Blends. Sponge the edge of the Pretty Label punched piece and the little rectangle greeting with Blueberry Bushel and pop up both pieces with dimensionals.
Summary:
Stamp sets: Vibrant Vases, Flourishing Phrases
Inks: Blueberry Bushel, Soft Suede, Old Olive, Cajun Craze, Daffodil Delight, Tuxedo Memento Black
Markers: Blueberry Bushel, Garden Green, Daffodil Delight
Stampin’ Blends: Cajun Craze to color rhinestones
Framelits/Dies: Be Mine, Stitched Labels
Punches: Vases Builder, Pretty Label
Embellishments: Four rhinestones colored with Cajun Craze
Card Base: Thick Very Vanilla 9 7/8″ X 5 1/2″ Scored at 4 1/8″ and 8 5/16″ ; Fold in the little right side first and then fold in the left side over the middle.
First Layer on left side and middle: Blueberry Bushel (make 2) 3 7/8″ X 5 1/4″ , Cut out the middle of the inside one. I used a retired rectangular framelit that I use to save paper when I am layering. A stitched rectangle framelit would work as well.
Second Layer on left side and middle: Pressed Petals DSP (make 2) 3 5/8″ X 5″ ; Cut out the center of the inside DSP layer with the Stitched Shapes Die- the fancy one. Use the cut out for the left side behind the Pretty Label punched piece.
Third Layer on left side and the flap for the front: Blueberry Bushel (make 2) 3 1/8″ X 4″. The left side 3rd layer is adhered 1/2″ down from the edge of the DSP and 1/4″ over from the edge of the DSP.
Fourth Layer on left side and the front flap: Very Vanilla (make 2) 2 7/8″ X 3 3/4″
Little Right side first layer: Blueberry Bushel, 1 1/4″ X 5 1/4″.
Little Right side second layer: DSP in plain burlap 1″ X 5″
The Blueberry Bushel Front Flap is adhered 1/2″ down from the burlap DSP on the little right side to exactly match the left side. This is done last! I put two pieces of tear and tape at the far right of the flap and then matched up the flap to the card’s left side and pressed it in place.
Shelf: Early Espresso, 4″ X 4″ Cut to 2″ X 1/4″ with the Be Mine Scalloped framelit and the Stampin’ Trimmer
Vases: Very Vanilla, Use the leftover from cutting the base or a 6″ X 3″
Punched Label: Very Vanilla 2″ X 2 3/4″
Left side greeting and the left side vase: 1 1/2″ X 3 3/4″ , you need it large enough to be able to hold it as you punch the vase. Stamp the greeting on the same piece and cut with the Little Stitched Labels Framelit.
I remember you looking at that little Die and saying it was too little to use for anything.
I did say that! Amazing isn’t it?! I am glad I have that set. I used two of the Dies on this card. I love the one I call the “fancy” Stitched Label Die!


Okay Sal, I am through with this post and it is your turn to guide folks to the store where they can shop to their hearts content! Don’t forget to check the Clearance Rack, friends, before you place your order, there are many Christmas sets available at great prices. I have a post coming up from our first Christmas card Stamp-A-Stack called Clearance Rack meets Stamp-A-Stack. Stay tuned!
SAL, Stamp A Lot, Smile A Little, Share A Love
Karen
Bird House Fancy Fold
Hello Stamping Friends,
What a wonderful summer it has been as we traveled to Yellowstone and camped at the base of the Grand Tetons and then traveled to a wedding shower and traveled again for the wedding celebration and traveled to be the guest presenter at a Stamp A Stack. Whew….. it is good to be home. The yard is glad we are home as well.
Amid all the traveling I even had club here in Castle Rock!
I love most all things “bird” and fell in love with the Bird Ballad Designer Series Paper (DSP), so for club we made a Bird House fancy fold card. I made a second one for my husband so I will show both.

The card on the left uses current Stampin’ Up! products whereas the one on the right uses two punches for the roof that are retired.


The fold is a fun diagonal fold and I cut the inside whisper white layer to have a matching angle so I could use one of the larger birds on top of the heart. Here is a close up:

The roof has three layers of scallops cut from the ‘Stitched Labels’ framelits, a ‘Flourish Thinlit’ strip cut out and then cut right down the middle and mounted on two strips of blue mitered at the top to make the gables. Part of a flourish from the ‘Be Mine Stitched Framelits’ and a little heart from ‘Stitched Labels’ was used. A 1″ punched circle of soft suede is sponged and popped up behind the heart cut out. Sponging is added to give depth to the Soft Suede and a rhinestone is added for a little sparkle:

The dimensions will be below but let’s compare the other card and some of the differences on it:

Aren’t those birds just the cutest!! TIP: When fussy cutting your birds and flowers do not cut clear into the legs or the branches, just use Stampin’ Blends or markers that match the background and color the small areas to match. This keeps the cut out image stronger and it is not noticeable. I used soft suede between the legs of the bird that was over the circle and Balmy Blue for between the legs that were outside of the circle. Can you tell? Hmmm.. I think I will go back and color all the edges on the cut out bird on the first card instead of leaving a little white like I have trained myself to do in fussy cutting.
The gables are from the retired ‘Dotted Scallop Punch’ and the scallops are from a retired ‘Scallop Punch but – –
The ‘hello’ sign is still current in the ‘Barn Door’ stamp set and has framelits to cut it out in the ‘Sliding Door’ framelits. We have used this set multiple times so it is a must for a stamp collection. I stamped the sign once in Soft Suede and once in Flirty Flamingo and then cut out just the hello of the Flirty Flamingo and popped it up.
I used the ‘Crackle Paint’ stamp on both cards but on the second card I scored and folded the card and then ran it through the Big Shot with the current ‘Pinewood Planks 3D’ embossing folder.

What a different look! You could run the front and back through the Big Shot separately if you didn’t want the middle fold to have different directions on the wood look.
I did a straight cut on the top of the Whisper White inside layer instead of angles like the first card. Here is a close up:

TIP: With cards like these that don’t stand up nicely by themselves I like to make a CARD STAND 3 3/4″ X 2 1/2″ scored and folded 1/4″ on each end of the long end.
Dimensions and supplies used:
Card Base: 10 3/4″ X 3 3/4″ Score at 5 3/8″
-Mark 3 3/8″ from each end on both sides and score diagonally
-Make the birdhouse hole by laying the smallest of the Stitched Shapes Circle Framelits 1 1/16″ from the edge of the framelit to the edge of the bottom and the right and left sides. Cut and then sponge the edge with Balmy Blue.
-Mask the back of the card base and stamp the front with the Crackle Stamp in Balmy Blue. Run through the Big Shot with the Pinewood Planks embossing Folder if desired.
Roof: Soft Suede 3″ square cut in half.
-Roof Scallops: (3) Soft Suede 6″ X 1/2″ cut with the ‘Be Mine Stitched Framelit’ and then cut to 4 1/4″ X 1 1/4″ . I found it easier to cut it wide and then trim to 1/4″ wide by laying the large part of scallop at 3/8″ on the trimmer. Sponge the edges of each. Offset your rounded part of the scallop with the previous indent of the scallop as you layer them.
-Once the scallops are adhered you can cut the little heart using the ‘Stitched Labels’ tiny heart.
-Circle behind the heart: punch 1″ of Soft Suede and sponge it deeply then pop it up behind the heart.
Pop up the roof with Stampin’ Dimensionals on the card base.
Gables: (2) 1/4″ X 3 1/2″ Balmy Blue strips mitered for top. Tip: Lay the strips on top of each other and cut through both at the same time to have a nice mitered edge or make a 45 degree cut at each end by lining up at 1/2 of a square on the Stampin’ Trimmer.
Gable Decoration: (1) 5 1/4″ X 3/4″ Soft Suede cut with the ‘Flourish Thinlits Die’ and then cut straight down the middle to make one for each side. Glue the Soft Suede on the Balmy Blue strips and pop up the gables on the top of the roof with its scallops.
Scrap of Balmy Blue: Cut out the flourish from ‘Be Mine’ stitched framelits. It has five branches and I cut off the outer two so it fit at the top of the roof. Add a rhinestone.
Scrap of Whisper White 1 1/2″ X 1″ stamped in Flirty Flamingo with “Hello” from Fourishing Phrases and punched with a small oval punch -retired- but we have the layering ovals that would work great. Sponge the edge with your Flirty Flamingo.
Fussy cut your bird from the Bird Ballad DSP and mount with dimensionals.
Inside: Whisper White: 5″ X 3 1/2″. Lightly pencil mark 3 1/4″ from bottom of the right and left and mark the top middle at 1 3/4″ and then diagonally cut from the sides to the middle. Or make a 3 1/2″ X 3 1/4″ rectangle if you don’t want the angled top.
For the inside I used Flourishing Phrases for the greetings and created a mask to sponge the heart by cutting out of a sticky note the third largest of the scalloped hearts in the Be Mine stitched framelits dies. You could use printer paper if you don’t have a large sticky note just be sure to use washi tape to hold it in place while you sponge the heart to the desired color. I fussy cut another bird and flowers to go around the heart and positioned them so they wouldn’t show through the front entrance but you could have a bird peeking out of the entrance for fun as one of my club members chose to do. It was cute.
Embellish with rhinestones! Send to your favorite bird lover or to your lover as I did with the second one which uses the “I love our life together” from the ‘Meant To Be’ Stamp set.
Have fun!
SAL,
Karen

Catalog Launch with New Wonders
Hello Stamping Friends,
We had a fun day Saturday at the catalog launch. Jo and Lucille had cards to sell and Christine brought cute little boxes to sell that she had made and filled with chocolate kisses. I had many stamp sets and tools for sale and those that didn’t sell will be posted here on the blog under the tab “bake sale” after we return from Yellowstone.
I traveled to a funeral held on Thursday and was glad to have our new Stampin’ Up! bags to pack all my tools so I could make the In Color bookmark at the motel so it would be ready for the make-and-take at Saturday’s event.

The bag held the Stamparatus bag and the 12X12 paper carrier and the inks, stamp set, punch, shammy, ribbons, markers and more. Love it!!
So what did I come up with for the Make- And -Take that would introduce our five new colors?
Drum roll…… introducing “New Wonders”:

Isn’t she adorable? The Perennial Essence Designer Series Paper is the perfect background for her and all the new In Colors:

The words describe our new catalog!!

My club members were looking at our club schedule to see when they would be able to earn the New Wonders stamp set:

This set is a hostess set and can be earned by hosting a party or purchasing $150 or more of products. It is also a DistINKtive set with all the amazing dimensions of that special type of stamp. Do you notice how the pages on the bookmark look 3D?
Be sure and notice the Rococo Rose and Pretty Peacock ribbons used together on the bookmark. They are unique and beautiful!
Bookmark Recipe:
- In Color Base (Rococo Rose) 2 3/8″ X 8 1/2″ – corner rounded at the top
- Designer Series Paper (DSP) Perennial Essence 2 1/4″ X 8 3/8″ – corner rounded
- In Color strips to stamp the pages in each color 1 1/2″ X 3 1/4″ – 5 In Colors, stamp and fussy cut the pages only on each color
- Shimmer White for angel 2 1/2″ X 2 1/2″ Stamp, color and fussy cut. I left the pages on the image and then glued the Purple Posy on top of the Shimmer White. The darker colors won’t show the little hands as well.
- Shimmer White for greeting 2 3/4″ X 1 3/4″- use the 2nd smallest oval in the Stitched Shapes framelits
- 5″ ribbon in Pretty Peacock and Rococo Rose
- 8″ twine
Each year I do a Color Chart for the five new In Colors and the stampers make one at the catalog launch. The colors will be current through June 1st of 2021. Each year a new set of five In Colors is introduced and those colors stay current for two years.

Contact me if you would like A) the set of 12 color charts or B) just the new In Color Chart and new comparison charts. The full set is $12, the new comparison charts and In Color Chart are $6. The 12 charts are the Basics, Neutrals, Regals, Subtles, Brights, Greens, Blues & Grays, Oranges & Yellows, Purples & Browns, Reds & Pinks, In Colors 18-20, In Colors 19-21.
I would love to earn your business and be your demonstrator! I have clubs that meet on Tuesdays and Saturdays every other month and in the off month I have Stamp A Stacks or other crafting events. Check out the calendar to see what’s in store for this coming year!
SAL, Stamp A Lot, Smile A Little, Share A Love
Karen
Click on little SAL to shop or the calendar to check out events.
Welcome to my blog!

Sal Window to Products


