
Home » All Occasion (Page 4)
Category Archives: All Occasion
Lions & Dragons – Oh My!
Hello Stamping Friends,
Let’s have some fun with Lions (dandelions) and Dragons (dragonflies)!
January’s hostess code is : UEEZKD2D for use if your order is under $150.
Yesterday I was live on Facebook with January’s club cards. Each club member had kits with all the supplies so this time my presentation was different with just the construction of the card without going from the beginning to the end and listing all the sizes of the card cuts, so this blog post will fill in the gaps!
Dragonfly Z Fold Club Card Introducing The Dandy Garden Suite

This suite is on Page 25 of the JJ catalog (Jan-June mini)!


Recipe:
Base: Bumble Bee, 5 1/2 X 10 7/8, Lay the base horizontally at the 7 1/4″ mark and cut down 1 1/8 inch, then score the rest of the way.

Secondly, mark the left hand side down from the top at 3 3/8″ and cut the base from 1 1/8″ to the 3 3/8″ mark. (Note: the tip of the cut is at 1 1/8″).

Score the base at 3 5/8″ from the left. You now have two score lines: one at 3 5/8′ and one at 7 1/4″.
Your base is done!
Let’s mount our little dragonflies and the bumblebees on little strips of window sheets.
Window sheet strips (X2): 3/8″ X 1 1/4″
Bumblebees: Use the Dandy Wishes Dies little Bumblebee die to cut two bumblebees from the Dandy Garden DSP (Designer Series Paper). Color the back of the bumblebees with Mossy Meadow. Place glue dots on the top of one of the window sheets, one on the front and one glue dot on the back, and then adhere your bumblebees back to back. The “Garden Wishes” stamp set has a bumblebee image to stamp if you would rather have a stamp set than a die set.
Dragonflies: The Dandy Garden DSP has sheets that match up with the Dragonfly punch (which is bundled with the ‘Dragonfly Garden’ stamp set for a 10% discount) and you will punch out two matching small dragonflies and mount them on your window sheet strip with a glue dot on the window sheet front and on the back.
Back Layer of the Z fold: Dandy Garden DSP, full rectangle – 3 3/8″ wide X 5 1/4″ tall. The DSP is directional.
Middle Layer of the Z fold (which is on the back of the base): Dandy Garden DSP, Start with a piece of DSP, 3 3/8″ wide X 4 1/8″ tall, Mark down 1 1/8″ on the right hand side and cut from the tip of the left hand side to the mark on the right hand side. Flip your base over and place your bumblebee where he will be on top of a dandelion at the back when you fold the card flat. Use a glue dot to position the bumblebee and then adhere the DSP.
Front Layer of the Z fold: Dandy Garden DSP, 3 3/8″ wide X 3″ tall to start. Mark 1 1/8 ” down -this time on the left hand side and cut a diagonal from the tip of the 3″ to the 1 1/8″ mark. Before adhering, wrap your linen thread around the DSP and tie a bow.
Note: On both the middle and the front layer, you can place your DSP where it will go, and make your marks for your diagonal cuts without measuring so that if your diagonal cut is not quite perfect your layer will be and will have a nice 1/8″ border.
Greeting Border: Bumblebee, 3 1/4″ X 3 1/4″, cut with the Largest Square Stitched Shape Die (2 5/8″)
Greeting Top Layer: Whisper White, 2 1/2″ X 2 1/2″, cut with the 2nd largest Square Stitched Shape Die (2 1/8″). I stamped the greeting from Dragonfly Garden, “May Good Things Grow All Year Long”, in green, and then did a stamp off of the dragonfly cluster across the greeting in Bumble Bee ink.
Embellishments: One little ladybug mounted with a glue dot. 16″ of Mossy Meadow Braided Linen Trim.
Alternative Cut: Diagonal Z fold with the diagonal from the back to the front.


The base of this card uses just 1/2 of a piece of cardstock so you can make two cards from one sheet.
Base: Bumble Bee, 5 1/2″ X 10 7/8″ scored at 3 5/8″ and 7 1/4″ with a diagonal cut from left to right at the 5 1/2″ cut down to 1″ from the bottom on the right.
Note: I have a 1/8″ border on the right, left and tops but did not have a border on the bottom.
Back Layer: DSP, 3 3/8″ wide X 3 1/4 ” tall, cut diagonally left to right from the 3 1/4″ tip to 1 3/8″ down from the top.
Back Greeting: Shimmer White, 3 3/8″ wide X 1 7/8″ tall, For this greeting I stamped the “Thank You For Your Kindness” from Dragonfly Garden in blue and then added a punched out dragonfly.
Middler Layer– goes on the back of the base: DSP, striped in this case, 3 3/8″ wide X 3 7/8″ tall , diagonally cut from the right to the left from the tip to left marked at 1 1/2 “. Tip: place the top of your layer with a nice 1/8” border and trim the bottom since it is flush to the bottom.
Front Layer: 3 3/8″ wide X 2 3/8″ tall, cut diagonally from the left to the right marked at 1 3/8″ from the top. Now wait — don’t adhere yet.
Dragonfly: Dandy Garden DSP, punch two large dragonflies and mount them with glue dots on a strip of Window Sheet 3/8″ X 1 1/4″. Use another glue dot to adhere the window sheet to the front of the base.
After the Dragonfly is adhered – adhere your front layer.
Embellishments: Die cut a bumble bee from DSP and adhere to front; adhere a ladybug trinket with a glue dot to front; tie a little bow with 8″ of Mossy Meadow Braided Linen Trim and adhere it to the back.
Which do you like better? A rectangle back or a diagonal back? Leave a comment with your vote by January 25 for a chance to win the ladybug trinkets!
Sand and Sea Club Cards Introducing The Sand & Sea Suite

This suite is on page 41 of the JJ catalog.

I used the Whale Of A Time Designer Series Paper instead of the paper in the suite so I had a smaller background behind the shells. The cards shown above have three different backgrounds from the Whale of a Time DSP:

Which do you like best? #1) little fishes amongst the seaweed, #2) seahorses, #3) the coral reef
Leave a comment with your vote by January 25 for a chance to win The Opal Rounds embellishments!
Recipe:
Base: Pretty Peacock, 5 1/2″ X 8 1/2″, Scored at 4 1/4″
Layer 1: Whale of a Time DSP, 5 3/8″ X 4 1/8″
Layer 2: Garden Green, Start with 5 1/2″ X 4 1/4″ and cut with the largest Seaside Seashell Die to make a base.
Layer 3: Granny Apple Green, Start with 5 1/2″ X 4 1/4″ and cut with the largest Seaside Seashell Die, then cut out all the little vines and glue them to the Garden Green base. This gives you a nice contrast of greens. Note: you can cut into the seashells to give more area to adhere the vines since the seashells will be glued on top.
Layer 4: Pearlescent Specialty Paper, Start with 5 1/2″ X 4 1/4″ and cut with the largest Seaside Seashell Die, then cut out all the seashells and glue them on the base over the greenery.
Greeting: Shimmery White, Start with 1 X 2 1/2″, stamp the greeting, and then cut with the rectangle stitched die to make a perfectly sized rectangle. Cut one end, stop halfway, reposition the die on the other end and cut that half. I demonstrate this in the video.
Inside: Shimmery White, 5 3/8″X 4 1/8″
Inside strip: DSP cut from the same piece as the background, 5/8″ X 4 1/8″
Here are two examples of what I did on the inside:


So you can vote and really see the backgrounds here are up close images of the cards:
#1 – Little fishes

#2 – seahorses

#3 – Coral Reef

Remember it is Sale A Bration time with free products for each $50 or $100 order!!
January’s hostess code is : UEEZKD2D for use if your order is under $150.
SAL, Share A Love
Karen

For The Love of Fall
Hello Stamping Friends,
I do so love fall! However, I would really like fall to come before winter, yet yesterday and today we have had snow here in Castle Rock, CO, so it looks like winter.
 Maybe it is all those Christmas cards you are making that brought on winter.
Now Sal, let’s just call it coincidence and Colorado’s unpredictable weather, okay?
We have two fall cards for you today and a Facebook Live video if you prefer videos over words, though the recipes follow.


Someday I will teach Sal to push the ‘Go Live’ and ‘Start Streaming’ buttons so I can look at the camera. I have heard there is a way to edit the Facebook Lives and delete the first part so that is a skill I need to learn.
Before I post the recipes for the cards let’s take a moment to look at the Stampin’ Up! news for the month:
The Stampin’ Cut and Emboss machine is available for purchase!
Stampin’ Cut & Emboss Machine
This machine has a wide 6″ (15.2 cm) platform that works with all Stampin’ Up! dies and embossing folders. Includes 1 Base Plate (Plate 1), 1 Die Plate (Plate 2), 2 Cutting Plates (Plate 3), and 1 Specialty Plate (Plate 4). #149653, $120.
Here are four videos (less than two minutes each) to show you the details of the new machine:


Magnetic Cutting Plate
Thin, fully magnetic sheet with self-healing cutting surface. Magnetic Cutting Plate (Plate 5) holds dies securely in place, even nested dies. This slim, portable sheet replaces a Cutting Plate in your sandwich, making it even easier to take with you. Use with the Stampin’ Cut & Emboss Machine. #149656 $24
What a beautiful machine! The mini version of the machine is not available yet, but we hope soon. All the plates are available to purchase separately and the specialty plate works with our 3D embossing folders just like the blue plate we had in the past.
Paper Pumpkin for September- You must subscribe by tomorrow! Click on the image:

Name: Hello Pumpkin
Details:
- Kit contains enough supplies to create 20 cracker box treat packages.
- Each cracker box treat package can be customized to celebrate Halloween, Thanksgiving, the autumn season, or all three!
- Coordinating Colors: Bumblebee, Basic Black, Cajun Craze, Cinnamon Cider, Mossy Meadow, Old Olive, Pumpkin Pie, white
September’s kit is a must-have for those who love to celebrate all things spooky. But, for those who don’t enjoy the Halloween haunts, the multi-occasion stamp set combined with a variety of die-cut and reversible paper pieces offers many ways to customize your fall crafts!
The Hello Pumpkin Paper Pumpkin Kit includes enough supplies to create projects celebrating Halloween, Thanksgiving, and the autumn season. Make them all the same, or mix ‘n’ match!
While this kit was designed to offer a unique treat packaging experience to subscribers, the supplies can easily be used to create cards for any autumn occasion. Don’t worry—we’ll be sure to provide plenty of project inspiration to spark your creativity!
The Clearance Rack has been restocked:

Join our team of “Carin’ Crafters” and get more products!
- In addition to the regular starter kit (for $99 USD/$135 CAD, new recruits choose $125 USD/$165 CAD-worth of products) new recruit will also receive enough cardstock pieces to make 16 cards, a pack of Rhinestone Basic Jewels, the So Much Love stamp set, and the Queen Anne’s Lace stamp set—all for their first event.

There is so much going on in September, and I just attended Leader’s Summit so I have lots of ideas to make being a part of the team fun. I would love to have you JOIN NOW!
I want to see how you made that cool pumpkin!
Good plan, let’s get started with my favorite part – teaching!
Simply Thankful
I am casing a card that Rosanne Mulhern of Heartfelt Stampin’ made last year but changing the products to current products and using the Mini Curvy Keepsakes dies to make a pumpkin instead of the Apple Builder punch she used.

- Stamp Set: Country Home
- Punches: Medium Daisy Punch, 3/8″ Circle Punch for the Black Eyed Susan
Dies:
- Mini Curvy Keepsakes Box Dies for the pumpkin and its stem
- Gathered Leaves Dies for the five leaves in different colors
- Banner Blooms Dies for the pumpkin vine
- Forever Flourishing Dies for the little crumb cake accents
- Rectangle Stitched Dies
Did you enter a challenge to see how many dies you could use on one card?
No, I am just stepping out of my comfort zone to make a collage type card. Wait ’til you see the wreath collage I made with the Forever Flourishing dies. Next post!
Recipe for Simply Thankful:
- Base: Basic Black, 5 1/2 X 8 1/2 scored at 4 1/4.
- Barnwood Layer: In Good Taste Designer Series Paper (DSP), 4 X 5 1/4.
- Black Layer: 3 1/2 X 4 3/4 cut with the Rectangle Stitched Die; TIP: use wax paper between the die and the cardstock. Emboss the greeting in white slightly to the right and then use Black Stampin Dimensionals to adhere.
- Pumpkin: Pumpkin Pie Cardstock 2 1/4 X 2, make 2 with the Mini Curvy Keepsakes Die using just the handle section not the slot section of the die. Before trimming down to size and making the bottom and top circular, lay one section 1/4″ over top of the second section and score a line following the curve of the section. Repeat on the other side. Score the line, color it with a Pumpkin Pie Marker and then sponge it. Do the same on the second section if you want to choose between the two sections for which one looks best for the top. Cut the bottom and top of each section to shape the pumpkin. Sponge all the edges of both sections and down the middle of the top section. Cut one section in half and glue each half behind the front section.
- Pumpkin Stem: Cinnamon Cider, 2 X 7/8, Cut with the handle of the Die. (This can be run at the same time as the pumpkin sections.) Cut in half, trim off excess and use a crumb cake marker to add a few lines.

- Pumpkin Vine: Garden Green, 1 X 2, make 2 with the Banner Blooms Dies.
- Medium Leaf: Cajun Craze, 2 X 2, the leaves are all cut with the Gathered Leaves Dies. Sponge the veins lightly and then the edges on all the leaves with their corresponding inks.
- Medium Leaf: Old Olive, 2 X 2, sponge
- Large Leaf: Daffodil Delight, 2 X 2, sponge
- Large Leaf: Merry Merlot, 2 X 2, sponge
- Small Leaf: Mango Melody, 1 1/2 X 1 1/2, sponge
- Black Eyed Susan: Mango Melody, 2 X 2 for each Medium Daisy Punch. You need six punched flowers so a 2 X 8 plus a 2 X 4 strip will work. Sponge the center with Mango Melody. Adhere two together with a glue dot.
- Inside of flowers: Early Espresso, 1 X 3, Punch with 3/8″ or 1/2″ circle punch. Adhere with a glue dot.
- Inside Layer: Mango Melody 4 X 5 1/4
- Bottom Strip on Inside: In Good Taste Designer Series Paper (DSP), 4 X 1/2.

Now the fun part of creating your collage! Start with the pieces on top of the pumpkin and work to the back. I used glue dots- lots of glue dots!
Other options for making a pumpkin are the Apple Builder Punch or using five circles or five ovals to layer together.
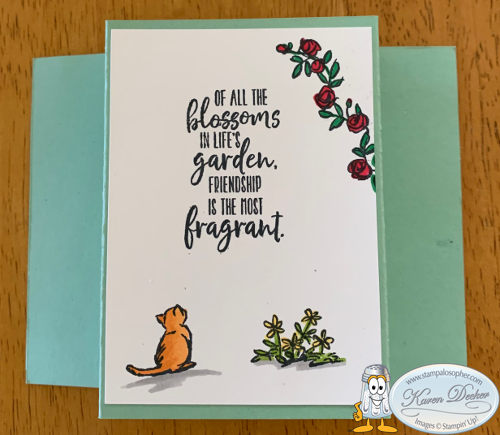
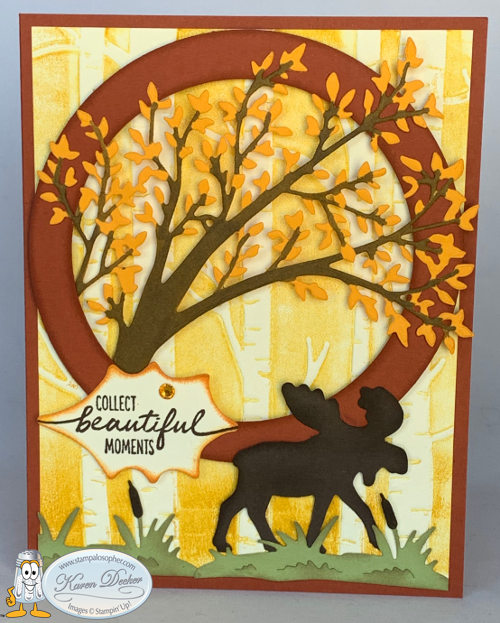
Beautiful Moments

- Stamp Set: Beautiful Moments
- Punch: Moose Punch
- Embossing Folder: Woodland
Dies:
- Circle Die for the frame
- Poinsettia Die for the oak leaf greeting
- Sweet Silhouettes Die for the tree
- Dockside Dies for the grass and cattails
Recipe for Beautiful Moments:
- Base: Cajun Craze, 5 1/2 X 8 1/2 scored at 4 1/4.
- Aspen Grove Layer: Very Vanilla, 4 X 5 1/4, Embossed with the Woodlands Folder after the folder is inked on the indent side with Crushed Curry. I turn the ink pad upside down and tap it on the folder.
- Tree: Mango Melody, 3 1/2 X 5, die cut with the Sweet Silhouette Tree Die. Tip: Use two folded up dryer sheets underneath your cardstock to make removing the little bits quite easy since they stick to the dryer sheet. The tree trunk and limbs are colored with the Dark Soft Suede Stampin’ Blend. The far left side of the tree has a limb that will need cut off so you can attach the trunk of the tree with a glue dot at the bottom left behind the circle frame. (I glued that little branch in the inside of the card as you see above.) Adjust the tree so that all the leaves will be inside the card borders. When you are completely done, place a small amount of Tombow glue on the silicon sheet and use a toothpick to add bits of glue to the leaves to attach to the circle.
- Circle Frame: Cajun Craze 4 1/2 X 4 1/2, Die cut with two layered circle dies to create the frame. Sponge the inside and outside of the frame with Cajun Craze and mount the tree at the bottom left behind the circle. Use Stampin’ Dimensionals to pop up the frame. You will need a dimensional at the thickest part of the trunk of the tree.
- Green grass and cattails: Pear Pizzaz, 2 1/2 X 3; die cut two grass sections from the Dockside Die. Color the cattails with Early Espresso and sponge the grass with Crumb Cake to give it that end of the summer look.
- Moose: Early Espresso, 2 1/4 X 2, punched with the moose punch and sponged on the edges.
- Greeting: Very Vanilla, 2 1/4 X 1 1/2 , die cut with the leaf in the Poinsettia Dies. Stamp with the “collect beautiful moments” from the Beautiful Moments stamp set, sponge the edge with pumpkin pie, then add an orange rhinestone. Glue to the circle but add a tiny dimensional to the left edge to attach to the aspen grove layer.
- Inside: Very Vanilla, 4 X 5 1/4, the little tree limb is glued to the inside corner .
Did I forget anything, Sal?
I sure hope not or you will have so many instructions you will lose your audience.
Paul, my DH, looks at these and says “another Karen card”. I keep telling him someday I will learn to make clean and simple cards but I always want to challenge myself. He suggested I call them Carin’ Cards to reflect a Caring Karen. He got a kiss for that! So I decided our team should be called Carin’ Crafters for the caring and sharing card makers that we are and yet a bit of a spoof on Karen vs. Carin’. What do you think?
Take a look around the new shop! We have new software to make the shopping experience better. I will be back soon to post the swaps and mystery cards we made in August.
SAL, Sighing A Lot as summer leaves us
Karen
Hostess code for September: SA9YHAC3
Mystery Card #3 and July Swap Cards
Hello Stamping Friends,
August hostess code if your order is under $150: HKVNWPPX
Today is the last day to order and get a $5 coupon for each $50 you spend and then tomorrow is the big day when the new mini catalog goes live, you can spend your coupons and the new online store goes live!!
Demonstrators earn the same $5 for each $50 and can order right now from the new mini catalog so call quick and we can make that happen (or click the join button in the tabs above and just follow the instructions.)
Our club met by Zoom last Tuesday and we shared our swap cards and made a “Mystery Card” using the list of supplies I had sent them all earlier.

 What happened to Mystery Card Challenge #2?
Hmmm….. I guess I was too excited to travel to Mount Rushmore and didn’t post. I will have to backtrack with a different post.
The cool 1″ fold of the base on the Mystery Card #3 lets you see and use both sides of a Designer Series Paper (DSP). So often we let our DSP sit on a shelf because we love both sides and don’t want to use one side and lose the other. Here is our answer to using both sides! I am using the Ornate Garden Specialty DSP on a Terracotta Tile Base.

I glued the DSP to the back of the 1″ flap and used the reverse side of one of the 3/4″ DSP strips. On the inside you have the full DSP showing on the left and a 3/4″ strip of the DSP with the front side showing on the right.

For the greeting I used the Stitched Nested Labels and the Ornate Thanks stamp set with Old Olive ink and Soft Suede ink. The ribbon is the Ornate Garden Ribbon Combo Pack and Terra Cotta Tile gems (retired). I wish I would have had the new In Color Butterfly Gems in the Terra Cotta Tile.
I received pictures from some of the club members who completed the card:


Sharon made three cards while we chit chatted and made one! She is preparing for Christmas and sends out 200+ cards so definitely time to get started!
I will be starting Christmas cards August 11 on Facebook Live (and it will be recorded if you can’t be there at 9:30AM). I will be demonstrating 3 Christmas cards and a Christmas gift box as I launch the new Mini Catalog. Kits are $10 for guests, free for club members. Contact me by Wednesday and I will deliver or mail your kits to you. You can create the cards at your leisure watching the recorded Facebook Live on the Stampalosopher Facebook page or right here on the blog.
July Swap Cards:
I promised in my July Facebook Live with the Banner Blooms Easel Birthday Card using the Rainbow Glimmer paper that I would make a card with the die cut colored so here you are:


Recipe:
- Base: Granny Apple Green 4 1/4 X 11 Scored at 5 1/2
- Border: Perennial Essence DSP 3 3/4 X 5 1/2
- Top: Whisper White 5 1/2 X 4 Cut with Banner Blooms Dies, colored with Stampin’ Blends
- Inside Layer: Whisper White 3 3/4 X 5 1/2
- Strips for Inside Layer: Perennial Essence DSP 1/4 X 5 1/2
Here are swaps from my creative stamping friends:


Swaps are so fun! We just mail our cards to each other throughout the month. If you are interested in August Swaps let me know ASAP and I will add your name and address to the list. Swaps are due to each other in time for the August 25th 9:30 am Zoom meeting.
Have a wonderful day!
SAL, So August Leaps into the picture
Karen
Hand Drawn Blooms and Prized Peony
Hello Stamping Friends,
Today’s Facebook Live event was successful!! For those of you who have done this for a long time I’m sure you are shaking your head but it was my third Facebook Live and the second one crashed and had to be abandoned. So two successful events feels rather nice!
Club members received two card kits for this month’s club and we joined together with a Facebook Live followed by a Zoom meeting. We created an Easel card with the Hand Drawn Blooms bundle and a Tri-Fold card with the Prized Peony bundle.
What you still need is the specific recipe for each card.
Easel Card with Rainbow Glimmer Paper:
Color #1, Daffodil Delight and Melon Mambo

Color #2, Granny Apple Green and Bermuda Bay

The Banner Blooms Die was used to cut the beautiful bouquet from the Rainbow Glimmer Paper. Since the paper is multi colored the cards were different depending on where the cut was made.
Recipe:
- Base: 4 1/4 X 11 scored at 5 1/2 and 2 3/4
- Layer 1: 5 3/8 X 4 1/8 Make 2 and Corner Round the top of one
- Layer 2: Shimmer White, 4 X 5 1/4 , Corner Round the top
- Easel Holder: Shimmer White, 4 X 1
- Scrap of Shimmer White on which to stamp the words to put on the banner 3 X 1 1/2
- Rainbow Glimmer Paper: 6 X 4, cut one bouquet and one butterfly
- Twine: 10″
- Jewels to embellish: 3
- Ink: Bermuda Bay or Melon Mambo
- Stamp Set: Hand-Drawn Blooms
- Die Set: Banner Blooms
Gosh, you didn’t post for a month and now you made a video! When do I get to be in the video?
Patience, Sal, I have been working with an animator and soon you will be joining the videos.
Prized Peony Tri-Fold Card:
I just received my mini catalog preorder and added a stamped image to my wedding card using the Little Treats Stamp set:

Isn’t that just the perfect addition?
Here is the original one I did in the Facebook Live Video:


Recipe:
- Base: Whisper White 12″ X 6″
To cut your tri-fold follow these step by step instructions:
- Place the base on the Stampin’ Up! Cutter the long way – (vertically) on 2″ mark- and cut from the 2″ to the 10″ mark on the cutter
- Move the base to the 4″ mark on cutter and cut from 2″ to 10″
- Turn the base the short way-(horizontal) and place it at the 2″ mark of the cutter and score from 0″ to 2″, lift the scoring blade and move to the 4″ mark on the cutter and score from 4″ to 6″
- Move the base to the 4″ mark on cutter and score from 0″ to 6″- top to bottom
- Turn the base to the other side and place it at the 2″ mark of the cutter and score from 0″ to 2″, lift the scoring blade and move to the 4″ mark on the cutter and score from 4″ to 6″
- Move the base to the 4″ mark on cutter and score from 0″ to 6″- top to bottom
Front Base Layer: Whisper White 5 1/8 X 3 5/8
Layer #1 all in Basic Gray:
- (1) 5 X 3 1/2 for front base
- (2) 5 7/8 X 1 7/8
- (3) 3 7/8 X 1 7/8
- (5) 1 7/8 X 1 7/8
Layer #2 in Designer Series Paper (Note: two of the top layers are whisper white)
- (1) 4 7/8 X 3 3/8 for front base
- (2) 5 3/4 X 1 3/4
- (2) 3 3/4 X 1 3/4
- (4) 1 3/4 X 1 3/4
Whisper White – all three pieces are embossed at the bottom with the Peony Edge Die
- (1) 2 1/4 X 4 1/4 Front Banner
- (1) 3 3/4 X 1 3/4 for stamping greeting
- (1) 1 3/4 X 1 3/4 for stamping peony
Envelope Punch Board – Whisper White Envelope Paper 8 1/4 X 8 1/4 with 3 3/8 score line starting point
Envelope Decor – Designer Series Paper 6 X 3 1/2, glue to flap and then fussy cut to fit
Ribbon – 1/4″ Gray Granite Shimmer Ribbon- 10″ for knot, 12″ for bow
Elegant Faceted Jems – 3
Peony (4) – Petal Pink 8 1/2 X 3 , die cut the four parts, each piece slides into the next largest piece matching up the notches. Use a bone folder to curl the edges and then sponge with Blushing Bride for a darker contrast.
Stamin (1) – Scrap of Daffodil Delight at least 1″ square
Leaves (3)- Garden Green large sections 2 X 3, die cut one of each size
Leaf accent (3)- Granny Apple Green 2 X 3, die cut one of each size

I used a glue dot to attach each piece at the notch and then added dimensionals in between the layers.
Here is the base with the gray granite layer and the DSP layers, the white part of the base is where you will glue the front base so it does not need a gray layer:

This shows the front base added and the die cutting at the bottom of each edge of the white pieces:

Obviously, you want to stamp the white pieces before you adhere.

I stamped the greeting in Basic Gray and then colored the back of the peony stamp with Stampin’ Write Markers – Petal Pink, Daffodil Delight, Garden Green and Granny Apple Green.
Note: Do not use Stampin’ Blends – they will stain your stamp.

Prized Peony Suite Card
Here is a card I made using every single one of the Prized Peony Suite products for a thank you card. I am casing Mary Deatherage of Stampsnlingers with this one:


Recipe:
- Base: Gray Granite 4 1/4 X 11 scored at 5 1/2
- Front Base: Gray Granite 4 1/4 X 5 1/2 Embossed with the Dainty Diamonds Embossing Folder; it might need shaved a hair on the edges if it stretches
- Front Mat: Petal Pink 2 7/8 X 5 1/2
- Cross Panel Mat: Petal Pink 2 1/8 X 4 1/4
- Inside Mat: Petal Pink 4″ X 5 1/4″
- Front Vertical Top: Peony Garden Designer Series Paper (DSP) 2 3/4 X 5 1/2 colored with Stampin’ Blends Petal Pink and Granny Apple Green. Don’t panic as you color the DSP flowers pink, as they look an ugly dark pink from the grey on the back of the DSP showing through. Once it dries it is a pretty petal pink!
- Front Horizontal Panel Top: Peony Garden DSP 2 X 4 1/4
- Inside Liner Top: Whisper White 3 7/8 X 5 1/8
- Sentiment: Whisper White Scrap stamped with Hand Drawn Blooms and fussy cut
- Ribbon – 1/4″ Gray Granite Shimmer Ribbon- 4″, glued underneath peony with glue dot
- Elegant Faceted Jems – 3
- Peony (4) – Petal Pink 8 1/2 X 3 , die cut the four parts, each piece slides into the next largest piece matching up the notches. Use a bone folder to curl the edges and then sponge with Blushing Bride for a darker contrast.
- Stamin (1) – Scrap of Daffodil Delight at least 1″ square
- Leaves (3)- Garden Green large sections 2 X 3, die cut one of each size
- Leaf accent (3)- Granny Apple Green 2 X 3, die cut one of each size
There you have it folks, recipes, pictures, a video and everything you need to create some beautiful cards!
SAL, Such A Lot (of pieces)
Karen
Father’s Day with Enjoy Life
Hello Stampin’ Friends,
(Click the title to go to the main blog if you are viewing in your mobile device)
Hostess Code for June: 2KNDJXFN Use this code if your order is under $150 and our monthly hostess will get the hostess rewards so no free dollars are left unused. If your order is over $150 you will have earned the hostess rewards. You will get a little thank you gift from me for any order outside of club! Club members receive the special reward of receiving card kits.
To all the wonderful men in our life that we need to celebrate and those we will always remember this Father’s Day: Happy Father’s Day!
I used the Enjoy Life stamp set (retired) and the Silhouette Scenes (pg 136) to make three Father’s Day Cards:

The greeting: “When you arise in the morning, think of what a precious privilege it is to be alive: to breathe, to think, to enjoy, to love.”
I did three different inside greetings as well using the “A Good Man” stamp set on page 32.
For my son-in-law, Tyler, with two little boys, Jaxson & Emmitt:


For my son-in-law, Jonathan, with a little girl – Emma:


For Paul:


Here they are at the Cheyenne Mtn. Zoo in Colorado Springs:


Such a great dad and such a great grandpa!

Well, Sal, it isn’t hard. Let me take a picture of the tools I use:

It is a piece of window sheet with several different sizes of circles punched in the sheet. (I placed the window sheet on black for the picture so you could see the different circles.) The largest circle is 1 1/2″, then 1″, 3/4″, and 5/8″ punched circles.
First, I used the Sponge Brayer (#141714 on pg. 147) and Mint Macaron ink and lightly sponged the entire front whisper white piece.
Then I placed the window sheet on that front sponged piece, held it in place with washi tape, and sponged several times over all the circles. I moved the window sheet to a new place on the front piece, secured it with tape, and sponged the circles again.
May we see that up close, please?
Sure, let me zoom it a bit:

The circles overlap giving the out of focus bokeh look!
I cased this layout from one at StampinSavvy.com. She used a watercolor wash for the background and added long hair to the image of the silhouette. I wanted a masculine silhouette instead so I used our Take Your Pick tool’s pointy end and removed ink from the neckline before stamping so it didn’t have any hair on the neck. I also increased the arm and leg sizes with a Basic Black Stampin’ Write Marker.
We still sell the Basic Black marker individually -pg 147, #100082. I used the black marker to color the edge of the front piece by using the side of the marker- not the tip -to color all around the edge. The Just Jade base was stamped at the bottom with Versa Mark and the grass stamp in Enjoy Life.
For the inside greeting, I used the black marker once again to color the “to be a” of the Enjoy LIfe greeting stamp – see above in red. This brought the same font from the front to the inside. Remember – only use the Stampin’ Write Markers to color the back of your stamps, if you use the alcohol Stampin’ Blends they will stain your stamp.
I used the retired Guy Greetings set for the dad, grandpa and Happy Father’s Day words and the Make A Difference stamp set for a nice exclamation point.
And “voila” we are done!
Not to be a pest, but could we have the recipe?
Of course, it is a great layout that would work with dozens of stamps.
Recipe
- Base: Just Jade 8 1/2 X 5 1/2 scored at 4 1/4
- First Layer: DSP (designer series paper) Forever Greenery 5 1/2 X 1 3/4
- Top Layer: Whisper White 3 X 4 1/4 sponged with Mint Macaron- bokeh technique
- Inside Layer: Whisper White 4 X 5 1/4
- Inside Strip: DSP Forever Greenery 1/2 X 5 1/4
- Stamp Sets: A Good Man, Enjoy Life, Guy Greetings, Summer Days for the tiny butterflies, Make A Difference for the explanation mark
- Ink: Mint Macaron, Tuxedo Memento Black, Versa Mark
- Basic Black Stampin’ Write Marker
- 61/2 Black Twine to wrap DSP and 2 1/2 to tie knot
- Three black jewels for corner
Thank you for stopping by and visiting! I hope you have learned something and will come back. Next week I will post a card with the Summer Days stamp set. If you add your email address at the top right of the page, you will receive an email each time I post. Leaving a comment lets me know there is someone out there and I am not just talking to Sal and myself! I love hearing from you.
Hostess Code for June: 2KNDJXFN Use this code if your order is under $150 and our monthly hostess will get the hostess rewards so no free dollars are left unused. If your order is over $150 you will have earned the hostess rewards. You will get a little thank you gift from me for any order outside of club! Club members have the special reward of receiving card kits so contact me if you are interested in being a part of a club: 303-815-0838 or [email protected].
If you are part of club and my faithful followers – THANK YOU for your support. If you don’t have a demonstrator, I would love to earn your business!
SAL, Sharing A Love of the wonderful Dads in my life
Karen
Click on Sal to order:
Grace’s Garden & Garden Gateway Dies & Bookmark
Hello Stamping Friends, (Click on the title to go to the full blog if you are viewing this on your mobile device)
Today’s card is a bridge fold card using Grace’s Garden Stamp Set and Garden Gateway dies.
I used the Forever Greenery DSP (designer series paper) for the background. I thought the ferns looked like evergreen trees and made a great background. Remember that movie ‘Secret Garden’ where the children find the gate to a beautiful garden?
Here is the card with a large evergreen tree and then the card with a small evergreen tree (fern).


Do you feel like you are in a forest?
I put the greeting on the back.
And more flowers and a sun in the middle of the front.

I taught a little bit about using the Stamparatus to save time by mounting three of the stamps on the plate and then moving the plate down two counts on the hinge and stamping again. The stamps I only wanted to stamp once, the bird, kitty cat and little flower were on the second plate and the gate and lupines on a third plate. I used three plates instead of 9 blocks when you count the greeting on the back!!

I stamped everything with Memento Tuxedo ink and then colored with Stampin’ Blends, except for the edging on the arch which I used a black Stampin’ Marker to color the edge so the arch looked very much like the gate and not so stark white. I just held the marker so I could rub the edge of the arch on the side of the marker, similar to sponging. Compare the arch on the first card without the edges colored to the arch on the second card with the coloring. Huge difference – yes? Little details like that make us artists not just crafters.
Grace’s Garden Stamp Set & Garden Gateway Dies Bridge Card Recipe
Base: Mint Macaron 8 X 4 1/4
Score the base at: 1 1/4, 2 1/2, 5 1/2, 6 3/4
Bridge Strip: Mint Macaron 5 1/2 X 1/2
Back for greeting: Whisper White 4 x 2 7/8
Front Garden Back: DSP 4 X 2 7/8
Sides and front: DSP Make 4- 4 X 1 1/8
Thick Whisper White for arch: 3 X 4 1/4, die cut with Garden Gateway Dies
Sun: 1″ punch of Daffodil Delight scrap, sponge the edge
Vines at corners: Mint Macaron 2 1/2 X 2 , die cut with Garden Gateway Dies
Cardstock for Stamped Images: Whisper White 5 1/2 X 4 1/4 make 2
Stamp two of each of the 3 flower images, die cut with Garden Gateway Dies
Stamp two fence posts and two rose vines, die cut with Garden Gateway Dies
Stamp one gate, one cat, one bird, die cut with Garden Gateway Dies
Note: 5 X 7 1/4 magnet sheet to hold the dies in place in your plastic pouch
Stampin’ Blends Coloring
Arch, Gate and Posts: Light Smoky Slate; also used the black Stampin’ Marker to color the edge of the arch.
Note: I colored with the Stampin’ Marker on the edge because the Stampin’ Blends will bleed.
Grass: Dk Old Olive
Lupine: Dk Highland Heather and Dk Granny Apple Green
Smallest flowers: Lt Mango Melody and Dk Granny Apple Green
Medium flowers: Lt Daffodil Delight, Lt Old Olive and a touch of Dk Mango melody in the center
Large hollyhock flowers: Dk Night of Navy and Lt Call Me Clover
Rose vine: Dk Real Red and Dk Shaded Spruce
Bird: Dk Daffodil Delight
Kitty Cat: Dk and Lt Pumpkin Pie
Remember to add a Lt Smoky Slate shadow below the cat and flowers on your back greeting
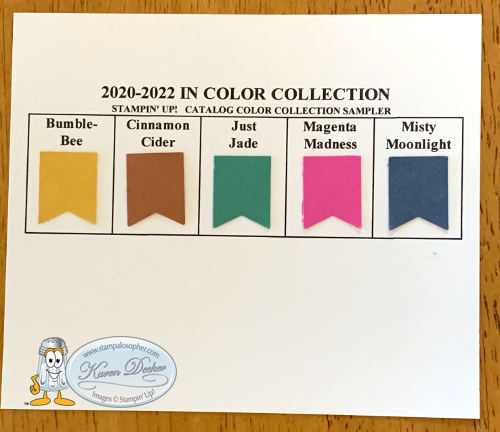
We made two other projects together – the In Color Sampler sheet and the In Color bookmark. It is tradition you know!
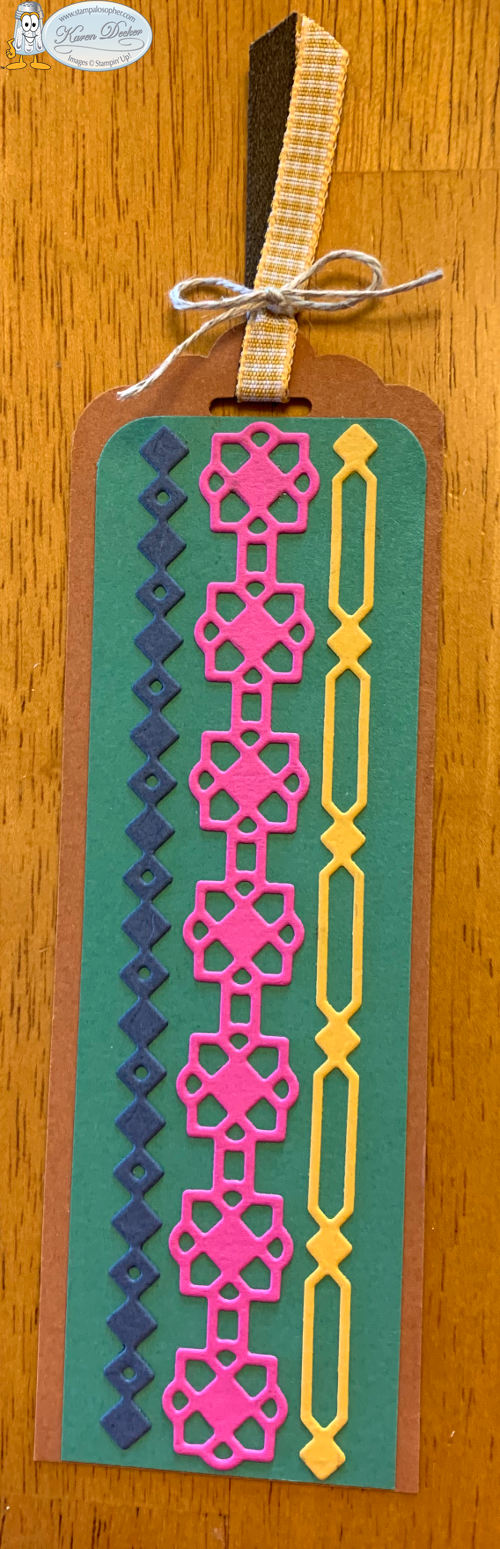
Bookmark Recipe
Base: Cinnamon Cider 6 X 2 (minus a hair) Punch with the Scalloped Tag Topper Punch
Layer: Just Jade 5 3/8 X 1 3/4 Corner round the top with the Detailed Trio Punch
Medallions: Many Medallions Dies in 1 X 5 1/2 strip Magenta Madness, 1/2 X 5 1/2 Misty Moonlight and Bumblebee.
Ribbon: 4″ of Faux Suede and Bumblebee Gingham; 6″ of Linen Thread
Magnet Insert to store Medallion Dies 6 1/2 X 6 1/4
See you soon!
SAL, Sharing A Lot
Karen
Music From The Heart
Today I am sharing three cards with several of my favorites:
First Card with my favorite- Music From The Heart:

Dawn Olchefske achieved one million dollars in sales and designed this stamp set as one of her many rewards!
When you reach one million will you design a set with me?
Of course if Toons4Biz will allow it.


This is Whisper White with a white background and natural light just like I researched would be best for picture taking and now I have a bluish white instead of yellow.
Better go back to the Youtube videos on that one.
Sigh….
The hearts have Wink of Stella to add some sparkle. I felt like Cinderella with the birds making the bow.
Recipe:
Base: Basic Black 5 1/2 X 8 1/2 Scored at 4 1/4
Top: Make 2 – 5 7/16 X 4 3/16 I know, crazy, but I wanted just a little black. Go to the 5 1/2 mark and move back 1/16 to get 5 7/16. For 4 3/16, go to 4 1/4 and move back 1/16. That is easier than counting 16ths.
Piano: Whisper White 2 1/8 X 2 3/4
Two Keyboard Pieces to layer at the bottom: 3 X 2 1/4, stamp twice and fussy cut. Adhere to bottom and then fussy cut around the bottom inside and out.
6 ” of twine
To cut your white top piece:
- place a pencil mark from the top right corner over 3/4″ and from the corner down 2 1/4″
- place two pencil marks from the bottom left corner up 1/4″ and up 1/2″
- cut diagonally from the 1/4″ mark at the bottom to the 2 1/4″ mark at the top right
- cut diagonally from the 1/2″ mark at the bottom to the 3/4″ mark at the top right
- shave off 1/16″ on each side of the middle piece
Okay, let me grab the sketch book.

Once they are cut remember to cut off just 1/16″ from each side of the middle piece so you have the black showing.
Second Card with two Favorites: Beautiful You and Special Celebrations:

I have used a stamp from this set on so many different cards. Today I used it on a graduation card that I am casing from Sharon Armstrong.


The Congratulations is from the retiring Special Celebrations set:

Recipe:
Base: Gorgeous Grape 8 1/2 X 5 1/2 Scored at 4 1/4
Layer 1: Smoky Slate 3 3/8 X 4 5/8
Layer 2: Gorgeous Grape 3 1/4 X 4 1/2
Top Layer Outside and Inside: Whisper White 3 X 4 1/4 – make 2
Inside Layer: Smoky Slate 3 3/8 X 4 5/8
Cap: Gorgeous Grape 1/2″ square
Diploma: Copy Paper 1/2″ X 5/8″ rolled up and tied with a double wrap of 2″ of colored twine
Tassle: 8″ colored with the Highland Heather Stampin’ Blend
- wrap twine 4 times around 1″ of cardstock
- cut the bottom ends and remove from cardstock
- slip the top ends on the end of your Take Your Pick tool
- tie another short piece of twine twice around 1/4″ from the top
- Use a glue dot to adhere the top to the middle of the cap
- punch a 1/16″ circle from Gorgeous Grape and put on top of the tassle
I used the Highland Heather Stampin’ Blend to color the dress and create sleeves then used a black journaler pen to color the edges of the sleeves. Ivory Stampin’ Blend was used for the legs and arms and Smoky Slate for the shadow. Wink of Stella was used to color the slip.
‘Congratulations’ was stamped in Versa Mark and then sprinkled with Silver Embossing Powder and heat set. The inside greeting is a retired Stampin’ Up! stamp.
Third Card with Two Favorite Retiring Items – Flourishing Phrases and the Pretty Label punch:

The Flourishing Phrases greeting set and the Special Celebrations set are excellent additions to your collection and you will use them over and over. I used Flourishing Phrases for a sympathy card in a Mystery Card Challenge. That is a challenge where you are given a specific list of supplies and measurements and you create a card with just those supplies.


Recipe:
- 1/2 sheet cardstock
- Designer Series Paper 3 X 5.5
- Coordinating Card Stock 3.25 X 5.5
- Stamp Set with words
- Punched Shape
- Ribbon
- Matching Ink
- Adhesive
I know, Sal, it was a fun challenge but I found out none of us avid crafters can make a card without blinging it up. I even had to add a few jewels.
Here is a card I made for my upline’s Mystery Card challenge that meets most of the criteria. I did use two ink pads, though.

SAL, Sharing A Love of stamping
Karen
Meerkats “We’re in this together”
Hello Stampin’ Friends,
Do I have a treat for you!!! To stay sane (sorta), I had a card swap with my club members and seven people participated.
 I can attest to the ‘sorta sane’.
For me or for you, Sal? I am going a bit stir crazy and not because I am bored. I listed all the projects I have started and all the cleaning and organizing I would like to get done and I could be quarantined for a long long time and not get them all done; but I am just not motivated. Sigh…….
 I know, let’s run around the block and get your blood pumping.
There is lightening and rain out there, Sal. How about let’s show our friends the cards we’ve made and received.
March’s Paper Pumpkin was one of the best ever! It made three card styles x four each. I thought the boot one was kind of odd until I realized that it would perfectly represent the coffee club I have with my neighborhood ladies. I put the initials of each of the neighbors on the top of the boots and left one blank for our dear friend who moved away. I cut away the boot around the leggings and used a greeting from Fable Friends. The kit even had little raindrop embellishments (on the umbrella).

I changed the greeting on the second Paper Pumpkin card and once again used the ‘Fable Friends’ stamp set for the “Happy Spring”. The flower bling is from Frosted Flower Embellishments (#148782) and I covered the heart with Glittery Crystal Effects from the Holiday catalog- you do have some left don’t you? It dries to a beautiful glossy finish.

The third card I pretty much made per instructions:
Okay, not quite, I added rain drops which the instructions didn’t call for. Satisfied, Sal? The flowers have the little rain drop embellishments but they didn’t show up in the picture.

The lined envelopes are like icing on a cake!
Using the stamps in the Paper Pumpkin kit I created my swap card:


Paper Pumpkin had Meerkats????
No, Sal, those are from ‘The Gangs All Meer’. The “Miss You” greeting is from the ‘Enjoy Life’ stamp set. The tape measure is narrow silver ribbon from my stash. The boots were stamped on gingham paper and fussy cut. I loved the basket of flowers in the Paper Pumpkin stamp set. It was a two time stamping set so I stamped the entire basket in Soft Suede and then stamped Crushed Curry to color the flowers. What fun!! I colored the leaves with Call Me Clover Stampin’ Blends and the background with Balmy Blue Stampin’ Blends. If I made it again I would stamp the basket directly on the blue and then mask it to stamp the clouds and ground around it. That would have saved some coloring and fussy cutting.
Recipe
Base: Balmy Blue, 8 1/2 X 5 1/2 scored at 4 1/4
Border Layer: Soft Suede, 5 3/8 X 4 1/8 (make 2- one for the inside)
Top: Balmy Blue, 5 1/4 X 4 stamped with clouds, a ground stamp and raindrops
Inside: Whisper White 5 1/4 X 4, sponged just a tad with the sponge roller, then stamped greeting and meerkat in soft suede
Greeting: Whisper White 2 X 1 1/2 cut with the rectangle stitiched framelit to 1 1/4 X 1 5/8, sponged with Balmy Blue and decorated with raindrops from leftover pieces of the Paper Pumpkin. Pop this up with dimensionals.
Boots: 2 X 2 1/2 gingham paper in desired colors (note: the Designer Series Paper shown at the top of Page 168 has gingham in all the different color families.)
Meerkats and flower basket: Whisper White 2 X 4, stamped in soft suede and colored with Stampin’ Blends.
Ribbon: 3 3/4″, marked every 1 1/2 cm with a black journaler so it looked like a ruler. I attached each end under the meerkat arms with a glue dot.
I still smile every time I look at those little meerkats!!
I received another card from Jo that keeps me smiling:


The stamp is from the retired ‘Postcard Pals’ stamp set, isn’t it just the cutest?!
You’re not thinking of replacing me with an otter, are you?
Of course not! Let’s look at swaps.
Some swappers made differing cards so there will be two cards with the same name on some. Thank you, Heather, for putting the names on the card pictures and sending them to the group. We had fun talking about them during a Zoom meeting.
We could all use this one in a frame on our walls:


Aren’t all those beautiful cards wonderfully inspiring?! Such talented, creative crafters. Thank you, friends.
Text me if you have questions: 303-814-0838
SAL, Safe And isoLated
Karen
Click here to order:
Sending Flowers Dies & Sending You Thoughts Stamp Set
I have one card to show you using ‘Sending You Thoughts’ stamp set and its coordinating ‘Sending Flowers Dies’.
 But that stamp set doesn’t have any flowers to cut out?!
No, but the dies have two labels which fit some of the greetings perfectly, one label is scalloped and one label has polka dots for all my polka dot loving stampers. Take a look see:


The background paper is a foil paper in the ‘From My Heart Specialty Designer Series Paper’ (DSP) . The picture doesn’t do the foil justice.
Instructions
Base: Thick Whisper White 5 1/2 X 8 1/2 Scored at 4 1/4
Layer 1: DSP (Designer Series Paper) 4 X 4
Top Layer: Thick Whisper White 4 1/8 X 5 3/8; Place the die 3/8″ up from bottom
Greeting: Whisper White strip 3/8 X 2 3/4
Backing for greeting and inside strip on bottom: DSP 3 3/4 X 2
Ribbon: 6″
This is such a great set of greetings, and it is free with a $50 order. My last post showed a get well card with this stamp set and a happy birthday card.
If you make a graduation card and thank you card, you will have used every stamp in the set!
Yes indeed, which makes it a nice set of greetings to add to the collection!
Thanks for stopping by!
SAL, Springs A Lurking –somewhere
Karen

Mosaic Mood Pocket Card

Happy Halloween!!
Sorry – no Halloween cards this year from me. I ordered “Trick or Tweet” from the clearance rack but it sits unopened and unused for this year! Sigh…… A cold knocked me for a loop this week. Maybe if I get some energy and quit coughing I could make tags for tonight like Lisa Curcio posted on Pinterest:

I could make the doggy look like Ruger by elongating the ears and body!
This past summer I made a Mosaic Mood Hummingbird card for a Stamp A Stack; it is a case of Michele Reynolds at inspirationink.typepad.com with the addition of a different greeting that fit perfectly in the ‘V” fold and a different top and tab:


You could make it a celebration card or a birthday card or …..
Directions:
- Base X2 in Mint Macaron: 4 1/4 X 11 score each at 5 1/2; Cut one piece diagonally from center top at the score line to bottom right. Cut the second piece from the score line to bottom left. Glue the two pieces together with Tombow.
- Mosaic Designer Series Paper: 5 X 3 3/4 (plus a hair) 3 13/16 to be exact. Cut in half diagonally. Be careful with your cut cutting from right to left for right hand side and left to right for the left side. Adhere these pieces to the front flaps and then decide which side you want to be the main flap on the front. Some of the hummingbirds face right and some left so select your hummingbird to determine which DSP to use on which side of the flaps. Fussy cut him out and fussy cut a flower and two leaves. If you don’t mind fussy cutting, the paper has cute bumble bees and butterflies so they make a great addition to the inside or to put on a leaf.
- Use Tear and Tape to carefully adhere the first flap to the inside base nice and straight. Use 1/8″ tape or cut the 1/4″ in half. Then adhere the second flap over the first flap at the bottom. With Tear and Tape you can get a nice even bottom for your slider insert to stop on. Place a glue dot on the ‘V’ where the flaps meet making sure not to have any glue exposed to the base.
- Adhere the leaves to the back of the rose and then pop up the rose and leaves on the front. First place a large dimensional at the intersection of the flaps but not exposed to the slider, add several more dimensionals to the flower and place it on top of the dimensional you put at the intersection of the flaps. Pop up the hummingbird as well. I added a touch of Tombow to adhere his beak to the rose to prevent it from getting torn off.
- Slider: Very Vanilla 5 1/4 X 3 5/8, the middle is 2 5/8, mark the backside with a pencil to center the circle tab. The stamparatus worked beautifully to line up the greeting. I marked a grid sheet with the diagonals and where I needed to place the slider for stamping. I recommend saving these grid sheets for future use.
- Strip of Designer Series Paper for the top of the slider: 5/8 X 5 1/4. (One of the DSP designs was almost the 5/8″)
- Circle Tab: 1 1/4″ punch of the Designer Series Paper, glue this on the back of the slider with only the amount showing to reach the top of the base (1/4″) so the card will fit in the envelope.
The greeting is from the “Beautiful You” stamp set. It is in the annual catalog.
Note: The ‘Happy Birthday’ in the ‘Botanical Bliss’ stamp set matches this font pretty well to add to the slider.


I wish you could see the shiny parts on the paper. It is just beautiful! Here is a left facing hummingbird and garden green for the base with the “Botanical Bliss” happy birthday that matches the “Beautiful You” font.

When you run out of big flowers on the designer series paper, it is just as beautiful with two of the little ones!

Wouldn’t this make a fun Christmas pocket card using the Let It Snow Specialty Designer Series Paper and the Snowman Season stamp set? Send me a picture if you make a pocket card!!
Check out this lovely card made by the awesome Lucille Kearin:

The home office also announced this week that they are making available to everyone – not just demonstrators – the bulk Magnolia Lane Designer Series Paper:

At my Christmas Stamp A Stacks, December 4th and December 7th, we will be turning these magnolias into poinsettias to make a regal Christmas card. You won’t want to miss this one! RSVP by November 25th.
SAL, Share A Lot of treats with the little ones!
Karen


Welcome to my blog!

Sal Window to Products


